-
Happy "Killer Rabbit" Attacks President Carter in His Paddle Boat (1979)! 🚣🏼♂️🐇
You are using an out of date browser. It may not display this or other websites correctly.
You should upgrade or use an alternative browser.
You should upgrade or use an alternative browser.
Light Weight Solo Tripper Build
- Thread starter Cruiser
- Start date
Moving on to cleaning up the inside.
I use a pair of these "hanger thingies" to get the canoe up on its side, to make scraping the sides easier. I flip the canoe around when I need to do the other side. I also do the 80 grit and 120 grit sanding while it is there.
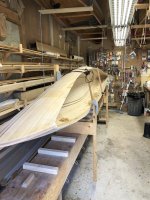
The scrapers from the last post worked pretty well getting everything leveled out, needed to be resharpened often, but they worked pretty well.
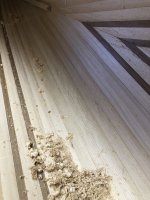
All sanded up and ready for final cleanup, before glassing ... the little patches of green tape on the side mark the form locations.
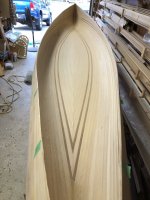
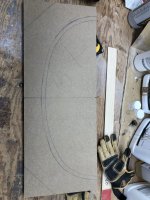
If you look at the previous pic, I have been using some low carpeted supports to work on the canoe when it is flat, these need to be replaced with something that will hold the canoe firm for glassing. I went out 3 forms from center and used the forms from there to make a template, then added 1/2" to allow spacing for added strips and the foam spacer/bumper I was adding.
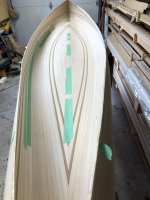
I also like to do one "combo" operation when I do the inside glassing. Any epoxy work, cracks fillets, whatever gets done just as I am ready to do the glass. The long green taped area is getting a fillet, because the strips didn't align and I want to smooth that area a bit, there are a couple of small gaps around the hull, notably on the center line. These get filled, then the glass gets laid in and the first epoxy is done before the repairs get a chance to harden (within 3 hours). The repairs just sort of melt into the first coat and disappear ... no sanding, scraping ... just lay the glass and go.
Coat one ... went pretty well ... hard to take any intermediate pics when glassing.
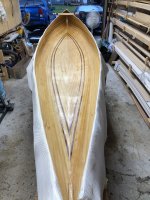
And final coat, only 2 coats, I want a textured finish ....
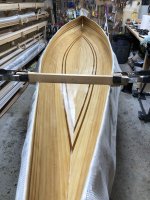
Now on to the gunnels .... well on to the gunnels after I get done baking a birthday cake for the better half ....
Be safe
Brian
I use a pair of these "hanger thingies" to get the canoe up on its side, to make scraping the sides easier. I flip the canoe around when I need to do the other side. I also do the 80 grit and 120 grit sanding while it is there.

The scrapers from the last post worked pretty well getting everything leveled out, needed to be resharpened often, but they worked pretty well.

All sanded up and ready for final cleanup, before glassing ... the little patches of green tape on the side mark the form locations.

If you look at the previous pic, I have been using some low carpeted supports to work on the canoe when it is flat, these need to be replaced with something that will hold the canoe firm for glassing. I went out 3 forms from center and used the forms from there to make a template, then added 1/2" to allow spacing for added strips and the foam spacer/bumper I was adding.

I also like to do one "combo" operation when I do the inside glassing. Any epoxy work, cracks fillets, whatever gets done just as I am ready to do the glass. The long green taped area is getting a fillet, because the strips didn't align and I want to smooth that area a bit, there are a couple of small gaps around the hull, notably on the center line. These get filled, then the glass gets laid in and the first epoxy is done before the repairs get a chance to harden (within 3 hours). The repairs just sort of melt into the first coat and disappear ... no sanding, scraping ... just lay the glass and go.

Coat one ... went pretty well ... hard to take any intermediate pics when glassing.

And final coat, only 2 coats, I want a textured finish ....

Now on to the gunnels .... well on to the gunnels after I get done baking a birthday cake for the better half ....
Be safe
Brian
Last edited:
Hi Jim ... I find it hard to get pics during the glassing process (don't want to risk my camera and phone with the epoxy) and i don't have any of that process. Although having said that, my wife came in while I was doing the epoxy and said Hi , stood around for a bit, but I was focused. Talked to my son a couple hours later and was telling him I was doing the inside epoxy work, he said he knew, it was on her FB page, she had been shooting video.
Anyway, not one to recreate the wheel (well, maybe we all are here) this link around minute 5:50 shows exactly a) how I do it b) where I learned it from
https://www.youtube.com/watch?v=sqDkUIXy1Fk
Brian
Anyway, not one to recreate the wheel (well, maybe we all are here) this link around minute 5:50 shows exactly a) how I do it b) where I learned it from
https://www.youtube.com/watch?v=sqDkUIXy1Fk
Brian
Last edited:
So, for those interested in what things weigh, I grabbed the weight of the hull this morning after cloth cleanup. The boat at this point weighs in at 11 kg or 24.2 lbs, the inner glass weighed 2.6 kg, 5.7 lbs.
I am going to assume that with the sanding on the outer glass, and only 2 epoxy coats on the inner glass, that those weights are near equal, that gives a cedar hull weight estimate of ~5.8 kg, 12.8 lbs
I have a work book for the build that estimates all the component weights and at this point in the build I should be at 23 lbs and obviously I am at 24.2 lbs, so it appeared that the target had maybe slipped a pound, but since I also planned to trim the sheer by ~1/4" when I install the gunnels, I think I may be close to on track with the final build weight of 30 lbs.
I hadn't planned on adding decks, but I had a brainstorm for a set and I may add then regardless .... have to see when I get to that point.
Brian
Last edited:
Brian,
I really admire the way you've been able to maintain your actual weight WRT your goals/predictions...
What would you say was total amount of resin used for the second inside coat?
I really admire the way you've been able to maintain your actual weight WRT your goals/predictions...
What would you say was total amount of resin used for the second inside coat?
Why two coats of epoxy on the inner glass? The wet out coat is sufficient for strength, and might save you a little weight.
Why two coats of epoxy on the inner glass? The wet out coat is sufficient for strength, and might save you a little weight.
I like to clean the inside of my hulls, once in awhile. A smooth finish is easier to clean.
Even though the second layer doesn't provide much additional strength . It does provide an extra barrier against water penetrating the hull.
System Three's Clear coat doesn't provide as much water proofing as their Silver tip epoxy. Because it is thinner.
Think of epoxy like varnish ! Why do we do several coats as compared to one ???
Jim
Stripperguy ... I think it works out to ~1.8 liters of resin for the inside ... I appreciate the comments, I am not done adding weight, so it remains to be seen how well I stay on track.
Mem, I agree completely with the sentiments that it would have saved some weight (more than a "little"), the BUT is that I will be adding cleated seats and I have footbraces to install as well. Those will require the areas to be sanded to give a bonding surface ... without the second coat, I think i would be into the cloth getting a bondable/flat surface for those areas. TBH, I wish I had considered doing this as part of the build, as it is, it's on and staying on and I have a suggestion worth thinking on for future builds.
Jim, I agree the second coat will give a bit more material to protect against the rigors of routine use.
Hopefully will start on inner gunnels today ... oh BTW, the cake didn't burn and was a hit ....
Brian
Is that just for the second coat? That's 4.7 lbs...
I added seat cleats on the last freighter build. It was 10 ounce glass with just the wet out coat. I just roughed it up and then stuck them on with thickened epoxy. Seems to be holding so far.
I added seat cleats on the last freighter build. It was 10 ounce glass with just the wet out coat. I just roughed it up and then stuck them on with thickened epoxy. Seems to be holding so far.
Rob, can you post a few pictures of your cleats. I am a visual learner!
Is that just for the second coat? That's 4.7 lbs...
That was everything, i think the "second" coat was 2 x 8 shot (~2 x 6.5 0z)
DC ... I used cleats on my last build and I was happy enough that I will also use them on this build .... about half through this link, it has a few pics on how I did that
http://www.canoetripping.net/forums/forum/paddlecraft-construction/73582-freedom-solo-16/page5
Brian
Last edited:
I did some testing on thickened epoxy cleat mounts
a single mahogany cleat attached with cabosil thickened epoxy took over 300 lbs to fail the assembly
even then the cleat failed not the epoxy joint
ever since then I use only epoxy to hold seat cleats in place no need for additional glass reinforcement
I'm sure I've posted this stuff before, but here it is again...
View attachment gD_gjA8Noeb-WdvfVP7MfR-tAiUUTSPjCJRszKfbeYoh6W5sF7gEPtIAGs5u4u2j5vR-FhWzClU1c434i4NSP20FMNCUprcGQhWp
View attachment PAHyXAyCUcWowo2AQi-z-X7ALT9N89LHgAyCvhEKkQJrmgRFGbNQCr70RxxHH2VvCMl0lRIJjy8_ohKThfqF4LNDlDxVdpvaSbEn
View attachment gTAG4W6q1vdLC-MGe4eODWuKcC0V1iYl15njWuOJtuz5H2Hvg6XxXVzVX-7bo-UmCHiov0P97TRIMnQ83_kdBjttqGbBWXWQyggJ
View attachment ULX_zjJroni9DHuin0cd2BZnQ6ZEaP8jxH9XQ75xqrSMadgML0sm6JQi3eJivdq3DMfO1Tbjx9ny93aV8BJXjFsC4Sgrw-xmWXHg
Last edited:
Just a quick update on adding the gunnels to the boat, the last one was applied yesterday and i will be going out after coffee to start the cleanup and fitting thwarts and decks.
This post will cover adding in the first gunnel (inner) and the next will cover the completion and cleanup.
First, this is the shape of the gunnels I made at the start of this thread, they are 5/16" x 5/8" and the inners have a 45 chamfer cut. The chamfered ones are for the inners and the slope allows water to easily flow out when the boat is inverted.
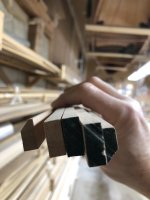
The top 1.5" or so is sanded with 120 grit and any glass with air underneath is cleaned up and removed.
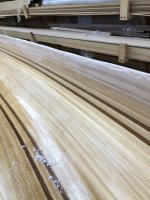
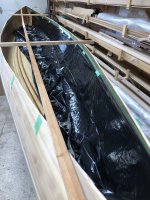
I dry fit the gunnel and drop it a bit lower than the sheer, in this case I am dropping it 1/4". As it approaches the ends, I will lessen the drop as the strip starts to roll it will get trimmed quite a bit in this area to accommodate the decks. Once I like the dry fit, I run a pencil along the top and bottom to give a guide for preparing the area to apply the gunnel. If you look at the dry fit, you can see the lines i have scribed.
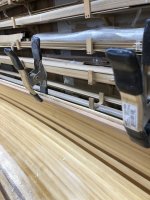
and the end area
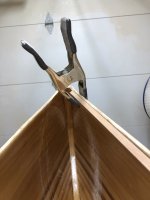
Why drop it a 1/4" ... I usually plan to do this as the edges of the sheer always manage to a) get thinner b) there always seems to be "imperfections in the glass at the edges c) trimming the sheer is usually a very rough cut
Planning to lose a 1/4" cleans all of those issues away.
The issues always seem to be in that first quarter inch
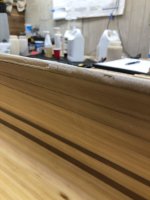
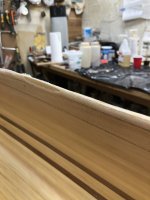
Apply painters tape (or whatever you use) just below the lower guide line and add a drip skirt ... I always seem to lose a drip or blob of epoxy, so I use one, it is easier than cleaning up.
Mix up a batch of epoxy (I use a 4 shot batch) and apply unthickened epoxy above the painters tape and onto the selected side of your gunnel
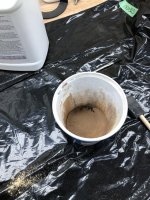
I am using cherry gunnels and it is a white cedar hull, I like to use the epoxy to create an accent, so when I do the epoxy thickening, I go quite dark. This batch is using cherry and black walnut dust , with cabosil to thicken to peanut butter. (also in this pic is the foam brush and paste brush I use to apply the epoxy)

There are imperfections in that sheer edge area, so i butter the gunnel quite generously with the thickened mixture ... you could also butter the sheer area if that is your preference, but only one needs to be done. The idea here is that the thickened epoxy won't run, it will stay in place. So as it gets clamped, it will squeeze out filling any voids and leaving behind a solid, filled area with no weak spots.
The clamping does not need to be anything other than moderate, I am using spring clamps this time and they are adequate, if you use C clamps, a good gauge would be to tighten to not leave any marks in the gunnel wood.
I use a 1" foam brush (JEN) to apply the unthickened epoxy and a small stiff glue brush to apply the thickened epoxy.
Start by clamping/aligning at each form location or every foot or so ... then go in between adding clamps and "tweaking" the gunnel to fall on the guideline. I like to have a clamp about every 3".
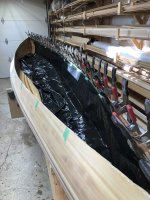
A few comments on the epoxy work, the only real time worry is to get the unthickened epoxy on the gunnel and the sheer area before it kicks, if the epoxy starts to kick while you are buttering, you will still have ample time to complete the task as it will stay soft and "flowable" for quite some time. In practice, you will be done long before the epoxy even kicks, as it is a relatively fast and easy operation.
VERY IMPORTANT ... once you have finished clamping, go around the bottom edge and cleanup the squeeze out. Use a putty knife, your finger , a stick, whatever you have or are used to using. Get the bulk of the squeeze out removed, then go around with a folded paper towel to remove the rest, get as much as you can and leave that bottom as clean as you can ...
you will be happy you did this when the time comes to sand and cleanup the hull for varnish ... soft epoxy is easier to cleanup than hard epoxy.
Remove the guide tape and skirt at this time, it isn't need anymore ... wipe the area of the guide tape for anything that got under the tape.
Now, leave it for the night ... at least that's what i do, just plan the work so it's done near my quitting time.
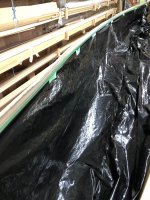
Next day, off come the clamps and you have a messy looking top like this
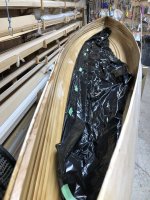
I grab a shorter plane and trim off the excess sheer to an angle the same as the gunnel forms ... this just needs to get the 2 at the same height, don't try and make this the finished product, just get it at the right angle and mostly smooth
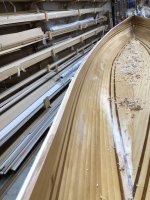
if it's anything like mine, the accent line will vary a bit in thickness, again, don't worry, it will just blend and disappear when it gets all finished.

Now a bit about the ends (stem/bow) ... the gunnel was allowed to rise a bit and not have the 1/4" sheer stick out the top, there is a reason for this ... you can see the angle formed by the gunnel near the end. that will be getting planed flat when I get ready to install the decks, when that area gets flattened, you can see pretty clearly a 1/4" is coming off the entire area as well. So you need to plan this area with how you will finish it ... deck on top (me), decks between or no decks at all and markup accordingly.
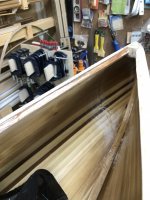
The outer gunnels use pretty much the same treatment, dry run markup, taping etc., one notable exception, the alignment will now be to the top of the sheer, by planing after the inner gunnel is attached, you establish the angle and the outer can be aligned to match, this will make the final cleanup/leveling/sanding a lot easier.
I will do up the last part of the gunnel install in a few days when I am a little further along in the finishing ...
Brian
This post will cover adding in the first gunnel (inner) and the next will cover the completion and cleanup.
First, this is the shape of the gunnels I made at the start of this thread, they are 5/16" x 5/8" and the inners have a 45 chamfer cut. The chamfered ones are for the inners and the slope allows water to easily flow out when the boat is inverted.

The top 1.5" or so is sanded with 120 grit and any glass with air underneath is cleaned up and removed.

I dry fit the gunnel and drop it a bit lower than the sheer, in this case I am dropping it 1/4". As it approaches the ends, I will lessen the drop as the strip starts to roll it will get trimmed quite a bit in this area to accommodate the decks. Once I like the dry fit, I run a pencil along the top and bottom to give a guide for preparing the area to apply the gunnel. If you look at the dry fit, you can see the lines i have scribed.

and the end area

Why drop it a 1/4" ... I usually plan to do this as the edges of the sheer always manage to a) get thinner b) there always seems to be "imperfections in the glass at the edges c) trimming the sheer is usually a very rough cut
Planning to lose a 1/4" cleans all of those issues away.
The issues always seem to be in that first quarter inch


Apply painters tape (or whatever you use) just below the lower guide line and add a drip skirt ... I always seem to lose a drip or blob of epoxy, so I use one, it is easier than cleaning up.

Mix up a batch of epoxy (I use a 4 shot batch) and apply unthickened epoxy above the painters tape and onto the selected side of your gunnel

I am using cherry gunnels and it is a white cedar hull, I like to use the epoxy to create an accent, so when I do the epoxy thickening, I go quite dark. This batch is using cherry and black walnut dust , with cabosil to thicken to peanut butter. (also in this pic is the foam brush and paste brush I use to apply the epoxy)


There are imperfections in that sheer edge area, so i butter the gunnel quite generously with the thickened mixture ... you could also butter the sheer area if that is your preference, but only one needs to be done. The idea here is that the thickened epoxy won't run, it will stay in place. So as it gets clamped, it will squeeze out filling any voids and leaving behind a solid, filled area with no weak spots.
The clamping does not need to be anything other than moderate, I am using spring clamps this time and they are adequate, if you use C clamps, a good gauge would be to tighten to not leave any marks in the gunnel wood.
I use a 1" foam brush (JEN) to apply the unthickened epoxy and a small stiff glue brush to apply the thickened epoxy.
Start by clamping/aligning at each form location or every foot or so ... then go in between adding clamps and "tweaking" the gunnel to fall on the guideline. I like to have a clamp about every 3".

A few comments on the epoxy work, the only real time worry is to get the unthickened epoxy on the gunnel and the sheer area before it kicks, if the epoxy starts to kick while you are buttering, you will still have ample time to complete the task as it will stay soft and "flowable" for quite some time. In practice, you will be done long before the epoxy even kicks, as it is a relatively fast and easy operation.
VERY IMPORTANT ... once you have finished clamping, go around the bottom edge and cleanup the squeeze out. Use a putty knife, your finger , a stick, whatever you have or are used to using. Get the bulk of the squeeze out removed, then go around with a folded paper towel to remove the rest, get as much as you can and leave that bottom as clean as you can ...
you will be happy you did this when the time comes to sand and cleanup the hull for varnish ... soft epoxy is easier to cleanup than hard epoxy.
Remove the guide tape and skirt at this time, it isn't need anymore ... wipe the area of the guide tape for anything that got under the tape.
Now, leave it for the night ... at least that's what i do, just plan the work so it's done near my quitting time.
Next day, off come the clamps and you have a messy looking top like this

I grab a shorter plane and trim off the excess sheer to an angle the same as the gunnel forms ... this just needs to get the 2 at the same height, don't try and make this the finished product, just get it at the right angle and mostly smooth

if it's anything like mine, the accent line will vary a bit in thickness, again, don't worry, it will just blend and disappear when it gets all finished.

Now a bit about the ends (stem/bow) ... the gunnel was allowed to rise a bit and not have the 1/4" sheer stick out the top, there is a reason for this ... you can see the angle formed by the gunnel near the end. that will be getting planed flat when I get ready to install the decks, when that area gets flattened, you can see pretty clearly a 1/4" is coming off the entire area as well. So you need to plan this area with how you will finish it ... deck on top (me), decks between or no decks at all and markup accordingly.

The outer gunnels use pretty much the same treatment, dry run markup, taping etc., one notable exception, the alignment will now be to the top of the sheer, by planing after the inner gunnel is attached, you establish the angle and the outer can be aligned to match, this will make the final cleanup/leveling/sanding a lot easier.
I will do up the last part of the gunnel install in a few days when I am a little further along in the finishing ...
Brian
Last edited:
I wonder if there is somewhere to get those plastic end caps they use on industry canoes? I'm not planning on putting decks on my new one, but wouldn't mind a little cap.
well, darn, just googled and found some https://www.cwoutfitting.com/shop/c/p/End-Cap-Canoe-ABS-x30055910.htm
well, darn, just googled and found some https://www.cwoutfitting.com/shop/c/p/End-Cap-Canoe-ABS-x30055910.htm
Last edited:
I wonder if there is somewhere to get those plastic end caps they use on industry canoes? I'm not planning on putting decks on my new one, but wouldn't mind a little cap.
well, darn, just googled and found some https://www.cwoutfitting.com/shop/c/p/End-Cap-Canoe-ABS-x30055910.htm
I'm sure any of the manufacturer's would sell to you direct. I got replacements for my Magic from Northstar.
One size does not fit all.
Alan
Hey Alan, did you use aluminium gunwales on one of your builds? If so, where did you get them?
Similar threads
- Replies
- 10
- Views
- 507
- Replies
- 75
- Views
- 3K
- Replies
- 20
- Views
- 1K
- Replies
- 169
- Views
- 9K

