• Happy National Pfeffernusse Day! ⚪🇩🇪😋

Passage Solo build

Looking forward to meeting you as well.

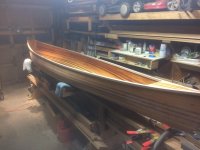
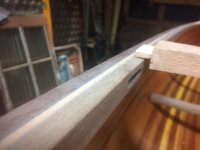
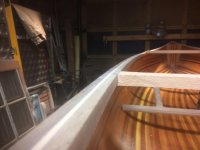
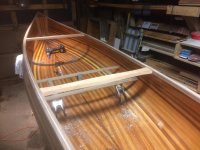
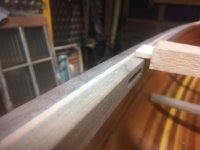
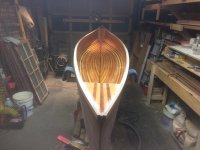
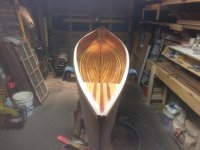
A little update on the build: gunwales on, bulkheads installed, and thwarts cut to fit. I know my method for installing these thwarts deviates from what most people believe is the "right" way to do it, but I thought trying something different was in order. So here it goes, I cut a tenon on the ends of my thwarts, and a mortise in the inwales and through the hull, but not the outwales. These will be glued into place with thickened epoxy. I will glass the top edge of my gunwales, bulkheads(second layer of glass on those), and thwarts to tie everything together. glassing the top edge of the gunwales affords me a number of benefits in my book. extra abrasion resistance when loading/unloading, it ties the in/outwales together across their top edge, and also protects the top edge of the hull from water intrusion.
27571383828_faf66c908e_k.jpg41400724412_1798dfaa38_k.jpg41452875512_c00b778e4f_k.jpg40781788494_1fa37c3fcc_k.jpg26623806597_2e8793dc69_k.jpg
 

Attachments

  • 41452875512_c00b778e4f_k.jpg
    41452875512_c00b778e4f_k.jpg
    175.6 KB · Views: 3
  • 27571383828_faf66c908e_k.jpg
    27571383828_faf66c908e_k.jpg
    237.2 KB · Views: 3
Sven, I've probably looked at the thwart installation idea at least a dozen times and I really like it. It gives me some thoughts about my hulls as this summer I have a lot of gunwale work do on several. I probably missed it but did you epoxy/glue the gunwales on? I typically use screws. Thanks for sharing.

dougd
 
Doug
I did glue the gunwales on. I am pretty sure some will think I am crazy for doing my thwarts that way...but if I need to replace one or both, I will cut them off at the gunwales, and drill out the mortise and remake them.
 
I Like! Two thwarts will give you all the rigidity a solo needs, plus a backrest.

Are you going to web the seats ? There is some nice colors for webbing out there !

Is your ice going to be gone, by the time of MW Mtn's event ? We got a foot of new snow over the weekend !

Jim
 
Jim,
I was planning on webbing for the seat. I have black on hand, but I think I might prefer a brown or tan on this one. I am also considering some sort of sliding mechanism for the seat, but I might just keep it simple this time. There's always the next one to try something a little more complicated, though I really like the simplicity and elegance of Alan's sliding pedestal bucket seat.

I'm guessing the ice won't be out by then. My local lake (Minnetonka) still has over 2' of ice as of last week, and I don't think the 20" of snow that we just got sped up the melt at all...it's looking like we might be well into May before the ice out, possibly a record for these parts.
 
I Like! Two thwarts will give you all the rigidity a solo needs, plus a backrest.

Are you going to web the seats ? There is some nice colors for webbing out there !

Is your ice going to be gone, by the time of MW Mtn's event ? We got a foot of new snow over the weekend !

Jim
 
Hi Sven !

Thanks for Running me down !

It was fun meeting up with you and your Dad, and talking canoes, At Mid West Mountaineering !

Looking forward to coming up to the test Paddle at Lake Nokomis, May 10 !!!

Maybe we can CRASH the event, and have a Builders Rendezvous !!!

Jim
 
Jim,

I'm glad we managed to connect for a chat at the event. I always enjoy talking canoes, and I enjoyed talking with you. It's looking like I will be able to make it on Thursday to Lake Nokomis for the demo, though I'm guessing I won't make it there until a bit after 5pm. Looks like it goes until 7:30pm so that should leave plenty of time for a paddle.

question for you other builders: Have you ever paddled one of your creations before it was varnished on the outside?

It's been slow going on the build. It's done except for the seat mounting and varnish. Here are a few pictures for those who are curious.

Untitled by Steven Fike, on Flickr

ready for wet out

Untitled by Steven Fike, on Flickr

I trimmed the excess glass with a knife, then ran a roundover bit along the top edge of the gunwales before doing a fill/seal coat of the gunwales and thwarts

Untitled by Steven Fike, on Flickr

skid plates are double layer 6oz wet out with graphite impregnated epoxy

Untitled by Steven Fike, on Flickr

Untitled by Steven Fike, on Flickr
 
Jim,

I'm glad we managed to connect for a chat at the event. I always enjoy talking canoes, and I enjoyed talking with you. It's looking like I will be able to make it on Thursday to Lake Nokomis for the demo, though I'm guessing I won't make it there until a bit after 5pm. Looks like it goes until 7:30pm so that should leave plenty of time for a paddle.

question for you other builders: Have you ever paddled one of your creations before it was varnished on the outside?

In short: yes.
Longer answer: I have paddled many of my builds before varnishing, sometimes to determine how much I like a particular design (and adjust the level of finish to my expected ownership time period).
My nephew paddled his boat for 3 years before final sanding and varnishing!

If you're storing your boat inside, out of the sun, I can't imagine any serious degradation of the epoxy...even if you go on an Alan-esque 4 week trip. It takes many months of direct exposure to cause any ultraviolet caused damage of consequence.
 
Last edited:
Build looks really good, I like the contour on the skid plate too.

I have only built one canoe and since it has a rudder and sliding seat I needed to water test to figure out where to place things. I did use UV inhibited epoxy on mine, but a short water test shouldn't matter much regardless.
 
Looking forward to Paddling with you Sven !

We are staying over, as the wife has shopping plans, so a motel will be in order !

I'm looking for Ash, so plan to stop at Root River Hardwoods in Albert Lea, on the way back.

Jim
 
Thanks to all for the responses and the kind words!

Jim,

I'm looking forward to paddling with you as well. Have you thought about checking with any of the lumber yards in the metro area for some ash lumber?

give these guys a call if you have a chance
Youngblood Lumber Company
1335 Central Ave NE, Minneapolis, MN 55413
612) 789-3521

They have probably one of the best selections in the cities.

Just thought I would throw it out there as an option.

Thanks ! Looks like a great option !
I have bought from Root River, and they are right on my way home. I also have an option here in Iowa, but about 2 hrs farther away.
 
Just wanted to pass on a compliment !

Having the chance to actually meet up with a builder, that I've just known on the internet, is special !
But to meet Two, (Mrindy, Mike) and actually paddle one of the canoes what I've watched being built on the internet, is Stellar !

Steve i'm impressed to say the least !

Excellent job on the Passage !

What's next ?

Jim
 
Jim,

Thanks for the kind words! They mean a lot coming from an experienced builder such as yourself.

I had a great time talking with you and Mike as well as Kent at the demo day!

What's next.....well, first and foremost I have yet to finish sanding and varnish the whole boat. I also have not made a final decision on my seat. I am leaning towards putting a foam saddle style seat in it. I feel most comfortable kneeling.

I got a little more seat time in it with my temporary seat a couple weeks ago. I'm somewhat embarrassed to admit that I also went for my first unintentional swim on one of my outings up north. Brrrrrrr was that water cold!

What's next in terms of boats to be built...I will probably be building another NWC cruiser as a gift for some very generous friends of the family. After that, I think I may build a Merlin, though I am not entirely sure on that yet. I wouldn't mind some suggestions on favorite solo hulls which others have built for tripping with a fairly heavy load approximately 300# total including me and my gear. I'm thinking the passage solo may be a little undersized for this load...
 
If you can locate a set of original Bruce Kunz 38 Spl., you will be impressed. an excellent tripper in my mind. Maybe add a little rocker to the stems.

Of course there are others !

We all swim sooner or later !!

Jim
 
Agreed - it was awesome meeting up with you guys and getting to paddle your boats! Wish I had more progress to share on mine but life is getting busy. Jim/Steve - do you think you could expand the forms of say that NW Passage a couple inches to get another foot out of the overall length? Curious to see how the NWC Merlin would compare if thats what you go with!
 
Agreed - it was awesome meeting up with you guys and getting to paddle your boats! Wish I had more progress to share on mine but life is getting busy. Jim/Steve - do you think you could expand the forms of say that NW Passage a couple inches to get another foot out of the overall length? Curious to see how the NWC Merlin would compare if thats what you go with!

You can lengthen to a degree. I always hated, and still do, throwing away strip cut offs, when they could have been in a boat !
I would think the Passage stretched to 15' 10" , using every bit of a 16' plank, would be how I would build it !
You will need to stretch the stem forms also, so I'd start with a 12.5 " form spacing. Then see how everything Faired out !

Jim
 
It's been a long time since my last update on this build, but it is done...for now...I did not varnish the inside yet as I may still do some interior outfitting.

I stole my seat cleat idea from deerfly with a slight variation in design. I made it in a similar fashion. Laid up in a big piece of angle iron covered with packing tape and then I adhered strips of dacron to the tape with super 77 spray (epoxy will seep through dacron if liberally applied) Dacron leaves a great surface for secondary bonding when it came time to attach them to the hull. I believe it took me at least 3-4 hours for each cleat to fit/adhere/reinforce/fill coat those buggers.

Here are a couple pics of the process

26922724477_f4cb3d214d_b.jpg
Untitled by Steven Fike, on Flickr
dacron glued in place ready for carbon (3 layers 5.7 oz)

41075546924_b83f0f4a49_b.jpg
Untitled by Steven Fike, on Flickr
carbon layup completed

42236087754_f57dffee04_b.jpg
Untitled by Steven Fike, on Flickr
CUSTOM fitted and ready for bonding

42236087764_4de981d2db_b.jpg
Untitled by Steven Fike, on Flickr
bonded and ready for bias strip reinforcement and subsequent fill coats

Here is a question for those of you that have used composite fabrics before. Have you ever seen this trick for cutting a straight line on carbon or Kevlar?
41163809040_3c4f9f8d34_b.jpg
Untitled by Steven Fike, on Flickr

Here is my lightweight carbon over cedar yoke.

43423213285_17e72d9c45_b.jpg
Untitled by Steven Fike, on Flickr

43611764314_e368e2dc25_b.jpg
Untitled by Steven Fike, on Flickr
That is a piece of 1x3 sitting next to the yoke for visual reference.
Finished thickness is right about 3/8"
double layer carbon with 2 fill coats each side

43423230945_20d80ccb62_b.jpg
Untitled by Steven Fike, on Flickr

43423232225_3565e53be3_b.jpg
Untitled by Steven Fike, on Flickr
42520719730_694a63f896_b.jpg
Untitled by Steven Fike, on Flickr
44336529401_bd863a0bd7_b.jpg
Untitled by Steven Fike, on Flickr
44336888721_8deea2fbf0_b.jpg
Untitled by Steven Fike, on Flickr


I used helmsman spar urethane in a rattle can for the outside varnish which was quick and easy. 5 coats in a time span of about 3 hours...and no sanding between coats.


I can't wait to go on my first solo trip in this. I have had it on the water a number of times but those times were all over 3 months ago, and boy am I excited to log some hours in this thing on some local lakes!
30461876608_4542af4905_b.jpg
Untitled by Steven Fike, on Flickr
 
Back
Top