-
Happy "Killer Rabbit" Attacks President Carter in His Paddle Boat (1979)! 🚣🏼♂️🐇
You are using an out of date browser. It may not display this or other websites correctly.
You should upgrade or use an alternative browser.
You should upgrade or use an alternative browser.
Time to build again - Short solo/kid's tandem
- Thread starter Alan Gage
- Start date
What epoxy are you planning to use ?
Jim
Raka. Is that still what you're using most of the time?
Alan
- Joined
- Aug 10, 2018
- Messages
- 1,596
- Reaction score
- 2,358
My sincerest apologies for taking so long.
Have you always built stemless?
Have you always built stemless?
I've built with internal stems a couple times because it allowed me to flare the stem so it was wider at the top than bottom for aesthetics. I've never done anything with external stems.
 20150226_001 by Alan, on Flickr
 20150304_001 by Alan, on Flickr
Awesome ... another build to watch/follow.
Looked up the mix ratio and recoat times for Raka and got conflicting info, so I am going to just share my epoxy plan for my next boat.
The System 3 General and Silver Tip epoxies have a 72 hour recoat schedule, which literally changes my epoxy application paradigm. Moving from a few hour window for recoat to 72 hours takes a lot stress off the process. Makes things like precoating the hull to save weight feasible, adding stern/bow strips easier and less work.
If you haven't purchased the epoxy yet, it may be something worth considering, I will be moving from my usual 5:1 , 2-3 hour recoat to the System 3 product, with a 3 day recoat time, for my next build.
Will also be doing a hull precoat, with a thin epoxy layer, just a thin coat to seal the wood and provide a bonding surface for the glass ... the idea here is to not saturate the hull, just seal it .... saturation adds weight and the increased penetration does nothing for the final composite but add weight. Applying glass straight on the dry hull requires making sure the hull is saturated with epoxy, so the glass doesn't get starved for epoxy ... theoretically, precoating should save some weight.
This link on Epoxy Application is worth a read IMO : https://laughingloon.com/epoxy.html
Brian
Last edited:
- Joined
- Aug 10, 2018
- Messages
- 1,596
- Reaction score
- 2,358
I'd just call Mike @ RAKA w/ questions. It's always seemed like a small operation, I think Mike may own it (he's the only one that ever answers the phone IME) and he's been super helpful. Just from the customer service standpoint and my desire to patronize small retailers, it would be hard to get me to switch to anything else.Looked up the mix ratio and recoat times for Raka and got conflicting info
Good point and something worth experimenting with for sure.Applying glass straight on the dry hull requires making sure the hull is saturated with epoxy... precoating should save some weight.
Awesome ... another build to watch/follow.
Looked up the mix ratio and recoat times for Raka and got conflicting info, so I am going to just share my epoxy plan for my next boat.
The System 3 General and Silver Tip epoxies have a 72 hour recoat schedule, which literally changes my epoxy application paradigm. Moving from a few hour window for recoat to 72 hours takes a lot stress off the process. Makes things like precoating the hull to save weight feasible, adding stern/bow strips easier and less work.
Consider the 72 hr, to be MAX for recoating, after which a mechanical bond is recommended.
Recoating while the previous coat is still tacky, gives you a clearer and stronger bond. I learned this from a System 3 Tech, years ago. It's true. I had some blotching, on a hull years ago. That lead me to contact System 3. That was the response I received.
A fill coat applied, while the previous coat is still tacky, also reduces runs.
RAKA's 127 resin and 350 Non blush resin is excellent.
Looks good to me.
Jim
Jim
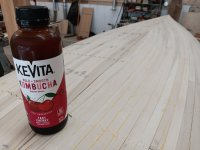
I must applaud your choice of beverage, sir! I must confess that, in the interests of drinking as much of the stuff as I'd like, I'm thinking about taking a second try at brewing it myself. The little buggers do tend to add up.
I think that build is going to look just fine. Simple and to-the-point.
I think that build is going to look just fine. Simple and to-the-point.
I can remember being very intimidated the first time I built a stripper. Since I didn't really understand what would be involved in each step I wasn't sure how choices or mistakes made earlier would affect things later one. I spent a lot of time getting everything as perfect as I could.
I've built a lot of boats since then and each time I seem to get less and less picky. As I got more familiar with building I realized there is really nothing you can screw up, within reason, that can't be easily fixed later. And oftentimes those mistakes and the subsequent fixes aren't even visible.
For me the aesthetics aren't all that important. Staple holes don't bother me. Filled or repaired areas that can only be seen on close inspection don't bother me. A not-perfectly fair hull does not bother me. None of these things will affect the performance, which is 90% of what I care about.
What I can live with not everyone else can so it's important to know yourself but in case anyone else is intimidated by the thought of building a stripper hopefully these photos will alleviate some of your fears.
When stripping this hull I followed the shear line from start to finish but I shouldn't have. There was a lot of stress in the strips during some sections but I decided to be hard headed and kept at it rather than laying a straight strip to relieve the stress. It took a lot of staples to keep the strips in place and in alignment.
![20240526_141152[1].jpg 20240526_141152[1].jpg](https://www.canoetripping.net/data/attachments/31/31830-a70b3299f38864ca7a9f699cebc78896.jpg?hash=pwsymfOIZM)
As you can see, even with all the staples, I wasn't able to hold all the strips perfectly flat at the stems.
![20240526_141218[1].jpg 20240526_141218[1].jpg](https://www.canoetripping.net/data/attachments/31/31832-b76ed2b9bf26f6cf89f4aa1e0973ad93.jpg?hash=t27Sub8m9s)
Sometimes I cut a strip too short as I was fitting it. I should probably have removed it and used a new strip but instead I'd just leave a gap. I'll fill these gaps with thickened and tinted epoxy before 'glassing and they'll be all but invisible.
![20240526_141204[1].jpg 20240526_141204[1].jpg](https://www.canoetripping.net/data/attachments/31/31831-46e63cab97e3d9a90223c04a1067c079.jpg?hash=RuY8q5fj2a)
More alignment issues (and blood). Any divots left after sanding will be filled the same as the gaps.
![20240526_142810[1].jpg 20240526_142810[1].jpg](https://www.canoetripping.net/data/attachments/31/31833-fe03dddbac24abe61c3bdf919c3cc25e.jpg?hash=_gPd26wkq-)
I don't always have the patience to re-cut and re-fit. Again, any gaps can easily be repaired.
![20240526_153950[1].jpg 20240526_153950[1].jpg](https://www.canoetripping.net/data/attachments/31/31835-b81e95d8a1e5d9107436b19d50295751.jpg?hash=uB6V2KHl2R)
A few of my strips didn't quite make the center line before making the cut, which left some gaps. Not a problem.
![20240527_211618[1].jpg 20240527_211618[1].jpg](https://www.canoetripping.net/data/attachments/31/31841-63ea97495494257f1c389ddd11f315f0.jpg?hash=Y-qXSVSUJX)
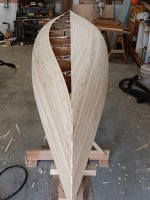
It's already looking a lot better after the first round of sanding
![20240527_210711[1].jpg 20240527_210711[1].jpg](https://www.canoetripping.net/data/attachments/31/31837-6ab6cfe5784256a793c2d66869702b12.jpg?hash=arbP5XhCVq)
The divots are nearly gone after the first round of sanding
![20240527_210759[1].jpg 20240527_210759[1].jpg](https://www.canoetripping.net/data/attachments/31/31838-9fdffa5a659f0f0923bf374b617d80f4.jpg?hash=n9_6WmWfDw)
A shot of the other stem after initial sanding
![20240527_210828[1].jpg 20240527_210828[1].jpg](https://www.canoetripping.net/data/attachments/31/31839-63a3c968576b7765aaa20ff4186c59f4.jpg?hash=Y6PJaFdrd2)
Another problem I created for myself was a lot of deep gouges from initially planing the hull before sanding. There was a lot of tear out. It's better after sanding but these will need to be filled. There are a lot of these over the entire hull so it will be interesting to see how they look when it's done.
![20240527_211543[1].jpg 20240527_211543[1].jpg](https://www.canoetripping.net/data/attachments/31/31840-5483b14358b2f3993dcadb52c078d634.jpg?hash=VIOxQ1iy85)
Attachments
A user on one of the other boatbuilding forums taglines as "It's really rather difficult to build an ugly wooden boat."
I've done the shear-following thing on all of my strip builds as well, and probably would need to learn otherwise if I do another one. For fairing, I think the important part is not having any little edges that will mess up the glass. It looks like you've achieved that.
I've done the shear-following thing on all of my strip builds as well, and probably would need to learn otherwise if I do another one. For fairing, I think the important part is not having any little edges that will mess up the glass. It looks like you've achieved that.
Thanks for coming clean on your imperfections. I found it encouraging to read. I have yet to build a stripper (though I have at least one plan set that's been waiting for years...) but the sentiment rings true.
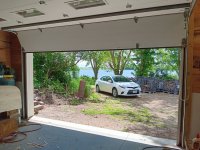
A workshop like that, with a body of water outside the garage door, is a pretty sweet set up. Cheers.
A workshop like that, with a body of water outside the garage door, is a pretty sweet set up. Cheers.
Thanks for coming clean on your imperfections. I found it encouraging to read.
I'm glad to hear that. Highlighting imperfections isn't something I make a habit of but when most people document stripper builds it's to show off their beautiful boat and the 'mistakes' tend to not be mentioned. I think, when done, that this boat is going to look just fine and I'm hoping to show that it's not really that daunting of a task.
Despite the above photos I do like to do things the right way and can take a lot of time and effort to get things perfect, or nearly so, when I know there is not an alternative. But I also tend to be inherently lazy and I'll try and get away with as much as I can. Each time I repeat a task I find myself wondering if I really need to go to all that work or can I cut a corner or two. Eventually I reach a point where I can't get away with it any farther and then I know how far I can push it. I haven't gotten there yet with strippers.
Alan
Alan, you're a man after my own heart, except for that crapbucka stuff, at least I can blame my multiple staple attacks on the liquor, lol.
Dr. Victor Frankenstein didn't do perfect surgical and sewing repairs, and his project turned out to be world famous!
No, seriously:
Alan's honest demonstration of common mistakes/flaws/blemishes, and how easily most can be remedied, should give encouragement and confidence to new builders who may be vacillating because of inexperience or fears of failure. A valuable lesson.
No, seriously:
Alan's honest demonstration of common mistakes/flaws/blemishes, and how easily most can be remedied, should give encouragement and confidence to new builders who may be vacillating because of inexperience or fears of failure. A valuable lesson.
- Joined
- Aug 10, 2018
- Messages
- 1,596
- Reaction score
- 2,358
I didn't bother to fill all the cracks on my Freedom solo build and I recall one of the 4 guys I met on the way out of the Steel river exclaiming "I can see through it!" Yep, you sure can but the cracks are full of epoxy so it doesn't leak. Besides, if it's worthy of being a display piece, I might feel bad dragging it up banks, scraping it over rocks and occasionally dropping it on portages.
I'd encourage anyone who's interested in building to just have at it. I mean, It's gonna displace water so it has to float! Make the second or third one pretty (or not...)
I'd encourage anyone who's interested in building to just have at it. I mean, It's gonna displace water so it has to float! Make the second or third one pretty (or not...)
Similar threads
- Replies
- 10
- Views
- 508
- Replies
- 18
- Views
- 919
- Replies
- 25
- Views
- 2K
- Replies
- 42
- Views
- 4K
- Replies
- 75
- Views
- 3K


![20240527_210602[1].jpg](/data/attachments/31/31836-37e524f19084860081fc4bb5b3818c47.jpg?hash=N-Uk8ZCEhg)