-
Happy 1st Performance of Handel's "Messiah" (1742)! 🎹🎺🆂🅳🅶
You are using an out of date browser. It may not display this or other websites correctly.
You should upgrade or use an alternative browser.
You should upgrade or use an alternative browser.
Hiawatha 15- Long term build
- Thread starter Momentum
- Start date
The craftsmanship on this forum is better than most boat building forums. Keep up the great work.
Jim, I'm a little lighter than you, so I'm hoping that the epoxy fiberglass combo does the trick
The craftsmanship on this forum is better than most boat building forums. Keep up the great work.
Thanks ppine. I hope I'm not going into too much detail with my explanations. I do tend to do that, but if you want even greater, please let me know.
Thanks again,
Momentum
Scuppered supports. Brilliant.
I'm amazed that adhesives (and glassing) can support seats without mechanical means (screws etc.). Very neat.
I don't know if any of you remember, but I tested a sample seat cleat in single shear (as real life loads) in an instrumented load frame. The seat cleat was mahogany, sample hull section was cedar with 4 oz glass on each side, RAKA epoxy resin, and only Cabosil thickened epoxy to hold the seat cleat to the hull. When it failed at over 300 lbs, the failure was entirely within the mahogany itself, the epoxy bond never yielded. I use 4 of these cleats to support a seat, so I could conceivably support a 1200 lb paddler!
And mom, love the inlay, it looks really sharp!
Last edited:
Well Stripperguy, I'm not that heavy! But it's nice to know that if I wanted to gain another 1000lbs, then I'd be ok with my supports as they are 
And, thanks for the compliment.
And, thanks for the compliment.
Despite my distaste for fiberglass, all went well. I sanded anywhere that there was fresh epoxy with 120 grit, and layed out my pieces of glass where they needed to be. I purposely cut them a little narrow so as to not get into trying to make the fiberglass follow my radius end. I also allowed about 5"” above and below the support.
Prior to making a mess with the epoxy, I took the time to make up some cardboard templates of the seats so that I could get them cut to fit while the epoxy set off. My templates were the same width as my seats (9 5/8") and as long as the blanks. So all I needed to do was take my time to cut a little off each time to make sure that they weren't too short. I'm calling the width across the canoe the length of the seat, so I hope I didn't just confuse you. Here's the stern pattern.
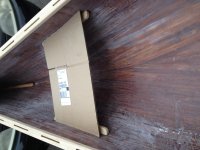
Here’s the before epoxy shot…
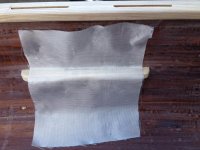
And, here’s the after…
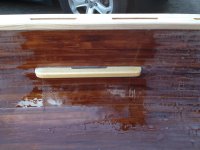
I do plan on applying one more coat before I apply a final epoxy coat to the entire inside and outside of the hull, so any imperfections should be worked out then. The scupper was cut out when the epoxy set up a bit, and I'll fine tune the opening when all dry.
I guess it wasn’t so bad after all. No need to put money in the swear jar this time.
Prior to making a mess with the epoxy, I took the time to make up some cardboard templates of the seats so that I could get them cut to fit while the epoxy set off. My templates were the same width as my seats (9 5/8") and as long as the blanks. So all I needed to do was take my time to cut a little off each time to make sure that they weren't too short. I'm calling the width across the canoe the length of the seat, so I hope I didn't just confuse you. Here's the stern pattern.

Here’s the before epoxy shot…

And, here’s the after…

I do plan on applying one more coat before I apply a final epoxy coat to the entire inside and outside of the hull, so any imperfections should be worked out then. The scupper was cut out when the epoxy set up a bit, and I'll fine tune the opening when all dry.
I guess it wasn’t so bad after all. No need to put money in the swear jar this time.
Very nice! I'm curious as to why you would be putting another coat of epoxy on the inside and outside of the boat. Many builders, including myself, only use the wetout coat for the interior.
Thanks Mem.
I'll be putting another coat on both for two reasons. One is that I think I did a terrible job with the fiberglass in many places (wrinkles, bumps, etc), so I'd like to clean it up a bit with another coat.
And the second is that I'm a little skeptical on the durability of my previous coats of epoxy because of my ratio mix up earlier. I guess I figured that the extra weight was worth a little more piece of mind for me. I'm just a little nervous.
I'm one who likes the weave filled on the inside of my canoes.
Yes it can remedy earlier mistakes. But I feel it's easier to clean the inside, and I don't feel like I'm wearing into the cloth when I enter with muddy boots.
When I apply varnish, or for that matter reapplying varnish. The sanding won't be chewing up my cloth.
I know a lot of builders just wet out the cloth, and call it good. That's OK !
Jim
Thanks for the poke Alan. It's been painfully slow at this point, which is kind of opposite to what you would think being warm out now. I have a list of outside projects as long as my arm that seem to always be more of a priority.
I do however have some photos for you, on what I have done lately. I'll try to post them tonight.
Thanks again,
Momentum
I do however have some photos for you, on what I have done lately. I'll try to post them tonight.
Thanks again,
Momentum
It took twenty years to get it to this point, could take another couple to get it done and in the water, so, just leave it out in the rain one day so you can say it got wet...
Boy can life get busy…In the last week alone, I’ve tackled 3 home improvement projects, researched and bought an SUV for the family (Dodge Durango), brought in 3 separate companies for a backyard fence redo, and looked into what it takes to rid one part of the house of black mold. Yuk.
I know you didn’t log in to hear about my world outside canoes, so, enough of that.
With seat supports in place, I trimmed the seats to the correct length, leaving about an 1/8” between the end of the seat and the hull. If there’s any movement, it won’t wear away any of the epoxy. I layed out the locations of the seat hardware. You may recall that I am installing brass inserts in the supports with ¼-20 brass bolts being used to hold the seats in place. It took a little trial and error to get these installed. I ended up installing them on a slight angle due to the fact that the gunwales prevented the drill from drilling vertically. Also, the brass is so soft that the slightest twist of the insertion tool in wrong way, would strip the head of the insert. I left them a little proud of the surface of the support because I just couldn’t get them to seat properly. This is turned out to be a blessing in disguise though, as I can use them as locating pins. Sorry, I just realized that I don’t have pictures for you of this step, so I’ll have to get you some.
Epoxy has been applied to both, inside and outside, and sanded after a week of letting it rest. I really didn’t need to wait that long, it just took me that long to get to it. I’m busy you know. Did I mention I detest epoxy? Yes, of course I did. I think that sanding epoxy is my second hate to applying it. I’m content with the final sanding job on the inside, but can’t say I’m happy with the overall inside look. I’ve got too many little bumps that I couldn’t get out. Good thing it all my gear will cover the “Wabi-sabi” effect.
So, Saturday was an exciting day…time for varnish. I did start a thread a while back about varnish. I was hoping to get a resounding unanimous vote for one brand and one product. That didn’t happen, but it was a great conversation with many sharing their experiences. Oil based, water based, 1 part or 2 part polyurethane. Decisions, decisions. After much thought, I chose the Interlux Compass Clear. My driving force behind this was the fact that I was hoping to get a pretty hard surface when done. It wasn’t cheap, but it was more affordable than some of the others.
The Compass Clear went on very well. I rolled it on in sections and then brush tipped off the air bubbles left behind by the roller. With the hull done, I also coated the seats, yolk, and removable blocks for the yolk. I checked on it yesterday, but still tacky. Had a look this morning and is now touchable. Boy, that took a long time to dry. I hope all the coats don’t take this long to dry, or I may not have it ready for this year.
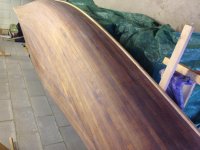
Before...
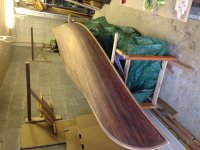
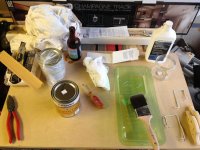
Supplies…
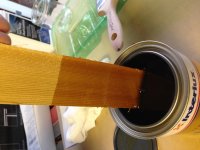
Here’s the hull and hanging seats...
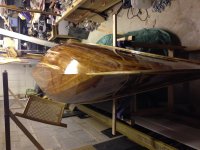
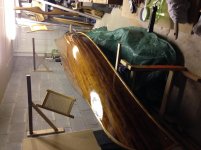
Very shiny. I'll post again when I flip it and coat the inside.
Momentum
I know you didn’t log in to hear about my world outside canoes, so, enough of that.
With seat supports in place, I trimmed the seats to the correct length, leaving about an 1/8” between the end of the seat and the hull. If there’s any movement, it won’t wear away any of the epoxy. I layed out the locations of the seat hardware. You may recall that I am installing brass inserts in the supports with ¼-20 brass bolts being used to hold the seats in place. It took a little trial and error to get these installed. I ended up installing them on a slight angle due to the fact that the gunwales prevented the drill from drilling vertically. Also, the brass is so soft that the slightest twist of the insertion tool in wrong way, would strip the head of the insert. I left them a little proud of the surface of the support because I just couldn’t get them to seat properly. This is turned out to be a blessing in disguise though, as I can use them as locating pins. Sorry, I just realized that I don’t have pictures for you of this step, so I’ll have to get you some.
Epoxy has been applied to both, inside and outside, and sanded after a week of letting it rest. I really didn’t need to wait that long, it just took me that long to get to it. I’m busy you know. Did I mention I detest epoxy? Yes, of course I did. I think that sanding epoxy is my second hate to applying it. I’m content with the final sanding job on the inside, but can’t say I’m happy with the overall inside look. I’ve got too many little bumps that I couldn’t get out. Good thing it all my gear will cover the “Wabi-sabi” effect.
So, Saturday was an exciting day…time for varnish. I did start a thread a while back about varnish. I was hoping to get a resounding unanimous vote for one brand and one product. That didn’t happen, but it was a great conversation with many sharing their experiences. Oil based, water based, 1 part or 2 part polyurethane. Decisions, decisions. After much thought, I chose the Interlux Compass Clear. My driving force behind this was the fact that I was hoping to get a pretty hard surface when done. It wasn’t cheap, but it was more affordable than some of the others.
The Compass Clear went on very well. I rolled it on in sections and then brush tipped off the air bubbles left behind by the roller. With the hull done, I also coated the seats, yolk, and removable blocks for the yolk. I checked on it yesterday, but still tacky. Had a look this morning and is now touchable. Boy, that took a long time to dry. I hope all the coats don’t take this long to dry, or I may not have it ready for this year.
Before...


Supplies…


Here’s the hull and hanging seats...


Very shiny. I'll post again when I flip it and coat the inside.
Momentum
Hi Mo, I just logged in to ask about fence rebuilds and mold removal. Just kidding.
Your photos totally faked me out. I was wondering why you were hanging your canoe up like it was a gorgeous cedar strip jacket hanging on a peg. Then I realized the pics were sideways. I've had one of those weeks. Whew! Anyway...
Your Hiawatha is looking awesome! I can't wait for some more photos (hint hint) as you coat the interior.
Hey, sorry about the sideways pics. I'm not really sure what happened. They are upright on my computer, but not when I post them. I guess the orientation really is indicative of how my life is right now.
Hoping you can still enjoy them anyways. I'm trying to carve out a little time tonight to get an interior coat on. You can bet I'll post some pics if all works out.
Thanks for the kind words.
Momentum
Hoping you can still enjoy them anyways. I'm trying to carve out a little time tonight to get an interior coat on. You can bet I'll post some pics if all works out.
Thanks for the kind words.
Momentum
Yo Mo,
Amazing how a little varnish makes things "pop".
It looks great, but when will you get it wet?
Amazing how a little varnish makes things "pop".
It looks great, but when will you get it wet?
Similar threads
- Replies
- 75
- Views
- 3K
- Replies
- 20
- Views
- 927
- Replies
- 73
- Views
- 6K


