What I would do with the triangular space where the outwales come together... make up a block to fit that matches the decks. When you do the roundover and it cuts into this block, then it would at least match the decks. The big pointy ends will get damaged if you ever have to roll the boat onto an end to get it up on your shoulders so rounding them over may eventually have to take place. The space could be filled with any wood of course for strength and the ends wrapped in brass or copper as well for protection and brass would match your painter fittings.
-
Happy Patent for First Computer Mouse (1970)! 🖥️🖱️🐁
You are using an out of date browser. It may not display this or other websites correctly.
You should upgrade or use an alternative browser.
You should upgrade or use an alternative browser.
Hiawatha 15- Long term build
- Thread starter Momentum
- Start date
Ya, I was thinking the same thing. I really don't like the idea of having the point take the brunt of the force should it hit the ground. I'll craft a block that fits and epoxy it when the weather turns for the better again.
Really itching to get it out on the water, and you can bet, that as soon as the snow disappears, I'll be finishing up the final details to get it out. Already planned a trip to Killarney PP for the May long weekend. Should be epic
Karin, did you get my PM?
Really itching to get it out on the water, and you can bet, that as soon as the snow disappears, I'll be finishing up the final details to get it out. Already planned a trip to Killarney PP for the May long weekend. Should be epic
Karin, did you get my PM?
Not yet.
May long out here is a crap shoot. Last year we still had ice. The year before it went out that week. Back in '09,.my first Spring in Manitoba we got 11" of snow on the Friday of the May long weekend, we still went on Saturday but there was snow in the bush and it sleeted and rained and was ugly. Other years we have had 80 degrees on that same weekend.
May long out here is a crap shoot. Last year we still had ice. The year before it went out that week. Back in '09,.my first Spring in Manitoba we got 11" of snow on the Friday of the May long weekend, we still went on Saturday but there was snow in the bush and it sleeted and rained and was ugly. Other years we have had 80 degrees on that same weekend.
Last edited:
Karin, I had sent you a response to your tool question on the 8th of Nov. You didn't get it?
May long weekend is generally pretty good around here as you probably know. A little cool at night, but that's great for sleeping anyways. Sunny during the day. Can't beat having a birthday on that weekend too.
May long weekend is generally pretty good around here as you probably know. A little cool at night, but that's great for sleeping anyways. Sunny during the day. Can't beat having a birthday on that weekend too.
Looking very nice! More input on outwales...I never join them, just cut them off flush with the stem. I run a brass stem band all the way up onto the deck. Looks very naughty, I mean nautical, and takes the abuse of tail thumps when lifting and setting down.
Yes, I did get it, just never responded, lol. That would explain why I got it again tonight. I was scratching my head over that.
Looks great! You are showing your skill and patience.
Thanks so much Hanz. After this long though, my patience is just about gone. It's a good thing it's not that long of a winter for us here in Southern Ontario.
So looking forward to getting out for a trip.
Thanks again
So looking forward to getting out for a trip.
Thanks again
G
Guest
Guest
That is a beautiful canoe, with a wonderful tale behind it.
I’m looking forward to seeing more of it on the water.
I’m looking forward to seeing more of it on the water.
Hi
Sorry for digging this old thread up, But as a relatively new member.
It Brought back memories of My Hiawatha !
It too was built from the early edition of Canoecraft ! The next edition changed the design somewhat.
I sold mine, as I had others to build, and needed $$. But with regrets !
I really liked my Hiawatha, more as a solo boat. I've been dreaming of a resurrection, but adding tumblehome, and solo trimming to it.
We'll see what the Summer brings.
Thanks !
Jim
Jim,
Thanks for posting. Very shortly I am going to revive this thread to finish up the build. I shut it down for the winter because I don't have heat. Every day it gets a little warmer and I get a bit more antsy to get it out on the water.
Keep watching, I'll be at it soon
Thanks for posting. Very shortly I am going to revive this thread to finish up the build. I shut it down for the winter because I don't have heat. Every day it gets a little warmer and I get a bit more antsy to get it out on the water.
Keep watching, I'll be at it soon
Jim,
Maybe you can help me with something... I chose this canoe based on what was written in the Canoecraft book so many years ago. Long before they had stability charts to help decide on a model. I understand that the shape was changed with a revision of the book. I found out that the original one, (the one that I am building) is shall we say...A little tender in the water. This is not what the book says, nor what I intended on building. I'm personally ok with it being a little squirly on the water but my kids won't want to paddle it. It will scare them off keeping it as a family heirloom after I am long gone.
Did you find this with your original Hiawatha?
As a tandem, the Hiawatha didn't fit my bill. I don't think a tandem should be built less than 17'
As you say, it was "Squirly". It could have been the seats were too high. That was a long time ago !
How high are your seats ?
I paddled it solo, heeled over a little, and loved it. On the smaller rivers I frequent, it worked.
Might be time to build another canoe ! My first build took 9 months, the second 3.
I'm sure you can shave some time off of 20 yrs !!
A stemless design is simpler, requires a lot less work, and in my book every bit as good, if not better !
You can do it !
Jim
Jim,
It hasn't been in the water yet! As my build posts say, It has taken me this long to get to this point and it hasn't seen water, apart from my sweat from sanding
I was told that it was a little tender in the water by Joan @ Bear Mountain Boats. I haven't installed my seats yet. They are one of the items I still have to finish up. I was going to install them low anyways. I don't kneel because of injuries. I prefer to sit.
It will be set up as a tandem, with the ability to remove both seats and replace with a solo seat somewhere off center. I also have a removable yolk set up. It comes out and is replaced by 2 thwarts. It will be explained in my posts once I get going again.
I hope this helps, and thanks
Momentum
It’s been a long winter, but with the spring finally taking hold, I’m back at it. My apologies to you all, I have actually been slowly working on bits and pieces since the snow disappeared. My computer went down though, so I wasn’t able to post. I really don’t like using my tablet, cause the keyboard isn’t that user friendly, so I had to wait to get up and running again.
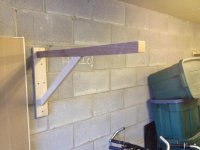
Anyways, the first thing I attacked was a rack for the canoe. I had some walnut and maple lying around, so I conscripted them into action. Walnut for a canoe rack??? What was I thinking? Hey, don’t judge…it’s what I had on hand. Besides, I couldn’t ask for a nicer material to rest the gunwales on when she isn’t in the water. The ropes that I used to suspend the canoe had to go.
Here’s a shot of one of the rack arms. Very simple, but I can hang on them. They are that strong.
This next part, has probably been the most fun I have hand with the woodworking aspect of the build. Very early into the build, I created a couple of inlays for the decks. I have been waiting for quite a while to be able to install them. I’ll walk you through the process, in case you ever have a hankering for eye popping details. Some may remember what the decks look like from previous shots…
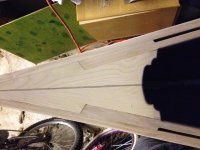
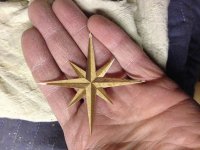
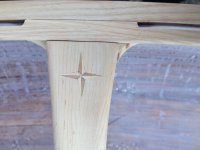
Here is the inlay I installed. It’s a compass rose, made up of Koa (the darker material), and Sitka Spruce. I found a really nice image online when I started this, and printed it off at the size I wanted. I figured out the shape of each piece of veneer, and cut each one out with a sharp chisel. Then I drew 2 lines (intersecting each other at 90 deg.) on the sticky side of a white envelope address label. Now I laid each one on my lines, starting with the center pieces. Then filled in the rest after. The sticky side offers a way to keep these small pieces in place without the need for glue or other adhesives. Time consuming? YES, but I’m sure you will agree that the result is well worth it. This is my method. I am sure that there are a multitude of others.
Here is the assembly on the label.
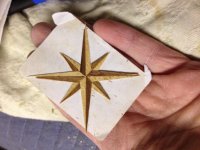
Here, I have cut away the excess label.
Ok, so now comes the other tricky part…actually burying it into the deck. I started by using the “racing stripes” in the deck as my guide, and figured out the location that I thought would be the best. Mechanical pencil in hand, I traced the outline of the inlay onto the deck. Remember that if you are doing this, that the white, non-sticky side is up. Don’t worry, it will be sanded off later.
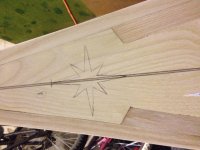
Carefully chisel out the material in between your lines, trying to keep the lines as sharp as possible. Your depth should almost match the veneer thickness. The corners were a little bit harder to remove the material, but an Exacto knife really excels here. Test fit, remove more, test fit, remove more…and so on.
This is what it looks like after all the material removal. I hope you can see it clearly enough.
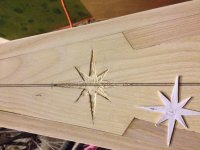
Now with some titebond III, a simple block of wood, paper towel, and a few clamps. We wait…
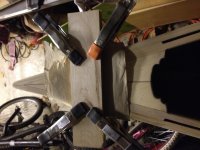
The result with clamps removed, and a really quick sanding to get the label off. As you can see, there are some small gaps, but nothing a little epoxy and wood dust can’t fill.
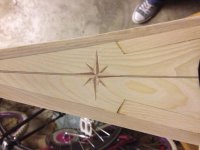
I also applied a similar inlay to the yoke...
Enough of the fine stuff, the hull has to be sanded down, inside and out. I will be applying another coat of epoxy to both. I’m just too nervous about the previous errors I made with the epoxy ratio, that I wanted a bit more insurance. If you are just joining in to this thread, go back a few posts to see my biggest single error of this build. Not funny then, but I am past it now.
Just about finished sanding.
Next step…installing the seat supports to the inside of the hull. Should be interesting. Please come back to see
Momentum
Anyways, the first thing I attacked was a rack for the canoe. I had some walnut and maple lying around, so I conscripted them into action. Walnut for a canoe rack??? What was I thinking? Hey, don’t judge…it’s what I had on hand. Besides, I couldn’t ask for a nicer material to rest the gunwales on when she isn’t in the water. The ropes that I used to suspend the canoe had to go.
Here’s a shot of one of the rack arms. Very simple, but I can hang on them. They are that strong.

This next part, has probably been the most fun I have hand with the woodworking aspect of the build. Very early into the build, I created a couple of inlays for the decks. I have been waiting for quite a while to be able to install them. I’ll walk you through the process, in case you ever have a hankering for eye popping details. Some may remember what the decks look like from previous shots…

Here is the inlay I installed. It’s a compass rose, made up of Koa (the darker material), and Sitka Spruce. I found a really nice image online when I started this, and printed it off at the size I wanted. I figured out the shape of each piece of veneer, and cut each one out with a sharp chisel. Then I drew 2 lines (intersecting each other at 90 deg.) on the sticky side of a white envelope address label. Now I laid each one on my lines, starting with the center pieces. Then filled in the rest after. The sticky side offers a way to keep these small pieces in place without the need for glue or other adhesives. Time consuming? YES, but I’m sure you will agree that the result is well worth it. This is my method. I am sure that there are a multitude of others.
Here is the assembly on the label.

Here, I have cut away the excess label.

Ok, so now comes the other tricky part…actually burying it into the deck. I started by using the “racing stripes” in the deck as my guide, and figured out the location that I thought would be the best. Mechanical pencil in hand, I traced the outline of the inlay onto the deck. Remember that if you are doing this, that the white, non-sticky side is up. Don’t worry, it will be sanded off later.

Carefully chisel out the material in between your lines, trying to keep the lines as sharp as possible. Your depth should almost match the veneer thickness. The corners were a little bit harder to remove the material, but an Exacto knife really excels here. Test fit, remove more, test fit, remove more…and so on.
This is what it looks like after all the material removal. I hope you can see it clearly enough.

Now with some titebond III, a simple block of wood, paper towel, and a few clamps. We wait…

The result with clamps removed, and a really quick sanding to get the label off. As you can see, there are some small gaps, but nothing a little epoxy and wood dust can’t fill.

I also applied a similar inlay to the yoke...

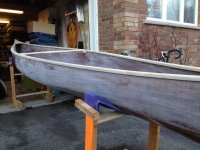
Enough of the fine stuff, the hull has to be sanded down, inside and out. I will be applying another coat of epoxy to both. I’m just too nervous about the previous errors I made with the epoxy ratio, that I wanted a bit more insurance. If you are just joining in to this thread, go back a few posts to see my biggest single error of this build. Not funny then, but I am past it now.
Just about finished sanding.

Next step…installing the seat supports to the inside of the hull. Should be interesting. Please come back to see
Momentum
Beautiful work Mo. Inlaying a compass rose into the deck and yoke makes this canoe look exquisite.
Thanks for the accolades guys. Nice to know fine work is still appreciated. 
In my earlier posts, I had indicated that I would be installing the seats to supports mounted to the inside of the hull. I wanted this for a couple of reasons…
Armed with my info, I layed out marks on the gunwales and transferred the lines to the inside of the hull. I also drew a level line at 5” from the top of the gunwales to help with placement of supports. My seats are 9 5/8” in width so I made my supports 11” long to allow for a radius on the ends. You know, I’m all about the aesthetic.
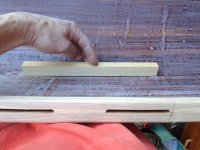
This is what it looked like before machining. You can see the small gap in the center. I also had to cut the bottom edge back on an angle so that the support ended up level.
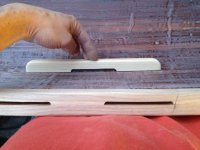
Here is the finished product. I used the same scupper detail in the center of the support so that water could escape. I then rounded the edges over with a ¼” radius bit. You can see my pencil line on the gunwale.
With the slathering of epoxy on the support, I taped them in place while they cured. My apologies to all of you… I meant to take a picture of the taped step, but got so excited once I figured that the epoxy was set, that I forgot all about it until I had removed it all. I only had one of them shift a little (1/16”), but I can live with it. (wink)
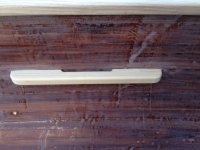
This is what they look like finished.
The next plan is to apply fiberglass and epoxy over them for added strength. Stay tuned, there may be some cursing…I hate fiberglass.
Momentum
In my earlier posts, I had indicated that I would be installing the seats to supports mounted to the inside of the hull. I wanted this for a couple of reasons…
- So that I could have them as low as I could. I don’t kneel, or rather, I can’t kneel on the boat bottom. I’m not that old, but have had a few knee issues in the past, so that’s out.
- I value the appearance of clean un-interupted gunwales. I didn’t want to see any hardware at all.
- I wanted to be able to remove the seats quickly and easily so that I could possibly drop in a center solo seat. I figured that if I removed the seats when using it as a solo, I wouldn’t have to carry the weight when portaging.
Armed with my info, I layed out marks on the gunwales and transferred the lines to the inside of the hull. I also drew a level line at 5” from the top of the gunwales to help with placement of supports. My seats are 9 5/8” in width so I made my supports 11” long to allow for a radius on the ends. You know, I’m all about the aesthetic.
This is what it looked like before machining. You can see the small gap in the center. I also had to cut the bottom edge back on an angle so that the support ended up level.

Here is the finished product. I used the same scupper detail in the center of the support so that water could escape. I then rounded the edges over with a ¼” radius bit. You can see my pencil line on the gunwale.

With the slathering of epoxy on the support, I taped them in place while they cured. My apologies to all of you… I meant to take a picture of the taped step, but got so excited once I figured that the epoxy was set, that I forgot all about it until I had removed it all. I only had one of them shift a little (1/16”), but I can live with it. (wink)

This is what they look like finished.
The next plan is to apply fiberglass and epoxy over them for added strength. Stay tuned, there may be some cursing…I hate fiberglass.
Momentum
Scuppered supports. Brilliant.
I'm amazed that adhesives (and glassing) can support seats without mechanical means (screws etc.). Very neat.
I'm amazed that adhesives (and glassing) can support seats without mechanical means (screws etc.). Very neat.
Similar threads
- Replies
- 14
- Views
- 692
- Replies
- 78
- Views
- 9K
- Replies
- 23
- Views
- 4K
