Dogbrain, that will be a very fine looking, well-constructed, and tough as nails boat - many thanks for the clear and detailed rundown of the build so far. I have pretty limited experience in strip-building, but I really like the idea of a decked canoe as I start pulling things together for build number 2 this spring. But the 60+ pound weight makes me hesitate (not a big, or young, guy and need something I can easily manage by myself for transport and short portages). You mention the weight range indicated by the plans could go as low as 50 pounds. Aside from leaving out the Kevlar, are there specific points/suggestions indicated in the plans that would get the boat solidly down to that level (and recognizing that it would probably have to be for lighter duty use than what you have planned for it)? Thanks
-
Happy Birthday, Nicholas Katzenbach, my old boss (1922-2012)! ⚖️
You are using an out of date browser. It may not display this or other websites correctly.
You should upgrade or use an alternative browser.
You should upgrade or use an alternative browser.
Decked Kruger Seawind style build
- Thread starter dogbrain
- Start date
This looks absolute amazing.
Dogbrain, that will be a very fine looking, well-constructed, and tough as nails boat - many thanks for the clear and detailed rundown of the build so far. I have pretty limited experience in strip-building, but I really like the idea of a decked canoe as I start pulling things together for build number 2 this spring. But the 60+ pound weight makes me hesitate (not a big, or young, guy and need something I can easily manage by myself for transport and short portages). You mention the weight range indicated by the plans could go as low as 50 pounds. Aside from leaving out the Kevlar, are there specific points/suggestions indicated in the plans that would get the boat solidly down to that level (and recognizing that it would probably have to be for lighter duty use than what you have planned for it)? Thanks
First, there is nothing that comes with the plans for this boat besides the 2 big sheets of paper with the form outlines. The website just refers to Nick Schades books as a good starting point for the build, which i think is sufficient. I picked up a used copy of nicks older book for next to nothing. He has recommendations in there for building for various uses. I would study that book if I were you.
I think the canoe will ultimately come out barely under 60 pounds, but I'll weigh it and post the results when finished. I suppose for a lighter weight build you could cut back a little on the fiberglass and kevlar, and maybe use thinner strips since this is a narrow boat with a rounder cross section. You could also do an all composite cockpit coaming, and make a seat different than a kruger. I think Deerflys seat design would save some weight. From what i have come to know, this boat requires a rudder, so you probably wont be able to save weight there.
good luck, Mark
Onward with the Seawind build.
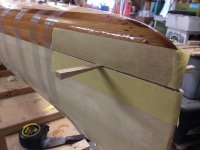
I did get some help getting the two halves of the boat lined up a bit better. There are probably a number of ways to go about mating the two pieces, but I decided to start things off by wedging the ends, put in some thickened epoxy, then tape them together. You can see there's a bit of a mismatch at the tip, with the hull section being about 3/8" longer than the deck. I put most of the mismatch in the front, since it seemed to be a bit easier to deal with re-shaping one end than having to do both ends.
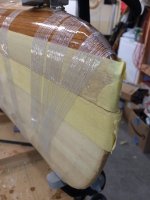
................. and the result
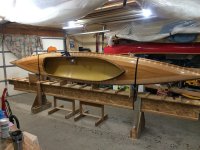
After the epoxied ends solidified, I put the boat up on its side to start glassing the part line on the inside.
The part line had virtually no gap on the outside, and just a little on the inside. I figured any gap would just fill with epoxy. I did run tape along the entire part line on the outside to keep the epoxy in the gap.
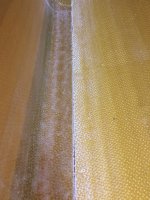
I have a roll of 8oz, 2" wide fiberglass tape and a roll of 6oz. I decided to use the heavier stuff on the inside. I broke the inside up into 3 pieces since I'm always looking at ways to make things less stressful, and this seemed like one of those opportunities. I painted on a coat of epoxy along the part line on the inside, then I soaked the two pieces of glass tape for either end in epoxy on the table. Next, I rolled up the epoxy soaked tape and rolled it out on the inside towards both ends. I did the center section in the conventional way once I was sure the ends were in place.
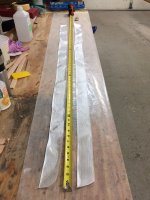
I let the one side cure for half the day and flipped the boat and did the other side.
The next morning I messed around with flotation, in the form of the 9x6x4" yoga minicell blocks recommended by Mike McCrea. I measured out the real Kruger to see how much flotation Verlen determined was necessary for keeping the boat afloat in case of a swamping and it turns out I need exactly 2.5 of these on each end. I'll probably cut them a little here and there to fit, and glue the parts back together. There might even be enough space to stuff a plastic bottle or two in the very ends for additional flotation. None of it will be seen, so who cares? Anyway, I'll epoxy 4 loops of webbing or poly cord on each end and use paracord to keep them in place.
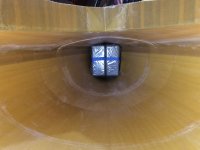
Here's the bow. I had to cut into the fiberglass and wood at the end and along one side to get everything faired. No problem, there's nothing that can be built with wood, glass and epoxy that can't be fixed with more wood, glass and epoxy. It all disappeared once I glassed over the part line on the outside.
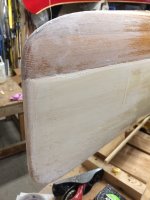
Before running the glass tape along the outside part line, I took the opportunity to attach some carbon fiber tubing to the stern to hold the rudder. I used thickened epoxy, then overlapped the 2 strips of glass coming from both sides. This thing is going nowhere. The rudder will certainly fail before this thing gets broken off.
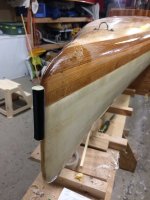
Rudder temporarily in place. You can see the beginnings of the next step of the build on the horizon, the cockpit coaming rim.
Mark
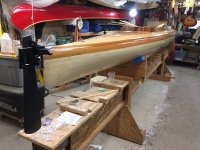
I did get some help getting the two halves of the boat lined up a bit better. There are probably a number of ways to go about mating the two pieces, but I decided to start things off by wedging the ends, put in some thickened epoxy, then tape them together. You can see there's a bit of a mismatch at the tip, with the hull section being about 3/8" longer than the deck. I put most of the mismatch in the front, since it seemed to be a bit easier to deal with re-shaping one end than having to do both ends.

................. and the result

After the epoxied ends solidified, I put the boat up on its side to start glassing the part line on the inside.

The part line had virtually no gap on the outside, and just a little on the inside. I figured any gap would just fill with epoxy. I did run tape along the entire part line on the outside to keep the epoxy in the gap.

I have a roll of 8oz, 2" wide fiberglass tape and a roll of 6oz. I decided to use the heavier stuff on the inside. I broke the inside up into 3 pieces since I'm always looking at ways to make things less stressful, and this seemed like one of those opportunities. I painted on a coat of epoxy along the part line on the inside, then I soaked the two pieces of glass tape for either end in epoxy on the table. Next, I rolled up the epoxy soaked tape and rolled it out on the inside towards both ends. I did the center section in the conventional way once I was sure the ends were in place.

I let the one side cure for half the day and flipped the boat and did the other side.
The next morning I messed around with flotation, in the form of the 9x6x4" yoga minicell blocks recommended by Mike McCrea. I measured out the real Kruger to see how much flotation Verlen determined was necessary for keeping the boat afloat in case of a swamping and it turns out I need exactly 2.5 of these on each end. I'll probably cut them a little here and there to fit, and glue the parts back together. There might even be enough space to stuff a plastic bottle or two in the very ends for additional flotation. None of it will be seen, so who cares? Anyway, I'll epoxy 4 loops of webbing or poly cord on each end and use paracord to keep them in place.

Here's the bow. I had to cut into the fiberglass and wood at the end and along one side to get everything faired. No problem, there's nothing that can be built with wood, glass and epoxy that can't be fixed with more wood, glass and epoxy. It all disappeared once I glassed over the part line on the outside.

Before running the glass tape along the outside part line, I took the opportunity to attach some carbon fiber tubing to the stern to hold the rudder. I used thickened epoxy, then overlapped the 2 strips of glass coming from both sides. This thing is going nowhere. The rudder will certainly fail before this thing gets broken off.

Rudder temporarily in place. You can see the beginnings of the next step of the build on the horizon, the cockpit coaming rim.
Mark

Last edited:
Looks Great Mark !
I'd say Verlen would approve also !
That open cock pit made it a lot easier to mate up the two halves !
What do you think was the cause of the different lengths ?
Yes if you build them, you can fix them !
Making the flotation removable is a good call !
Jim
I'd say Verlen would approve also !
That open cock pit made it a lot easier to mate up the two halves !
What do you think was the cause of the different lengths ?
Yes if you build them, you can fix them !
Making the flotation removable is a good call !
Jim
The open cock pit made it a lot easier to mate up the two halves !
Jim[/QUOTE
it did make it easier than a kayak would be for sure, plus the part line is almost flat on this boat.
QUOTE=Jim Dodd;n103222
What do you think was the cause of the different lengths ?
Jim
Actually there are 4 reasons when i think about it, but it mostly had to do with the way the forms were set up. Since I built this on a regular strongback, the forms had to be completely disassembled, flipped over and reassembled to build the deck, which introduced some of the error. The other issue is that I added a strip to the deck half to make the boat a little deeper which added in a little more uncertainty. Also, the stem forms must have been slightly mis aligned, adding a slight offset. Finally, i simply wasnt able to finish the stem tips exactly the same, and I had no good way to measure the exact length of the deck with it still on the forms.
If I had built this on a beam strongback, like many people build a strip kayak, all of this would have been avoided. If I ever build another one, I'll invest the time to make or buy a 2x4 beam. A rectangular aluminum tube, 2 x 4" and 16' long is upwards of $200, so a bit of an investment but probably worth it in the end since it would save a lot of time, which seems to be the biggest cost when building a strip boat.
Mark
Here's a quick update, mostly pictures. This project is coming to a close now. I have to say that I'm a bit surprised at the time and effort it took to build a decked canoe compared to a regular open canoe. From where I'm at, I think this is easily double the effort of an open canoe. The cockpit coaming structure is a big part of the extra effort, but a boat with two halves is like building two boats. The coaming rim alone was a significant number of steps and is not the equivalent of making and installing gunwales. I attached a link down below to a video I made of all the steps in building the coaming rim for anyone interested.
Enjoy! Mark
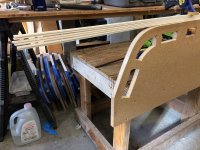
For the coaming rim, I ripped 3/16" strips of spruce and planed them down to about 5/32". After that, I cut them in half to make strips 3/8" wide, which was the starting thickness of the rim. I decided to make a form to bend them instead of doing it on the boat in case the heat had an effect on the curing epoxy. For a steamer I used some plastic tubing sent to me by one of the members on here, but I can't remember who it was. The tubing was hooked to an old kettle with radiator hose. It worked great. I bent the stems this same way, and is now my preferred way to bend gunwales and anything these days. The steam box doesn't work nearly as well. I might have been able to bend these strips using a heat gun, but the spruce is pretty dry and I didn't want to take any chances.
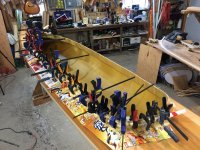
After drying, the bent strips were put in place on the canoe. I removed clamps in the center third and brushed epoxy all over the top of the strips. Then I worked epoxy into the spaces between the strips. I clamped that section and did the same to the front and rear. I used a heat gun to get the epoxy to flow into all the nooks and crannys at the end and let it set overnight.
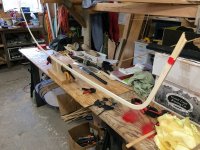
After doing the second side, the rim was ready to be installed on the canoe using thickened epoxy.
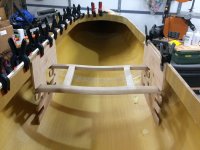
While the epoxy was setting on the rim, I used the time to experiment with the seat riser configuration and came up with this. I'll probably only ever use the center height, but there are two more just in case an adjustment is ever needed. Who knows.
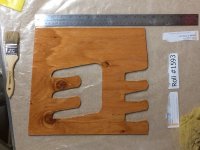
These are just the temporary seat risers, but I decided to put some leftover glass on each side to make them usable. They seemed a bit too flexible with glass only on one side.
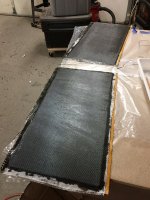
These are the panels I'll use for the final seat risers once I get some time in the temporary set. These are made of 1/4" birch plywood. Supposedly the glue is waterproof. I put carbon on each side and a layer of 4 oz glass. These 12 x 24" panels are really stiff and surprisingly heavy.

Back to the coaming lip. I trimmed the first side and laid second side on like this.
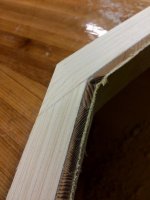
The Stern
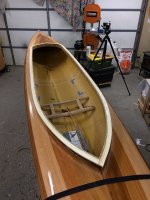
Coaming rim on and trimmed
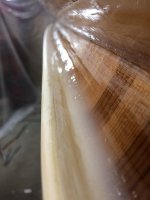
I put a heavy bead of thickened epoxy under the rim for support and to get the glass to wrap around the sharp edge.
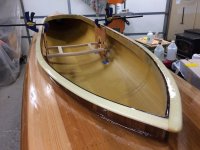
OK, I'm skipping pictures of a big part of the operation. I routed the inside edge using a roundover bit. The kevlar fuzzed up like crazy and dusted the shop with kevlar dust. I used a respirator during that part of the operation. I was able to use coarse sandpaper to remove most of the fuzz, but it ended up getting glassed over anyway, so was no problem. I also rounded over the outside edge using a block plane and sandpaper. I put 2 layers of 4 oz glass over the rim, which wrapped from below the fillet to up and over most of the way down the kevlar. That rim is strong as hell now, and I don't think I can break it. With all the overlaps, the coaming riser has 1 layer of kevlar on the inside in addition to 3 layers of 4 oz glass. The outside has 4 layers of glass. Crazy!
Here is a link to the video of making the coaming rim:
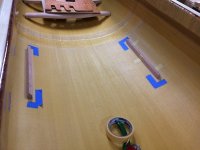
I decided that I want to have the seat riser removable, so I installed a couple of cleats on the floor in line with the coaming riser. These were epoxied down and then some 4oz glass was laid at the joint on either side of the cleat.
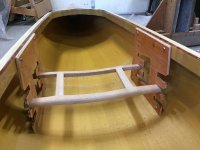
Temporary seat risers are installed with one of my seats. I'll probably add one or two more screws/bolts to these at each joint.
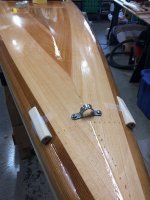
The jet propulsion system will need some fancy exhaust tips near the stern. I made these out of ash, but they'll be lined so they don't burn. They're a bit bright, so I'll probably stain them to tone it down a bit. Another option is to paint flames on them which I'm considering. As rudder cable exit points they're a bit overkill, but it's too late since they're already glued on.
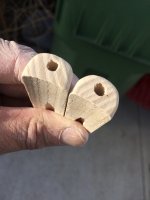
Here's what they looked like prior to installation. I had to go out and buy a 12" - 3/16" drill bit to get the angle to drill through these and into the hull.
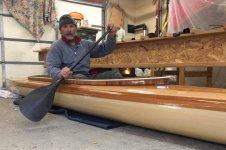
And finally the test sit. There I am, not feeling so well these days, but happy that I'm where I'm at with this build. I just need to install the foot braces and run the rudder cables and this canoe can be put on the water which I'll be looking to do in a couple weeks. The problem is that open water is difficult to find in Montana at this time of year. I'm willing to drive, so who knows where I'll end up.
Mark
Enjoy! Mark

For the coaming rim, I ripped 3/16" strips of spruce and planed them down to about 5/32". After that, I cut them in half to make strips 3/8" wide, which was the starting thickness of the rim. I decided to make a form to bend them instead of doing it on the boat in case the heat had an effect on the curing epoxy. For a steamer I used some plastic tubing sent to me by one of the members on here, but I can't remember who it was. The tubing was hooked to an old kettle with radiator hose. It worked great. I bent the stems this same way, and is now my preferred way to bend gunwales and anything these days. The steam box doesn't work nearly as well. I might have been able to bend these strips using a heat gun, but the spruce is pretty dry and I didn't want to take any chances.

After drying, the bent strips were put in place on the canoe. I removed clamps in the center third and brushed epoxy all over the top of the strips. Then I worked epoxy into the spaces between the strips. I clamped that section and did the same to the front and rear. I used a heat gun to get the epoxy to flow into all the nooks and crannys at the end and let it set overnight.

After doing the second side, the rim was ready to be installed on the canoe using thickened epoxy.

While the epoxy was setting on the rim, I used the time to experiment with the seat riser configuration and came up with this. I'll probably only ever use the center height, but there are two more just in case an adjustment is ever needed. Who knows.

These are just the temporary seat risers, but I decided to put some leftover glass on each side to make them usable. They seemed a bit too flexible with glass only on one side.

These are the panels I'll use for the final seat risers once I get some time in the temporary set. These are made of 1/4" birch plywood. Supposedly the glue is waterproof. I put carbon on each side and a layer of 4 oz glass. These 12 x 24" panels are really stiff and surprisingly heavy.

Back to the coaming lip. I trimmed the first side and laid second side on like this.

The Stern

Coaming rim on and trimmed

I put a heavy bead of thickened epoxy under the rim for support and to get the glass to wrap around the sharp edge.

OK, I'm skipping pictures of a big part of the operation. I routed the inside edge using a roundover bit. The kevlar fuzzed up like crazy and dusted the shop with kevlar dust. I used a respirator during that part of the operation. I was able to use coarse sandpaper to remove most of the fuzz, but it ended up getting glassed over anyway, so was no problem. I also rounded over the outside edge using a block plane and sandpaper. I put 2 layers of 4 oz glass over the rim, which wrapped from below the fillet to up and over most of the way down the kevlar. That rim is strong as hell now, and I don't think I can break it. With all the overlaps, the coaming riser has 1 layer of kevlar on the inside in addition to 3 layers of 4 oz glass. The outside has 4 layers of glass. Crazy!
Here is a link to the video of making the coaming rim:

I decided that I want to have the seat riser removable, so I installed a couple of cleats on the floor in line with the coaming riser. These were epoxied down and then some 4oz glass was laid at the joint on either side of the cleat.

Temporary seat risers are installed with one of my seats. I'll probably add one or two more screws/bolts to these at each joint.

The jet propulsion system will need some fancy exhaust tips near the stern. I made these out of ash, but they'll be lined so they don't burn. They're a bit bright, so I'll probably stain them to tone it down a bit. Another option is to paint flames on them which I'm considering. As rudder cable exit points they're a bit overkill, but it's too late since they're already glued on.

Here's what they looked like prior to installation. I had to go out and buy a 12" - 3/16" drill bit to get the angle to drill through these and into the hull.

And finally the test sit. There I am, not feeling so well these days, but happy that I'm where I'm at with this build. I just need to install the foot braces and run the rudder cables and this canoe can be put on the water which I'll be looking to do in a couple weeks. The problem is that open water is difficult to find in Montana at this time of year. I'm willing to drive, so who knows where I'll end up.
Mark
Looks great!
You have done a wonderful job of documenting your build, and it has been inspirational to follow along.
i really like the contrast of the different species of wood.
Very nicely done!
I look forward to hearing how you like it on the water.
You have done a wonderful job of documenting your build, and it has been inspirational to follow along.
i really like the contrast of the different species of wood.
Very nicely done!
I look forward to hearing how you like it on the water.
congrats on a fine build. Was fun for me to see someone else build one and how you approached the various challenges along the way. Canoe is beautiful, you did a great job.
Plenty of open water down in here in Fl. If you ever think about getting down this way give me a heads up and we'll put a trip together. There's always the Everglades, but there's also some remote coastal routes between Aucilla River and Cedar key, about 100 miles of Gulf paddling that I've been trying to get some friends to do with me. Saves you a drive all the way to the bottom of the state. I'll probably do a least a couple legs of it this year. Perfect route for decked canoes and great fishing along the whole route too. https://myfwc.com/media/1503/big-bend-saltwater-paddling-trail-overview-map.pdf. We have a couple fresh water rivers that can be paddled 70+ miles like the Suwanee and Withlacoochee in the same region, beautiful routes but a bit tame for decked canoes.
- eric
Plenty of open water down in here in Fl. If you ever think about getting down this way give me a heads up and we'll put a trip together. There's always the Everglades, but there's also some remote coastal routes between Aucilla River and Cedar key, about 100 miles of Gulf paddling that I've been trying to get some friends to do with me. Saves you a drive all the way to the bottom of the state.
- eric
G
Guest
Guest
I like the idea of making the seat risers removable. The ones in the Monarch are glassed of course, and the lowest position is a little low, the medium position just a touch too high, at least without a gear load and the top position useful only for the flipped over seat yoke.
I did not like that the Monarch seat was unsecured in the riser slots when the hull was upside down, didn’t want to take the seat out when car topping, or have it fall out in a (knock wood) capsize, so it is secured in place to the frame with bungee balls wrapped around the risers either side, inelegant but functional, and it doesn’t budge or even jiggle when on the roof racks.
One of the retrofitted decked boats has a webbing strap and side release buckle from the seat down to a D-ring. Less fugly looking, but not as zero-jiggle as the bungees.
I also like the idea of running the rudder cables through oversized exit guides. Even if you never need a 12 x 3/16 drill again.
Hoping you find that open water.
Yeah mike, I wanted to experiment with the seat heights and also have an idea for a portage yoke attachment, different from the Kruger. I’ll also use some kind of bungie to secure the seat.
Mark
Mark
Looking forward to seeing this beauty on the water! And the canoe too!
congrats on a fine build. Was fun for me to see someone else build one and how you approached the various challenges along the way. Canoe is beautiful, you did a great job.
Plenty of open water down in here in Fl. If you ever think about getting down this way give me a heads up and we'll put a trip together. There's always the Everglades, but there's also some remote coastal routes between Aucilla River and Cedar key, about 100 miles of Gulf paddling that I've been trying to get some friends to do with me. Saves you a drive all the way to the bottom of the state.I'll probably do a least a couple legs of it this year. Perfect route for decked canoes and great fishing along the whole route too. https://myfwc.com/media/1503/big-bend-saltwater-paddling-trail-overview-map.pdf. We have a couple fresh water rivers that can be paddled 70+ miles like the Suwanee and Withlacoochee in the same region, beautiful routes but a bit tame for decked canoes.
- eric
Thanks Deerfly, I'll certainly keep you in mind if I ever make it that way. I've never been to Florida, so maybe I'll have to go and see what all the fuss is about one of these winters.
Mark
Congratulations on a gorgeous boat! You've done a superb job of documenting and sharing your progress. I'm looking forward to seeing pictures of her on the water.
G
Guest
Guest
The problem is that open water is difficult to find in Montana at this time of year. I'm willing to drive, so who knows where I'll end up.
Mark, I saw a forecast of 60’s F in parts of Montana this coming weekend, and have my fingers crossed for an inaugural test paddle.
Last edited:
Mark, I saw a forecast of 60’s F in parts of Montana this coming weekend, and have my fingers crossed for an inaugural test paddle.
Saturday
Sunny, with a high near 60. Southwest wind 44 to 55 mph, with gusts as high as 70 mph.
The warm temps in the winter always come at a price here. I don't know if I'll even attempt to put the canoe on the car.
Mark
I got the canoe ready for its maiden voyage last week. Adding a little deck hardware, making a spray skirt and varnishing the whole thing is all that's left of this project. I thought about trying to get the canoe on the water on Saturday, but the wind might be too strong. The Yellowstone River is just down the street, but the flow is just a tad too strong in the town section for a first time paddle. I'll likely head up the valley to an access point with calm water since I'm worried about the hull being a little bit twitchy. I really don't want to go for a swim in January. I should probably pull out the dry suit and make a day of it.
Here's what I did to finish out the boat.
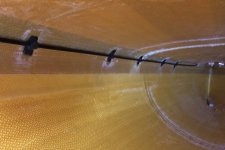
I attached the plastic rudder cable guides with small patches of epoxy soaked polyester fleece. I worked the pieces into place with a small brush, then when the epoxy started to harden I layed on some peel ply and smoothed them out. This worked really well and keeps the rudder cable guides tight against the hull so they won't interfere with luggage.
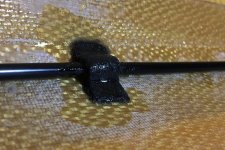
A closeup. If I ever needed to remove these it would probably just take a sharp chisel on each one.
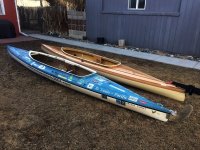
Locating the rudder pedals was a bit of a pain in the arse. It was almost impossible to get a sense of how they would feel on the water. I'm a little worried that I won't like where they are, and it will be a pain to move them now since the posts are epoxied to the inside of the hull. Like anything with these boats, they can be cut and chiseled off and moved if necessary.
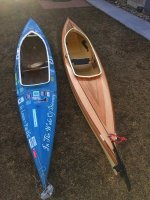

Next to its brother and all ready for the water.
Mark
Here's what I did to finish out the boat.

I attached the plastic rudder cable guides with small patches of epoxy soaked polyester fleece. I worked the pieces into place with a small brush, then when the epoxy started to harden I layed on some peel ply and smoothed them out. This worked really well and keeps the rudder cable guides tight against the hull so they won't interfere with luggage.

A closeup. If I ever needed to remove these it would probably just take a sharp chisel on each one.

Locating the rudder pedals was a bit of a pain in the arse. It was almost impossible to get a sense of how they would feel on the water. I'm a little worried that I won't like where they are, and it will be a pain to move them now since the posts are epoxied to the inside of the hull. Like anything with these boats, they can be cut and chiseled off and moved if necessary.


Next to its brother and all ready for the water.
Mark
Patience is a Virtue ! Wait for Spring ! I'd hate to hear the world lost another canoe builder !!!
That's a great use of Polyester Fleece !
I've been using it as a replacement for Kevlar wear strips. It's not as durable as Kevlar, but it's machine ability, and thickness will add a lot of resistance to wear.
Stunning looking boat Mark !
Jim
That's a great use of Polyester Fleece !
I've been using it as a replacement for Kevlar wear strips. It's not as durable as Kevlar, but it's machine ability, and thickness will add a lot of resistance to wear.
Stunning looking boat Mark !
Jim
No paddling today. Even though we're supposed to get up to 61(f) today, having wind gusts in the upper 80mph range now. No thanks.
Similar threads
- Replies
- 13
- Views
- 2K
- Replies
- 46
- Views
- 5K
- Replies
- 78
- Views
- 10K
