-
Happy Winter Solstice! 🌇🌃
You are using an out of date browser. It may not display this or other websites correctly.
You should upgrade or use an alternative browser.
You should upgrade or use an alternative browser.
Decked Kruger Seawind style build
- Thread starter dogbrain
- Start date
Could you put a bag into the space and fill that with spray foam... it would take the shape perfectly but still be removable. Saves the time of having to shape a foam block.
Karin
Karin
Wow, not sure how I missed this build! Fantastic, that boat is a thing of beauty!
Could you put a bag into the space and fill that with spray foam... it would take the shape perfectly but still be removable. Saves the time of having to shape a foam block.
Karin
Wow Karin, that's an awesome idea. Thanks.
G
Guest
Guest
Hey Mike, thanks for the suggestions. I'm going with a standard Kruger style spray skirt with the two zippers that radiate outward towards the font from the paddler, and I'll make the cross ribs that slip into pad eyes mounted on the coaming risers. It will be snapped into place since I don't think any kind of bungee system would hold it on in any kind of serious wave.
My friend has a standard 6-gallon bucket with a screw top lid that he jams forward in his boats. It fits perfectly and goes all the way almost to the foam flotation. All the cooking gear and tools go in that bucket and it doubles as a camp stool.
Mark, no doubt a rec kayak Harmony/Wilderness system spray skirt would implode with a dumping wave, and the Kruger system is far more dependable in those conditions. I am not a fan of spray skirts with tunnels, and even in rainy conditions usually chose not to wear one. Big waves dumping on the decks see me off the water in any case.
But I am a fan of cockpit storage covers for use in camp, especially with a decked & ruddered hull that I don’t want to flip over to occlude rain collection. The simple bungie randed Harmony/WS storage cover works to keep rain out even when coated nylon puddle stretched, although I cock the hull over sideways for a bit of puddle drainage. (Those bungee rand storage covers will implode if an inquisitive Everglades raccoon plays trampoline atop)
The CCS covers on our canoes are bow and stern partials, but I have a center “cockpit” cover for that in-camp use, although for a no-puddle, no-sag storage cover something other that stretches-when-wet coated nylon would be advantageous.
 PA060099 by Mike McCrea, on Flickr
I really like being able to leave all of the paddling gear safe and dry in the canoe while in camp; I have enough stuff to haul up to camp, and don’t need to haul the paddling gear back and forth when camp is 100 yards away. If I decide to do a spur of the moment day paddle away from camp everything is at the ready.
We have some Cur-tec wide neck drums that fit wonderfully under the Monarch (and other) decks, but even so they are round pegs in triangular spaces. A couple of our decked canoes will accommodate a 30L blue barrel behind the seat (one fits a 45L barrel), which is where I’d prefer the weightiest gear.
We once used (lightly loaded) small dry bags or sea kayak sized tapers in the stems of our decked canoes; the sea kayak tapers didn’t fill the vee, and the cylindrical dry bags were another round peg of wasted space. I was astonished at how well a DIY heat sealable tapered bag, custom sized for the girth of the stems, packed and filled the space, and if restrained in the stems occlude water like a flotation bag.
Test fit of a custom sized DIY heat sealable tapered bag in the stern of the Monarch. I learned that I could stuff that taper more bulbous full and it fit even better. It is not a complete V taper, more of a \_/ unpointy at both ends. I put the fold over side buckle opening at the narrow end; the opening is still plenty big enough to easily pack/extract clothes and other light-weight gear.
 P8111156 by Mike McCrea, on Flickr
One Kruger outfitting touch that I have come to love, and replicated on all of our decked canoes, is having pad eyes or other tie downs under the deck. Pretty much anywhere there is a fitting on top there is a fitting underneath; I’ve already drilled a hole in the deck, might as well use it for something on the underside.
I am envious of the build and looking forward to seeing the outfitting design.
G
Guest
Guest
Could you put a bag into the space and fill that with spray foam... it would take the shape perfectly but still be removable. Saves the time of having to shape a foam block.
Looking at the symmetrical blob shapes of the (I think undersized) OEM floatation in the Monarch I’m guessing the foam was sprayed directly into the hull. Or maybe sprayed into some shape-specific container?
 P8071119 by Mike McCrea, on Flickr
 P8071120 by Mike McCrea, on Flickr
One possible caveat with spraying expanding foam into a bag; I tried to make a cylindrical foam block using hardware store expanding foam sprayed into an old 10L dry bag. Even with the bag left open the center of the foam never set up and I had a gooey jelly donut of a cylinder. It might have worked better had I sprayed it in an inch or two at a time.
I wonder what spray foam Kruger and MRC used, and how they laid the spray down? Ubiquitous “Great Stuff” didn’t work when I tried to fill the little dry bag all at once, and I’m not sure how well something like Great Stuff does with water exposure. The floatation in the Monarch is harder than Great Stuff, even where I’ve poked it with paddles and tarp poles, more durable & water resistant. That floatation is 28 years old, so whatever they used it worked.
Might be worth some trial and error somewhere else before spraying expanding foam in the stems.
It would be a Bugger if you ever had to make any repairs in the ends, with foam adhered in them !
Doing any work inside the stems on a decked canoe is a PITA. I laid some glass tape far up in the bow stem as reinforcement for a Pacific Action sail. The only way to lay the glass was “roller on a stick” trick awkward and I still had to crawl part way inside. Installing hardware under decks was worse; I had to rest the boat one stem on tall sawhorses and one stem on the shop floor, positioned /, and lay diagonally inside the hull.
If the spray foam proves unacceptable I’d carve a fitted minicel wedge and just affix it in place. Could be another use for a couple minicel Yoga Blocks glued together and band saw shaped.
 PB220043 by Mike McCrea, on Flickr
Before canned foam almost 40 years ago we'd use a two part expandable foam for end floatation in Old Town royalex boats. Seal with tape, tip them on their endas, and pour it in. No problems with curing.
Cockpit opening and Coaming
I traced out the cockpit opening from the Sea Wind onto craft paper and used some battens to fair out the curves. I put down some masking tape and followed the line on one side and flipped it over for the other.
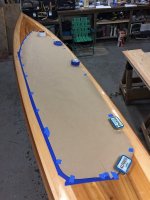
I used a jigsaw to cut out the hole. I got a little tear out on the bottom before I realized I shouldn't be cutting into the grain. It will all sand out and be covered anyway, so no big deal.
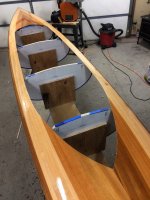
I'm using the same method to build the coaming riser that Deerfly used in his build. It just involves stripping the coaming all the way around the cockpit opening. It sounds a bit tedious, but for some reason my brain really enjoys this type of thing. It took a total of 270 strips between 3 and 3-3/4" long to get all the way around. I used about 70 linear feet of 3/4" bead and cove strip.
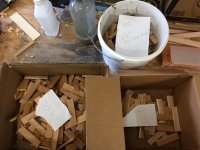
I used some birch dowel to get things started at the bow, then it's off to the races. Once you get the hang of it the whole process goes quickly.
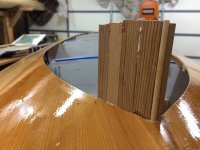
later that day..........................
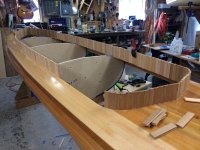
I removed some of the forms to make things a bit easier, and notice how I had to notch the remaining forms to make room for the riser strips.
Here's a short video I made showing how it's done.
Sanded and ready to be glassed.
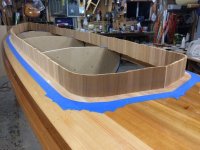
First I added a filet of thickened epoxy so the glass could make the tight bend. Being a bit skeptical at how strong this will be, I ended up using 6 oz glass for the first layer, and added another layer of 4 oz. This boat will be transported upside down with the coaming on the rack, and I want the coaming to have a chance at surviving the weight of me falling on it. Don't worry, the riser will be trimmed down below where the glass ends.
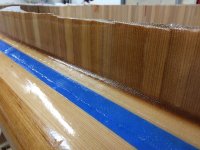
I finally was able to use Nick Schade's method of overlapping a glass layer onto masking tape, then using a razor blade to trim when things are still a bit soft. I have to say that I like the clean edge it leaves without all the little straggling fibers. This will save some work later on, which I am really trying to do on this build.
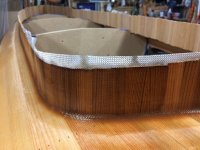
OK, another money shot of the deck and hull together. I know, that coaming looks pretty tall, but it will be trimmed down to about 2" all the way around and will grade a little higher towards the bow. It looks like I've got about 1/4 to 3/8" more total length in the hull, so I'm going to have to do some trimming after putting the two halves together.
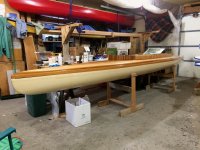
I was originally worried about the strength of a coaming built with vertical cedar strips, but it's pretty rigid now. With a layer of kevlar and glass on the inside of the coaming I think it will be bomb proof.
Next, sanding and glassing the insides of both halves.
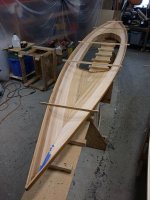
I traced out the cockpit opening from the Sea Wind onto craft paper and used some battens to fair out the curves. I put down some masking tape and followed the line on one side and flipped it over for the other.

I used a jigsaw to cut out the hole. I got a little tear out on the bottom before I realized I shouldn't be cutting into the grain. It will all sand out and be covered anyway, so no big deal.

I'm using the same method to build the coaming riser that Deerfly used in his build. It just involves stripping the coaming all the way around the cockpit opening. It sounds a bit tedious, but for some reason my brain really enjoys this type of thing. It took a total of 270 strips between 3 and 3-3/4" long to get all the way around. I used about 70 linear feet of 3/4" bead and cove strip.

I used some birch dowel to get things started at the bow, then it's off to the races. Once you get the hang of it the whole process goes quickly.

later that day..........................

I removed some of the forms to make things a bit easier, and notice how I had to notch the remaining forms to make room for the riser strips.
Here's a short video I made showing how it's done.
Sanded and ready to be glassed.

First I added a filet of thickened epoxy so the glass could make the tight bend. Being a bit skeptical at how strong this will be, I ended up using 6 oz glass for the first layer, and added another layer of 4 oz. This boat will be transported upside down with the coaming on the rack, and I want the coaming to have a chance at surviving the weight of me falling on it. Don't worry, the riser will be trimmed down below where the glass ends.

I finally was able to use Nick Schade's method of overlapping a glass layer onto masking tape, then using a razor blade to trim when things are still a bit soft. I have to say that I like the clean edge it leaves without all the little straggling fibers. This will save some work later on, which I am really trying to do on this build.

OK, another money shot of the deck and hull together. I know, that coaming looks pretty tall, but it will be trimmed down to about 2" all the way around and will grade a little higher towards the bow. It looks like I've got about 1/4 to 3/8" more total length in the hull, so I'm going to have to do some trimming after putting the two halves together.

I was originally worried about the strength of a coaming built with vertical cedar strips, but it's pretty rigid now. With a layer of kevlar and glass on the inside of the coaming I think it will be bomb proof.
Next, sanding and glassing the insides of both halves.

Kevlar on the inside.
I started by putting a filet of epoxy in the very tip of the deck, then laid in a strip of glass tape along the center line. Notice that I don't have a hardwood stem on the deck like I did on the hull section. I added a small piece of Kevlar in the very end to make wetting out the larger areas a little easier.
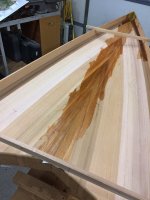
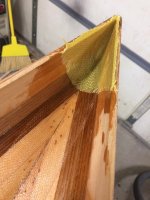
I experimented enough with the kevlar last week to determine that it is a bit more difficult to wet out than standard fiberglass, so I decided on doing an initial wetout coat to make sure the wood got what it wanted in terms of the epoxy.
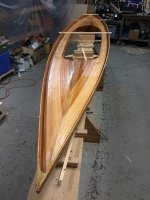
5 hours later here's what I had. I was surprised how long it took for me to get everything in place and all the kevlar down. I didn't realize how much more time it would take to get the area around the coaming wet out using just a brush compared to just pouring the epoxy on the fabric and moving it around with a squeegee.
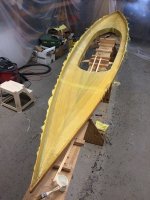
Here's a video of part of that process
To add additional strength and weight, I added a layer of 4 oz glass around the cockpit opening.
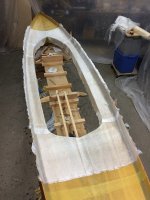
Some of you might be asking. What the hell is he doing? Why does the deck need all this reinforcement? I don't have a good answer. In retrospect I would eliminate the strip of glass along the centerline and the kevlar out towards the ends and use glass instead. In my defense, the boat will need to be transported upside down with the coaming resting on the roof rack. I'm also concerned about my weight falling on the coaming or the deck at some point. Still, I admit it is overkill.
Mark
I started by putting a filet of epoxy in the very tip of the deck, then laid in a strip of glass tape along the center line. Notice that I don't have a hardwood stem on the deck like I did on the hull section. I added a small piece of Kevlar in the very end to make wetting out the larger areas a little easier.


I experimented enough with the kevlar last week to determine that it is a bit more difficult to wet out than standard fiberglass, so I decided on doing an initial wetout coat to make sure the wood got what it wanted in terms of the epoxy.

5 hours later here's what I had. I was surprised how long it took for me to get everything in place and all the kevlar down. I didn't realize how much more time it would take to get the area around the coaming wet out using just a brush compared to just pouring the epoxy on the fabric and moving it around with a squeegee.

Here's a video of part of that process
To add additional strength and weight, I added a layer of 4 oz glass around the cockpit opening.

Some of you might be asking. What the hell is he doing? Why does the deck need all this reinforcement? I don't have a good answer. In retrospect I would eliminate the strip of glass along the centerline and the kevlar out towards the ends and use glass instead. In my defense, the boat will need to be transported upside down with the coaming resting on the roof rack. I'm also concerned about my weight falling on the coaming or the deck at some point. Still, I admit it is overkill.
Mark
I have a tendency to over build a little !
Better than being out in the middle of no where, and hearing an ominous CRACK ! come from the hull .
Yes, maybe Kevlar is overkill, but it shouldn't weigh any more than say E-glass.
I suck at laying out, and trimming cloth. Especially Kevlar.
Yours looks great however !
Jim
Better than being out in the middle of no where, and hearing an ominous CRACK ! come from the hull .
Yes, maybe Kevlar is overkill, but it shouldn't weigh any more than say E-glass.
I suck at laying out, and trimming cloth. Especially Kevlar.
Yours looks great however !
Jim
Jim, this was really my first experience with Kevlar and even though the layup went fine I was surprised at the time it took, and the amount of resin it seemed to take. I wish I would have kept track of that.
I have a tendency to over build a little !
Better than being out in the middle of no where, and hearing an ominous CRACK ! come from the hull .
But there's also the possibility of being in the middle of nowhere and hearing an ominous CRACK! come from your back.
Alan
But there's also the possibility of being in the middle of nowhere and hearing an ominous CRACK! come from your back.
Alan
Yes, when I go to pick up this thing.
Thanks Sven, 50 to 65 lbs according to JEM. A real all Kevlar sea wind is in the 65# range. This canoe will probably fall under that, hopefully under 60. It will certainly be strong enough, but the Kevlar will add weight compared to if I had used all glass. I think you could build one in the 50# range, but the deck and extra hardware related to the rudder would make it a challenge.
Mark
Mark
Mark, fwiw I can get in and out of mine on dry land by resting my full weight (215lbs) with my hands on the combing like parallel bars. I can sit anywhere on my deck too and not be concerned. Admittedly I purposely over built mine, but I still came in under 60lbs. To me over building made sense for an expedition canoe. I don't think you'll regret a little extra material on that deck.
Jim, I trimmed the Kevlar with a razor knife after the epoxy hardened. This required changing the blade frequently and of course it didn't really work at all where the Kevlar wasn't totally saturated. After that, I ran my freshly sharpened block plane along the edge. It was able to take care of most of the edge, but it did leave a bit of fuzz in some places. I used 120 grit sandpaper along that Kevlar edge and it was able to remove the Kevlar fuzz. I was surprised that worked and didn't make things worse.
Everything came out fine with the Kevlar but I learned a bit too and would be a little more discriminating with regards to when and where to use it in the future. One thing stands out, I am really glad that I seal coated the wood before laying the Kevlar. With it being significantly more difficult to get it the cloth fully wet out, I would be afraid there would be a lot of resin starved patches otherwise.
Mark
OK, back to glassing the inside. After my experience with kevlar on the inside of the deck, I again decided it was best to do a seal coat on the inside of the hull. It went quite well, but was a little frustrating with the added time to wet out the kevlar cloth. It seemed that even when I thought it was all wetted out, it really wasn't stuck to the hull. I had to mix a few micro batches of epoxy to get everything soaked. I don't think I would ever consider doing kevlar on wood without a seal coat on the wood first.

Here's the finished product with an extra layer of 4 oz cloth around the seat area. With the Kruger style seat risers it seems prudent to reinforce that area since the hull will only be able to flex between the risers since they are glassed to the bilge area. Again, maybe overkill but the weight penalty here is minimal. Trimming the kevlar edges is a bit of trial and error. I explained how I did these to Jim Dodd in a post above.
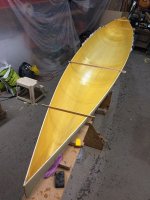
I epoxied some ash blocks to the underside so I can attach some deck eyes before putting the two halves together.
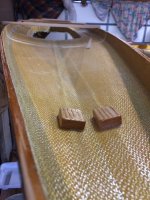
These are the same thing used on a Kruger Sea Wind. The stern eye doubles as a guide for the rudder drop line and stern painter.
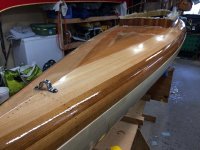
Both halves of the hull ready fo join.
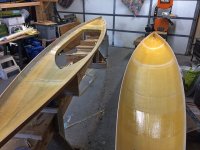
The two halves fit pretty well but there are some issues with it lining up at the ends. Most of this is because I need an extra set of arms to hold it while another set tapes, I can't do it by myself, so a friend is coming over today to help coax this thing together.
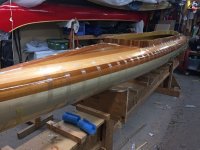

Here's the finished product with an extra layer of 4 oz cloth around the seat area. With the Kruger style seat risers it seems prudent to reinforce that area since the hull will only be able to flex between the risers since they are glassed to the bilge area. Again, maybe overkill but the weight penalty here is minimal. Trimming the kevlar edges is a bit of trial and error. I explained how I did these to Jim Dodd in a post above.

I epoxied some ash blocks to the underside so I can attach some deck eyes before putting the two halves together.

These are the same thing used on a Kruger Sea Wind. The stern eye doubles as a guide for the rudder drop line and stern painter.

Both halves of the hull ready fo join.

The two halves fit pretty well but there are some issues with it lining up at the ends. Most of this is because I need an extra set of arms to hold it while another set tapes, I can't do it by myself, so a friend is coming over today to help coax this thing together.

Similar threads
- Replies
- 13
- Views
- 2K
- Replies
- 46
- Views
- 5K
- Replies
- 78
- Views
- 10K
- Replies
- 10
- Views
- 918
