• Happy National Pfeffernusse Day! ⚪🇩🇪😋

cutting strips

Just an update, as I know many new builders, and Old are waiting for warm weather to start cutting strips !

I picked up a great bargain on a Skil Brand Skilsaw, and so I set it up for cutting strips. It's a 15 amp saw (good !), and a magnesium base, that takes little effort to push the saw down a plank ! The base seems ridged, unlike a Dewalt saw I checked out.There was more play on the Dewalt than I was comfortable with. Pass on the Dewalt for that reason !

After trying my set up I decided I used too thin of an aluminum angle ! I recommend a 1/8" thick 3/4" x 3/4" x 12-15" piece. I always trim one side of the angle down to 5/8". This insures plenty of clearance on the cleats that support the planks . I tried to Cheat and use a thinner aluminum angle, that I had, it was too flimsy ! A mistake, I hope others don't make my mistake.

Use a decent caliper and accurately measure clearances between the blade and fence, for smoothly cut strips ! No need to plane to thickness !
Once I set up a saw, I hate to change, unless it leaves saw marks on the strips !
I will use this saw to cut gunnels, and so I set it to cut 3/8" Ash strips.
 
Last edited:
Guess I can chime in a little on this thread ..... Jim, a good saw makes a world of difference for this method and it is not restricted to just strips or 4/4 wood. I use it to make strips for all sorts of things, after all .... gunnels are just strips. I have ripped up 8/4 ash strips for steam bending to be used in furniture, it is just an overall good technique to add to the work shop repertoire.
Some points:
- use a thin kerf blade with few teeth (I would say max 24 tooth or less)
- the guide should be kept shorter, extending past the saw bed by no more than a few inches (this short guide is the key to the consistent cuts IMO, it even follows a warped board)
- I use 1/16" aluminum, which I find works well (sorry Jim, I think 1/8" is pretty HD ... in reality it was my neighbor had on hand and it works for me)
- at the front of the aluminum guide piece, where it rides on the wood edge, bend the corner back a bit ... this prevents it from jabbing into the wood, makes it run smoothly along the edge

When possible, I like to use rough lumber to make strips, this presents some challenges as a support board of the correct thickness isn't always an option, when I get down to the last strips .... the easy way around this ..... I just line up all the pieces on the strongback and edge glue them, before I start. Now I have essentially one wide piece to work with and it is only the last piece that may have a little wastage.

To hold the planks in place while sawing, just clamp a couple of additional pieces that stand proud of the sacrificial strips, think backrest .... to keep it moving forward and back, add a scrap piece to the last sacrificial that is just proud and an inch from the inside edge .... now your plank is held from moving and you can cut all your strips in one go. The stop pieces cannot extend past the thickness of your strip wood, so "proud" is limited to a little less than the plank thickness.

The blade selection is also worth a mention (some may not already know). Strip cutting is a ripping operation, the fewer the teeth on the blade the better. I have read on other forums where the poster was using a very fine blade to cut strips and was having a few issues of heating and binding, but refused to consider anything else because " a fine blade, gives a fine finish". When ripping you are creating longer cut fibers (and longer cuts) and more space/room is required for the dust to clear the blade, so fewer teeth creates larger gaps between teeth, increasing the blades ability to remove the sawdust it is creating. Any blade marks are dealt with during the finishing/sanding phase later in the build and the only reason IMO to plane or smooth is for thickness purposes, not a better finish.
The thin kerf blade actually removes less wood, which eases the loading on your saw (less wood = less work) and will give you more strips per board.


Brian
 
Great advise Brian!
Yes ! I've edge glued planks several times ! More recently 1" x 4" were glued for a 1" x 12"plank !

Here is one of those pics I tried to post earlier.


IMG_2031_zpswo422ema.jpg


Jim
 
Last edited:
Adding that little bend at the leading edge of the aluminum guide, like a sled runner, keeps the guide from digging in and makes it run more smoothly over the edge. Hope this pic is clear enough to show it:

OtcmUmaV5ajNFNWKrUIid-8K-Q24b8ufE0_pOo9yjAk9yVmDnCGe2Y_BfXCgwdbfvbmj0a8sZwncl1rq-IaEcTQG-gGCKKZTwXGcyFxx7zNjO8aPUrxWpFTpnKXIjCif2QSdBC-WhTz1tNnxnMuxxK3nalGJmTnIwraJ8CfXyNcW4ytamKp_C1ZjV1sB6NxelCCCPUUDdXk2zAdBntB0z6KffZZQ8dE_YGoARO1_nPv7g2AlPQ7asbyJgjUmeJns38sGpS-4nCEzDECr0uSV5GKUT17DnKSG4hT5Ge_2T3JuSTWxWnULFqnYv3aHzKbca98Oredm6tebIZOdt7aVggKmfJxfsvK_bkKMew7UqA2bdm0P7aznF54l_LqVE3svjd4qM3PeeC3TGU47NjKNUBhFe3sj-oF24Rnd71G0huEN7AHr7N1KQeCEqUFslXwvh3gCwYehi-9LOs3pxCV48gPyNjIDf9vgJ2eB-xj_UnL0PJrW0-7Xr5kVy-060FqCoVTpRjdtICuw2A-4hDDrdkLQZi1RqjNG7h5I2SZfTCMjYrFTXC3851z1BZkZt06hqGqURbLqoqCFVh3BlKm1LLnt2ExslBysTwoPnw7pgKXvxLdWrVQD741Dw4Z_SZOmAGgj2YPNVtP8DgQ7NR9zoGbViI1ykxaet8RfdbqkrbAB0MRt1HhzYw=s893-no
 
Last edited:
A strongback is a great aid in building a canoe ! I cut my strips on it, I cut my gunnels on it, using a different saw, but the same setup . And I glue up my accent strips on it. Multi-task ! Oh and it even holds my forms while stripping .

I started bead and coving my strips on my fourth canoe. I slapped my self for not doing it on all of them !!!

I bead and cove a little different than others, but I'll bring that up in another post !


Thanks

Jim

Jim, any pictures of the differences between bead and coving and not that you could share? At some point I will build a boat. Already have all the books but the one major component missing is the time. I suppose when all three of my kids are off to college then I will have plenty of time. Anyhoo, curious about the aesthetics of a finished boat when it has been bead and coved and not bead and coved.
 
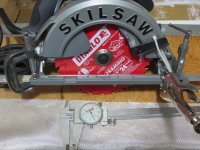
Here is a pic of my current saw setup. It is soo simple and effective. When choosing a saw for cutting strips, any saw with at least 13 amps is acceptable.
For the blade I prefer Feud Diablo. It has a thin kerf, and it's a quality blade.
The fence is a 3/4"x3/4" x1.8" aluminum angle. I trim the side that runs against the plank down to about 5/8". This insures that my fence does not catch on anything in case my plank is less than 3/4", and most of them are.
Two C-clamps, and I'm ready to adjust the width of cut.

This system produces the best strips, and at a minimal cost.
The whole setup is less than $100.

Jim

I have a large Delta Unisaw that I had envisioned would be perfect for ripping my cedar strips someday. I am curious how the irregularities are realized if the fence is accurate. Obviously, the skill saw is the preferred choice by many and I would like to know what "went wrong" to seek out alternate cutting methods for accuracy and precision. Have to admit...I am a little saddened to learn that my table saw will not be up to the task for my future project.
 
The skil saw has a short "wheelbase" and is able to uniformly follow the edge of a board that that may not be or stay perfectly straight. The fence on a table saw is much longer. When a board is ripped that crowns away from the fence thinner strips result.
 
There are several advantages to the Skilsaw method. But accuracy and ease of doing it are the most important ! Cost is another.

A Tables saw with a power feed, and long in feed and out feed tables, is just not practical for a Hobby builder. Nor does it do any better than a Skilsaw !

Bead and cove as compared to hand beveling. B&C will keep the strips in place, where beveled strips can, and do slip out of place. I've been there and done that !

B&C provides more surface for glue. I use very little glue with B&C, which saves a lot of scraping and sanding especially on the inside ( which is where the real pain is !)

If you lift a canoe over head in the day light. You will see gaps between the strips. Not so with B&C. Most will argue that's not a problem ! I agree. I just don't like seeing the gaps !

I would only consider a tablesaw if I was cutting 2X stock. You will have more waste, but if you can't find 1X stock ? A tablesaw will do it !

I hope that helps !

Jim
 
Save the tablesaw for furniture work !

I use the Skilsaw to cut my Ash gunnels also !

Jim
 
I know the skilsaw method works great but I have a good tablesaw setup with in/out feed tables in a nice sized shop with dust collection so that's what I use. I make sure the board has a straight edge before starting, which most of them do. Even if it's a little crooked it will follow the fence ok if you have the outside of the bow against the fence.

Sometimes part way through a board something will go a little wonky so that your straight edge isn't any more. Then I just flip the board over and start running the other side against the fence.

Alan
 
Will be giving the Skilsaw a whirl in a couple of weeks - the big draw for me is that I won't have to run 30 odd feet of in and out feed tables from the back of my garage halfway down my snow covered driveway. But I have to figure out the dust control part - I am sure there will be lots, as you have mentioned Jim. Thinking about some kind of shroud over the cutting table to at least direct most of it along a well-defined space on the floor, where it can be easily shop-vacced up before my wife gets home and claims the space for her car. Maybe just a tented tarp strung from the ceiling or some poles at either end of the table will do it - worth a shot I think.....
 
Don't over think it Traveler, it's a skilsaw and shrouding will be a tough thing to try. I would put everything away, with an eye to cleanup, get a good dust mask and have at it. Then sweep and blow out your work area.

Brian
 
Yes. I've cut all my strips outside. The strips won't touch the ground, if I'm concerned about getting them wet.

The dust is swept up, and spread around the foundation of the house. Supposed to deter fleas and ticks. Never had a problem with either, so I can't vouch for it's effectiveness.

A Dust mask is mandatory, outside or inside ! Glues and eye protection should be mandatory also !

B&C depends on accurately cut strips, and the Skilsaw will do it , for less money invested in tools, less time, and with less waste.

I've traveled and cut strips for friends with my skilsaw in the back seat of a car. Do that with a tablesaw and to feed tables !

Yeah, I'm sold on the Skilsaw method of cutting strips ! Can you tell ?


Jim
 
Dogbrain, grass is a distant memory here - thought about setting up in my backyard but not keen about the prospect of running extension cords across potentially wet snow. But I did find a dust hose adapter on Amazon to connect my skilsaw to a shop vac - reviews range from "better than nothing" to "great", so it should at least help. At the end of the day I will probably have to just dive into it per Cruiser's point - won't start until January so should be used to blizzards by then anyway (har har).

On another point, is there any reason why I can't stack two boards and double my production per run with the saw? Jim, have you ever done it this way?
 
thought about setting up in my backyard but not keen about the prospect of running extension cords across potentially wet snow

I don't see where that would be a problem other than possibly tripping a GFCI outlet/breaker if water gets into the terminals.

Alan
 
Dogbrain, grass is a distant memory here - thought about setting up in my backyard but not keen about the prospect of running extension cords across potentially wet snow. But I did find a dust hose adapter on Amazon to connect my skilsaw to a shop vac - reviews range from "better than nothing" to "great", so it should at least help. At the end of the day I will probably have to just dive into it per Cruiser's point - won't start until January so should be used to blizzards by then anyway (har har).

On another point, is there any reason why I can't stack two boards and double my production per run with the saw? Jim, have you ever done it this way?

First off, use common sense when ever you do anything. I have no control over what you may be doing, and so I want to present a disclamer. I'm not responsible any injury you incur !

I cut strips one Winter. It was on cleared cement, and a decent day. Nice days in Ottawa might be a long time coming ! I set my saw on a 5 gallon bucket. It stays out of any snow. Tape the plug, and I'd call it safe. Obviously use a good cord. I use a 12 guage three prong.

Shop vac filters clog up quickly ! I clean the ones at the shop constantly. A home made cyclone dust collector would be a good idea !

Stacking two planks would increase any blade deflection, and thus more variation in thickness, especially on the bottom plank. The blade would also have more dust to clean out of the kerf, needing more HP. I'd stick to one at a time . A good question though !

I've been trying to post some pics, but Photobucket is not cooperating !

Good Luck !

Jim
 
Jim, any pictures of the differences between bead and coving and not that you could share? At some point I will build a boat. Already have all the books but the one major component missing is the time. I suppose when all three of my kids are off to college then I will have plenty of time. Anyhoo, curious about the aesthetics of a finished boat when it has been bead and coved and not bead and coved.


I'm struggling with Photobucket.So pics are hard to come byright now.

A few thoughts that will save you time. Build a stemless canoe, use staples ( Some may disagree with that last one ) Be minimal when applying glue to strips ! Bead and Cove your strips.
Maybe have the kids lend a hand ! ! I always say a Family that strips a canoe together, stays together ! Ha !

Spend some time searching forums for ideas. We all build differently. Through trial and error I've developed my methods. and they work for me.

Good luck !

Jim
 
I would suggest you don't try and stack the boards, it just complicates the process. With a single board, you can use a spare or extra board to form an extended bed allowing you to cut strips right to the end of a board, leaving little waste.

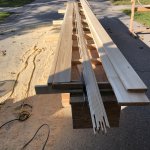
Earlier this fall, I prepared strips for the winter build, you can see in the pic a) a simple way to hold the boards, using small strips at an angle to prevent them sliding "in" and b) a second strip to hold them for sliding with the saw. You can make strips to almost the end of a board this way.

If you try and stack those boards, it will just get messy, trying to keep them from sliding on each other, properly supporting the saw when they get narrow ... if they slip at all, you have uneven strips ... it would likely be more work getting a double board setup working well than just getting it done. At this point in the pic, dragging out the strongback, setting up and cutting 78 strips took 3 hours ... in the context of a build, that is very little time.

Just my $.02

Brian
 

Attachments

  • photo13816.jpg
    photo13816.jpg
    619.3 KB · Views: 1
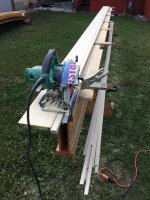
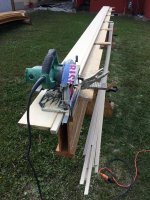
Just thought I would throw in a picture of cutting strips in my yard. I taped a little cardboard deflector on the saw where the dust comes out. It helped a bit with keeping the sawdust spraying directly on me.

IMG-1711.JPG

I don't have to sweep up anything, just rake it around a little and it disappears into the grass. Last winter I cut strips on the shovelled side walk and used the snow shovel to throw the sawdust into the snow covered yard.

Mark
 

Attachments

  • IMG-1711.JPG
    IMG-1711.JPG
    515.9 KB · Views: 1
Back
Top