• Happy Apple Cider Day! 🍎🍵

Another Kite Canoe Build

I keep meaning to get a long sanding board but I always use my random orbital instead. I usually use 100 grit to start flattening the surface and then 120 grit. I'll usually cut into into cloth in a few places so after I'm done sanding I give a really thin coat, as this as I can get it, of epoxy to seal everything up. After it cures I scuff sand it before varnishing.

Alan
 
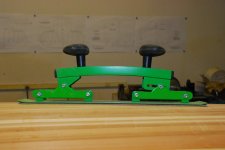
Last year or so I bought one of these, if you're even mildly interested, I can look up where I got it.
I sanded almost the entire exterior of my Kite with this, by hand. It really didn't take very long and it produced a very, very, fair hull.


DSC_1106.JPG


But back to your bubbles...I looked upthread in your descriptions, but didn't notice where you said you squeegeed the initial wet out.
You did squeegee it, right? Any epoxy can become air entrained, by the act of mixing in the hardener, or exuberant use of a roller. If that air is not forcibly removed, then it will work its way to the atmosphere at its own pace. Unfortunately, that pace is usually slower than the time it takes for the resin to kick. Any pin holes below the resin will also create bubbles, same for an increasing temperature as the laminate cures.
I know Jim and Alan keep an eye on the resin as it cures, I also go back to check on the resin an hour or two after I finish a wet out. Any bubbles that are coming to the surface can be dealt with then, so not to create craters in the subsequent covering coats.

Ultimately, it doesn't matter how perfect your build may be, you, the creator ( or artist ) will only ever see the flaws. So your laminate might not end up water glass clear, will it change the way the boat handles? Probably not. I spent 15 years obsessing over a poor keel line joint, even though the most astute critic saw no problems at all. That's is the artist's lament, so it goes!
 
Preamble.

The bubbles that appear in that grid pattern are surely fabric-related, and perhaps they travel as micro-bubbles along the fine filaments in each tow and collect at the intersections of warp and weft where the material is thickest, and nearest the surface. Don't know. But the important questions to address are, where is the air coming from, how does one prevent air from appearing, and how does one get rid of it before the epoxy sets up?

I think the 'out-gassing' term is often applied too broadly, because it comes late to the party, and it's not responsible for all of the bubbles we see when applying fabric. There's 'in-gassing' too (I made up the term), where air is introduced into the surface during the fabric wet-out and squeegee processes.

The tiny, individually harmless, champaign-sized bubbles (regardless of their source) happily join together and become larger bubbles-- then, toward the end they're heated by epoxy's exothermic cure and become even more prominent. Air volume is proportional to temperature, yet from 20C to 40C, thermal-inflation is just 6%.

Some builders pre-seal the hull with a coat of epoxy that's allowed to cure, and is lightly sanded before applying the fabric. I've seen that done, and it worked fine-- however, there appeared to be some tendency for the cloth to 'float' more than when applied to bare wood, which seemingly has some 'draw' to it. While out-gassing is virtually eliminated by pre-sealing the hull, in-gassing is still in the hands of the operator.

I've done propane torch flame-heating of the surface of epoxy to burst bubbles on a bar-top-type application where there is no fabric, and it works great. Here is a case where a pre-coat makes sense for a couple of reasons: it seals the wood against out-gassing, and it prevents pour-out imprinting. You can paint the seal-coat on lightly and carefully starting from one side, moving evenly across the surface (if you just pour your bucket of mixed epoxy onto the raw wood, it can leave that pour pattern visible on the surface). After the seal-coat is well sunk in and still green, mix the main batch and pour it in from one corner of the project and let it flow out across the work.

As you know, epoxy can catch fire, and you can scorch the wood through the epoxy. Keep the flame moving at all times. I wonder how the heat would work on bubbles under fabric-- I'll have to set something up and try it.

The random orbital sander vs longboard: typically the ROS does the initial heavy lifting, and the longboard is used to finish the sanding-- it's generally the last sanding tool except for a small hand rubber board and some 3M cloth used in detailed areas. The longboard preserves and enhances the broader, overall shape of the hull, whereas the ROS is more for getting serious work done efficiently.

The ROS requires some experience to handle, but it does a fabulous job in skilled hands. The challenge for new users is to keep from focussing locally, but rather, to keep the big picture in mind. The ROS has sharp edges and its pad doesn't curve much; it's an aggressive flat-bottomed tool sitting on a round hull.

Mark's project.

Where you sanded it-- it seems like there is fabric terrain there, and you still need a fill-coat. The other photos where the bubbles appear are deep, and the surface shows no fabric coming through whatsoever.

If the orientation of the squeegee is more vertical than horizontal it can cause in-gassing, starvation, and lifting of the fabric. It's so hard to know what brought the bubbles in, but I think the glassing technique is a place to start. Keep the squeegee at a low angle and work slowly and evenly.

Are these bubbles a structural issue? I'd say no.

If you wish to eliminate the bubbles in your hull you'll have to sand them out, and it looks like that will take off a good deal of the fabric-- maybe most of it.

Here's what I think: forget about the bubbles and move forward to finish the boat as though they didn't exist. If you sand off fabric you just have to add more in that area, and that's one gigantic GF.

If you can't abide the bubbles, smooth-sand the hull as it is, and paint it. I've used Epifanes 2-part Polyurethane Yacht Paint with great success. Martin Step's beautiful painted Kite hulls on greenval.com are works of art. I prefer painted strippers with just the inside wood showing-- to my eye that's the right balance.

This Kite is painted: http://www.greenval.com/kite.html
 
Last edited:
Great pics of the cloth.
I agree it's air trapped under, or between the two layers.

First to fix, I'd be tempted to sand down, and add an additional layer, of 4 oz. I stress tempted ! I feel other than appearance, it would be OK just the way it is.

Now, how I do it. I wet out one layer of cloth at a time... No problems. It's when we try and wet out multiple layers, that's when things go wrong, especially with epoxy resin.
Even the infusion methods can be plagued by air in the resin.
I still put a lot of blame on the cold resin.

I guarantee your next one will be better !

Jim
 
I like Peach's coining the term, "champaign-sized bubbles. !

I used to always glass in the Summer time, 80-90degrees F. My resin would create bubble gum type bubbles. That could be as much as a 1/2" in diameter.
A blow drier and foam brush cured them, as long as the resin was fresh !

In the cold, the bubbles can't escape the grip of the resin..

Also, I use foam rollers almost exclusively. I'm not sold on squeegees solving the problem.

I know Alan likes Peel Ply, and it works for him. One of the things I didn't like about it, was I couldn't see what was happening under it.
I also think it traps air, not allowing it to surface.

Jim
 
On my most recent repair work, when I did the last fill coat last weekend I had several thousand bubbles on the surface which most likely were caused by the shop being about 65 degrees at the time. I forgot to raise the temperature and the foam roller lifted the epoxy creating the bubbles. Even switching to a dry roller and using only it's own weight for pressure as the resin was kicking, still drew tendrils of epoxy to create a bubble. Not a big deal for me since I just used a scraper after initial cure to remove most of them then sanded with 220 before varnishing. Lessons learned.

Karin
 
When I made the plug for the Caribou S, I didn't use the Random Orbital Sander at all. On convex curves like the chines, I removed the peaks between boards with a spokeshave, filled voids with West System 105-205 and 407 fairing filler, and went straight to the longboards with Norton A275 stick-on roll sandpaper. Grits varied, but they went something like 40, 80, 120, 180, 220.

Then 6 oz glass followed by three coats of polyester contour primer with longboard sanding between each coat (220, 320) and 2 topcoats wet-sanded with longboards (320, 400, 600, 800, 1200). Then small touch ups. Polish with buffers and paste; wax.

It came out as fair as I could make it. Finally, I made a mold from this plug.
 
Last edited:
Hi All - Thanks for the brainstorming. There's a wealth of information in every post. Stripperguy, I used a squeegee on the cloth wet out. I didn't notice bubbles after that, but with the fiberglass weave still showing it would have been difficult to see them since I supposed I didn't know to look for them in the first place.

Peach thanks for the discussion. There's a lot of information there that I'll have to re-read a few times.

Jim, I agree that my problem was probably related to temperature control, especially temperature of the resin prior to application.

Karin, What you describe is very near to what I experienced with my last 2 fill coats. I tried to knock down the bubbles with a foam brush, but by then I had already buried a layer of bubbles and ended up creating more. I think a foam roller should only be used with warm resin.

I'll go ahead with sanding the rest of the hull, but I won't sand too deep, so some of the bubbles will have to stay in the boat. This was all a great learning experience for me and for others, and I hope an interesting topic of discussion for all. A local paddler friend of mine jokingly said last night "with all those bubbles you won't need flotation". For sure!

Thanks again, Mark
 
Thanks for sharing your build ! Both the good and bad !
I must say I'm impressed !

Jim
 
Canoe Build Update

But first: Day before yesterday my friend Norm and I met up with these fellows who are paddling the entire length of the Missouri River System, all the way from Browers Spring in the Centennial Mountains near the Continental Divide in Montana to the Gulf of Mexico (www.avoidingbarges.com). They just spent the last 10 days hiking, portaging, dragging, occasionally paddling and generally abusing that poor old royalex explorer down to Missouri Headwaters State Park, where we met them. The park is where the Gallatin, Madison and Jefferson rivers all come together to form the Missouri River. They made it 50 miles this day all the way from Twin Bridges in non-stop rain and driving snow coming from the north to meet us at this wayside on the Jefferson River Canoe Trail (www.jeffersonriver.org). P1110734.JPG


We had hot pizza, beer, hot tea, a dry place under a tarp and a big fire going for them when they arrived. Needless to say, they were really cold and wet. Later, we drove them a few miles away to the town of Three Forks so they could dry all their stuff at a laundry mat to make a fresh start in the morning. Yesterday morning we put our boat in and paddled an hour with them past the confluence of the Madison and Gallatin Rivers. P1110725.JPG


Canoe Build:

Well, after sanding and really careful attention to temperature control, mixing and everything else I could think of, I'm essentially where I started before. In the back of my mind I wondered whether the epoxy would be able to seal the little pinholes and the bottom line is that it didn't.

On one area of the hull I poured on epoxy and used a squeegee in various different directions and the holes would come right back. In another area I used a roller, then smoothed out with a foam brush, same thing. In another area I just used a foam brush, putting the epoxy on real thick. None of it made a bit of difference. I was able to get a few holes filled by dabbing at them with the foam brush for some time, but the overwhelming majority of them wouldn't fill.

Interesting experiment, but I'm moving on and will be curious about how things go on the inside of the hull. I'll only be using a single layer of cloth and I'll get different cups for mixing resin just in case that's the problem. The only other variable would be the resin itself, which I'm committed to using at this point.

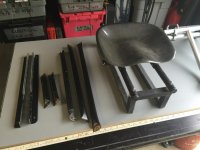
On a more positive note, I picked up this seat, foot bar and thwart set for real cheap. I think they came off a graphite Wenonah Prism. This will save me a bunch of time on getting this boat in the water. If I decide to initially use the aluminum thwarts I may replace them at some point in the future with ash. seat.JPG


I was able to get a coat of thickened epoxy around the edges of the dynel strips last night, so most of the epoxy work should be done on the bottom of the hull. I'll give it a little sanding this week and it's coming off the forms.

Also, I bought a 10' ash board yesterday that I'll rip into strips and scarph together for gunwales.

Mark
 
Canoe Build:

Well, after sanding and really careful attention to temperature control, mixing and everything else I could think of, I'm essentially where I started before. In the back of my mind I wondered whether the epoxy would be able to seal the little pinholes and the bottom line is that it didn't.

On one area of the hull I poured on epoxy and used a squeegee in various different directions and the holes would come right back. In another area I used a roller, then smoothed out with a foam brush, same thing. In another area I just used a foam brush, putting the epoxy on real thick. None of it made a bit of difference. I was able to get a few holes filled by dabbing at them with the foam brush for some time, but the overwhelming majority of them wouldn't fill.

Interesting experiment, but I'm moving on and will be curious about how things go on the inside of the hull. I'll only be using a single layer of cloth and I'll get different cups for mixing resin just in case that's the problem. The only other variable would be the resin itself, which I'm committed to using at this point.

On a more positive note, I picked up this seat, foot bar and thwart set for real cheap. I think they came off a graphite Wenonah Prism. This will save me a bunch of time on getting this boat in the water. If I decide to initially use the aluminum thwarts I may replace them at some point in the future with ash.


I was able to get a coat of thickened epoxy around the edges of the dynel strips last night, so most of the epoxy work should be done on the bottom of the hull. I'll give it a little sanding this week and it's coming off the forms.

Also, I bought a 10' ash board yesterday that I'll rip into strips and scarph together for gunwales.

Mark

I use smooth sided clear cups. From Walmart. No problems. For some reason going back and trying to fill pinholes hasn't worked for me either. I'm suspecting amine blush. Maybe if you could really get into the holes, and ream them out. ??

If the air bubbles appear on the inside, while glassing, have a blow drier handy.

I bet the travelers really appreciated your help ! Good for you !

I've talked to others that have made really long paddling trips. They stated that they had more trouble with people, than with wildlife .

Jim
 
Jim, that reminds me to tell you that I did have my heat gun on hand and used it to see if I could get the resin to floe into the holes, but that didn't work either. I thought about thickening up some epoxy to see if that would do the trick but didn't. Most of the holes are so small that you'd have trouble getting a pin point in them.

That's very true about the wildlife vs people except add domestic dogs to the list of problems. I've hiked the 3 big trails, at, pct, cdt and it certainly was the case there.

Mark
 
Very interesting discussion. I've not had similar issues (that I noticed anyway) so don't have a lot to contribute.

dogbrain I'll agree with the others that this is not a structural issue, and for the most part, you are the only one who will ever see it.

​I appreciate all the information, etc. provided by Peach Canoe. I've seen the pour printing effect myself, even through glass. I would caution others, though, to run some tests on scrap before trying to use a torch near hardened glass + resin. I've had to heat an attached part to get the epoxy to yield so I could remove it for better positioning. One slight swing with the torch left me with.... not sure what to call it. The resin seemed to have been expanded around the fibers, leaving a micro-void, sort of the same effect you'll get if you try to move resin and glass while in the gel stage. Sort of translucent cloudiness, primarily white. Needed to sand it out and apply a patch.

stripperguy Cool tool. Was it pricey? I'd be interested myself, or I might try to make something similar...
 
sailsman,
The sander is from SMS, called a Flexicat. It's made specifically for fairing boat hulls. It has a 2.75 x 16 hook and loop bottom, and just a pair of handles, strictly powered by calories!!

Mark,
Did you make prior arrangements with the long distance guys? Very nice of you to treat them to some local hospitality.
You will appreciate that sliding seat, even if its just temporary, like I said, the Kite is very sensitive to trim.

For mixing larger batches of resin, I use 32 oz paint cups and my graduated pumps. I pour directly from the mixing cup to the hull when wetting out the outside. Covering coats are done with a foam roller and paint tray with a liner in it. Same mixing cups though. Inside wet outs I do with a foam roller and a squeegee.

For small batches, I use graduated syringes. In fact, I just did a patch job yesterday and mixed as little as 3/4 oz at a time. Those little batches are mixed right in a paint tray with liner.

Sounds like you'll be coming off the forms soon. It's always an exciting time, seeing the empty hull for the first time!

Yes SG, my friend Norm in town here has paddled from St. Louis to the Pacific Ocean as well as some other really long trips, and is the local expert and contact for people doing the entire length of the Missouri/Mississippi Rivers. There are usually one or two people a year doing big trips like that. I've had my share of similar treatment on my big expeditions, so I try to pay it forward.

I don't think the seat will be temporary, just the thwarts.

For the small batches, do you pull the resin in with the syringe, then put it in a small mixing cup? I assume you use separate syringes for resin and hardener.

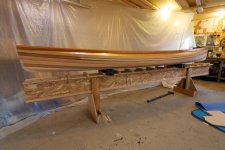
The Kite is off the forms now. I really like the shape of this boat. I was surprised how it seems to have more rocker sitting upright than it appeared on the forms. I added an inch to the height of the boat to make it a bit drier, which I'm thinking might have been too much. I may end up taking half of that off when I go to install the gunwales.

I did sand the outside of the hull again after having tried to fill all those little holes. After this round of sanding it actually does look a bit better than before, so it was time well spent. I sanded into the glass weave in a couple of spots though, so I'll have to go over it again with epoxy in a couple of places. The dynel looks much better now that it's fully encased in epoxy too. I'll have a go at putting in the inner fillets along that knuckle and stems tomorrow, then sanding the inside by the end of the weekend and hopefully have it ready to glass by first thing next week, we'll see.

Mark
 
---

For the small batches, do you pull the resin in with the syringe, then put it in a small mixing cup? I assume you use separate syringes for resin and hardener.

--

Mark

Yes, I have separate syringes for resin and hardener.
In fact, I keep 10 or 12 oz of resin and hardener in separate mixing cups, with their dedicated syringes inside. I keep each of the mixing cups/syringes in dedicated 1 gallon zip lock bags, both to contain the mess and keep out contaminants.
A side note on the syringes:
I have found that if I fully empty the syringes, it is very difficult to get them to "draw" resin or hardener into them. They just get stuck. After every use, I draw in an ounce or so of fluid and store them that way. It is much easier to get the syringes moving when emptying them, rather than trying to fill them. I even had a syringe leave its polymer seal in the bottom of the cavity when attempting to fill it after a lengthy period of non-use.

To be clear, I leave 1 oz in each syringe in the container, in the zip lock bag. When I'm ready to mix a small batch, I squirt out the resin (or hardener) to "bump start" the syringe action, then draw in the desired amount. It should go without saying that I have clearly labeled the containers and the bags to avoid a mixing ratio disaster. BTW, we've all made that mistake at one time or another.

Those really small batches are mixed in a small cup or lined paint tray. I should also mention that I am very careful to not cross contaminate the resin and hardener by touching the syringes to any part of the mixing vessel.
 
Last edited:
A trick I learned from a first time builder, was to use Hospital urine sample cups. You can get them on line, or maybe a drug store,pharmacy.
They are graduated in standard, and metric. and transparent.
I don't have very many, so I clean them out after use.

So far they work great for batches of 1 to 3 oz.

Jim
 
Just a few photos to update my progress.

Off the forms and ready for the inside work.

P1270470.JPG


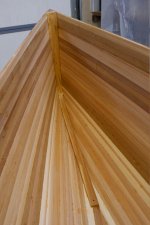
This is how the stems look on the Kite.

P1270488.JPG


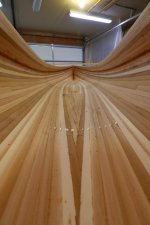
A view of the tumblehome area. After I wet out the fiberglass I didn't even try to put more epoxy on this area since it was upside down. I'll do fill coats while I'm working on the boat in the upright position.

P1270491.JPG


I did the epoxy/wood flour fillets on the inside of the tumblehome crease. I also decided to fill the sharp creases along both inner stems.

P1270502.JPG


I only had a few small gaps along the planks which also got filled.

P1270504.JPG


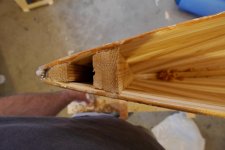
And now for the puzzle of the day. The Kite design calls for this tapered stem, and you can either build it with inner and outer, or just the inner which is what I chose to do. With only the inner stem, plus having the strips come together and the ends, I ended up with this gap. From an earlier post you'll remember that the block nearest the end was glued there because my strips didn't come together at the top. The gap, however, goes all the way down to just above where the stem curves. The question is, what to do about this opening. I'm worried that I need to seal the wood in there somehow. My first thought is to soak a rag with epoxy and slather it around inside there, then fill the area with some of that non expanding spray foam. Any thoughts? I'm worried about water getting in there somehow, someday.

P1270483.JPG


Now I'm ready to sand the inside. Should be doing that first thing this week.

Mark
 
Flood the openings with a cheap varnish, flip the boat over to drain it, let it dry, repeat to seal the wood.

Cut a piece of wood to fill the gap.

Use your foam idea after sealing the wood.
 
Back
Top