• Happy Mathematics Day! ❌📐♾️

A Raven from Scratch

Doc says "light duty, no lifting and nothing strenuous" and the strips are light and building is relaxation... naturally, I made my way to the canoe shop upon discharge.

I got quite a bit done and then would up with a dilemma...

Like Roy, my plans do not include a stemless option so I (think I) used the one piece stem line and tapered it to where I thought it would finish.

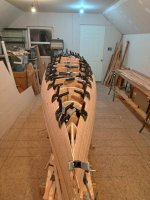
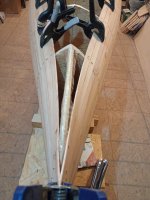
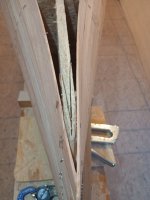
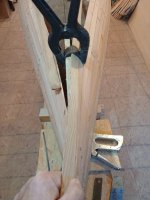
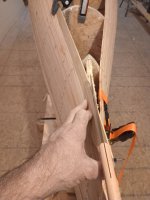
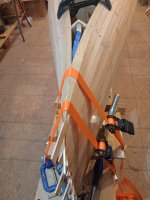
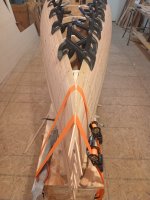
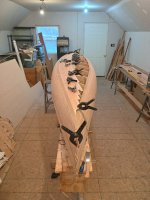
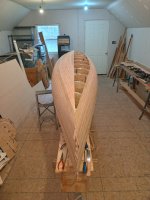
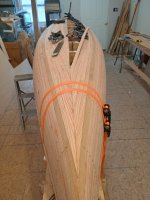
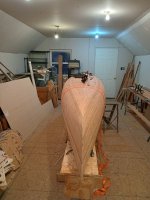
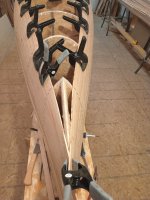
Tonite, I got stripped almost to the top and realized that my angle is going to be too sharp and I'll need a work-around.

I'm including a few pictures and, if anyone has suggestions, I'll consider them. I can shave the forms but that would add rocker. I can possibly make some long, compound angle cuts and twist them into position... maybe using Sassafras as it doesn't seem as prone to shattering.

I don't recall having this issue on my Freedom build... maybe I just got lucky?

Here's some pics:
IMG_20241212_200225762.jpg
IMG_20241212_200315838_HDR.jpg
IMG_20241212_200206994.jpg

Appears (to me) to be coming out nicely if I had a stem but, of course it's a little late for that...

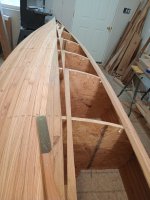
I'm going to be close on the Larch strips but I think I've got enough. If not, I suppose White Pine or leftover Aspen would look ok at the center of the football.
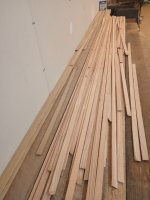
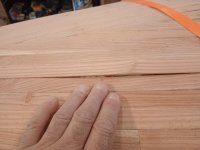
IMG_20241212_200704445.jpg
 
Last edited:
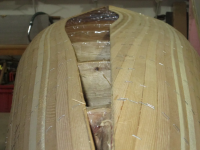
I've only built stemless once, so don't have a ready suggestion for you, maybe Jim will chime in. Looking forward to seeing that hull once it is glassed, our tamarack up here has a lot of dark orange hues, the epoxy should make the colours pop. Are you going to use cherry for trim? Just finished up using one of those cherry pieces you brought me, I've had to remake four different paddles for woodworking for demos, as I gave away all of my paddles from last year. Not sure what you had done, but don't overdue it. My rehab project from my first round of stents was that big 20 foot freighter, and it was probably responsible for my next round of stents, lol.
 
Could you make a single stem, and squeeze it in? It doesn't have to be a thick beefy stem. Even several pieces of strips, maybe a little wider or thicker than the strips you're using, slide them in along the sides of the stem end. Hmmm 🤔 thinking on it.
Surely there is a work around that may look creative.

Spring is around the corner, so don't hurt yourself. Give your body time to heal.
Roy
 
I appreciate the health concern but I just had my thyroid removed (micro carcinoma so I'd guess "baby cancer" lol). 10 lb weight restriction but it seems reasonable that that includes people for whom 50 lbs is "heavy". Either way, I'm not going to overdue it and I won't be shoeing or trimming any horses for a week or two.

I'm hoping to get the hull finished up and glassed by that point and will probably mess with the stems again today. I don't want to go beyond the designed lines as I'm wondering if that's one reason the Freedom seems so sensitive to the current. Right now, I'm leaning toward cutting them short and creating extra rocker with the fine entry.

No Cherry on this one Mem. This will be Larch & Sassafras only unless I run short on the Larch. Then I've got the discard strips piling up under the strongback, the White Pine that needs coves or some leftover Aspen from the Freedom that I can use to finish. I'd prefer to just use two woods and I think I've got enough strips.
 
You are fine. Looks great !
I usually drop the stem forms, before starting to strip, a 1/4", to reduce the hump that you will get . Too late for that now.
Don't worry.
Just keep stripping. The transition from vertical to horizontal is a little tricky. Cutting the angle is different with each hull. So all I can tell you is to trim the strip to match.
If you goof it up ? just whittle a sliver, to fill any big gaps, or putty as needed.
A Shinto File/rasp, will aid you in shaping those strips.
Don't sweat it too much, as you will have plenty of layers of cloth to reinforce.
If you are needlessly worried about strength? You can add a fillet to the inside, when you get there.
A Stemless build is every bit as strong, as one built with stems!
Trust me ! I have put many to the test.

21a432b9-211c-4baf-8c99-6ca6d7e553ee.jpg

87e6ee1e-55ea-40c6-9ae6-0c11987d6baa.jpg

Jim
 
Crap Jim, now that you mention it, I think I'd seen you mention before that you cheat the stem forms down... wish I'd remembered that before and I hope I remember it next time.
Too late for that now.
Not really if you have a sawzall and aren't afraid to destroy a hull mid-build...
-----------------

I spent about 3 1/2 hours today and got 2 strips on. One on each side but I think I solved my problem.

Jim's solution of cheating the stem form down made sense and some of my options from yesterday were "I can shave the forms but that would add rocker. I can possibly make some long, compound angle cuts and twist them into position... maybe using Sassafras as it doesn't seem as prone to shattering."

I wound up doing all of the above.

First, I grabbed a sawzall and cut the stem forms about flush with the last strip I'd put on. I screwed up a little by being tentative with blade speed. The slower blade speed allowed the saw to grab and I broke one of the Larch strips. After that, I held the trigger down and ran it hard while the saw destroyed only the forms and not the boat.

IMG_20241213_154354245.jpg

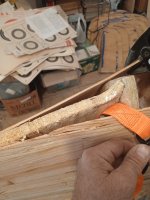
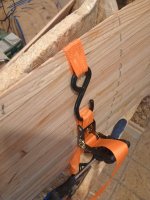
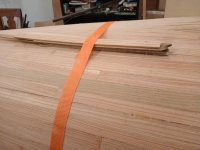
I applied some glue to the cracked strip, wound a ratchet strap around the planking & tightened it down while I modified the rest of the forms

IMG_20241213_154639022.jpg

I then used the pull saw to shave the rest of the form and grabbed some short pieces of Sassafras strips

IMG_20241213_155516865.jpg
IMG_20241213_160606877.jpg

I laid the Sassafras at a pretty sharp angle, eyeballed the centerline and started cutting with the pull saw.

IMG_20241213_163101430.jpg

I cut, rasped and fitted the two strips much like you would fitting the whiskey strip to close the football until I had something that I thought would give a nice transition from vertical to horizontal while still looking reasonable. (I worked shorter pieces for fitting because they were easier to handle and were more disposable)

I taped the chopped-off stem form to keep from gluing it to the hull, applied glue liberally to the Sassafras strips and used ratchet straps (attached to the strongback) to pull the strips tightly into place

IMG_20241213_164151437.jpg
IMG_20241213_165558660.jpg

I then fit short pieces for the other end and spliced in the longer strips to complete a Sassafras accent strip that, hopefully, looks like it was meant to be there.

IMG_20241213_180102867.jpg

(you may notice that the point is gone on the last form in the above picture... I rounded off the first and last forms to ease the transition further. Also, there IS tape on the stem form in the above picture. I'd found my clear tape by that time and used it to minimize sticking)

From this point, I'll go back to the Larch and close it like a football. I started fitting in hopes that I could continue today but the glue had not set and I thought it best to let it cure overnight.

Overall, I'm pleased with the work-around and I'm hopeful that I can get the football closed in this weekend.

I'm really looking forward to wetting out this hull in hope that the colors show well in photos. As memaquay has mentioned, the oranges and browns of the Larch (aka Tamarack) are gorgeous but, so far, have not been prominent in these pictures.
 
Creative ! Some times you just have to adapt !
Way to go !

Looks great !

Jim
 
Hid out in the boat shop again today (I could get used to this...)

I stripped past the mid-point & called it quits. Should have the centerline cut tomorrow but my daughter wants to murder a couple of trees so I'm unsure how much more I'll get done.

I'm going to be very close on strips and decided to close the football w/ Sassafras since it's easier to work with and I probably need to cut more Sassafras strips for the seat anyway.

IMG_20241214_162912894_HDR.jpg
 
I got the centerline cut out on Sunday and actually managed to get it in the center of the hull this time.

I took a small drill bit, reached under the strongback and drilled up through the hull using the center lines of the forms

IMG_20241215_112528717.jpg

I then used a flexible straightedge to put a pencil line between the holes and cut just wide of the line with the pull saw.

IMG_20241215_121726712.jpg

I cleaned up the cut with the horse-shoeing rasp, touched up the tape at the top of the forms and started fitting strips.

IMG_20241215_122631927_HDR.jpg

I only got a couple on yesterday but spent about 4 hours over there this afternoon / evening. It's pretty slow going since I can't switch sides while the glue tacks up.

I place pencil marks on the strip where it will hit the centerline and then cut a little wide of the line with the bandsaw. The shoeing rasp then trues the line and tapers it for the final fit. I am not brave enough to attempt fitting both ends so I fit 2 separate pieces and then join them with a bevel. The ratchet straps pull everything together along the centerline and I can usually reach under the hull with one hand to align strips while I tighten the strap with the other. Straps are then leap-frogged when the next strip is glued in.

IMG_20241216_121955974_HDR.jpg

With the extra down-time waiting for glue to tack up, I trimmed off the stems also. In all, I've got just a sliver over 2 strips to install tomorrow and the hull will be closed.

IMG_20241216_164825483_HDR.jpg

Happily, the remaining strips are all Sassafras. Good thing too; I was almost out of Larch. I'll have to go through the cut-off & reject piles to find useable strips for the float tank panels.

IMG_20241216_164749014.jpg

Prior commitments may prevent me from finishing tomorrow but it looks like I'll have it glassed for Christmas. Hopefully, some spar varnish on New Year's and I can start 2025 with the sucky inside sanding part (yippee).
 
Looks good !
I would delay the varnish, until done with the inside. Otherwise you will likely scar it up, while working the inside.
Good you have the centerline cut. I always enjoyed fitting the final strips.

Jim
 
Looks great! I'd skip the float tanks. Not necessary, and every little bit will contribute to a hull that will probably be on the heavy side just due to the size.
 
Yeah, but then I have to try to do a nice job of glassing the inside stems... UGH! (maybe just small ones?)

I would delay the varnish, until done with the inside. Otherwise you will likely scar it up, while working the inside.
I'm not worried about scarring it up, that will happen pretty liberally this summer if all goes well. I might wait anyway and just get the sucky part started so that it's over sooner.
 
Doesn't help you now, as you are almost finished. If you keep your build area on the cooler side, say 65ish, then you may want to think about an express glue for the future. That would help a lot with the glue setup and eliminate your "waiting on the glue".

I like Lepages Express 10 minute (https://www.lepage.ca/en/products/central-pdp.html/lepage-express-wood-glue/SAP_0201FTL01EI4.html) .... in the cooler temp, that setup extends to about 15 minutes to setup, which gives good timing for adding strips (at least for me).
 
Flotation chambers are a must in my book.
You will want to finish the inside of the stems, regardless of tanks.

A wood strip hull will float, barely above the water. Push down on it, and it will sink. Problem is, it takes a long time to resurface !
Flotaion chambers bring it back to the surface much faster !
It also makes reentry much easier.
I've done the test.
There is a reason all commercial canoes either have flotation chambers, or are buoyant by nature. ( Royalex)

Jim
 
You will want to finish the inside of the stems, regardless of tanks.
I'll glass them but it's not going to be pretty in there

---------------------------------------------------

Well, hull is closed, staples are out. I've started sanding and found more issues...

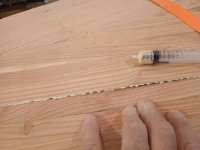
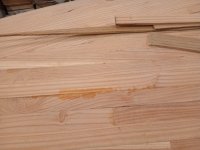
In my quest to keep glue squeeze-out to a minimum, I believe that I was over-zealous. When pulling staples, I found a few areas where the strips pulled away from each other as the hull flexed. Upon inspection, I had very little glue in these areas.

IMG_20241219_110634687.jpg

I refilled the syringe, squirted what I thought should be an adequate amount of glue onto the high side of the seams

IMG_20241219_110800551.jpg

wrapped a strip in clear tape to keep from gluing it to the hull and stacked a few strips on top of it. I then put the ratchet strap over the strip stack & snugged it up, pulling the hull together

IMG_20241219_111020304.jpg

I allowed it to dry overnight and I am satisfied with the results.

IMG_20241219_171259122.jpg

I will be a little more liberal with my glue application on the next build, however, as it seems easier to rasp off a little extra squeeze-out than to realign and re-glue seams that didn't hold because I was too stingy.

IMG_20241219_184841731_HDR.jpg

At this point, I've rasped about 85% of the hull and sanded the same with 80 grit. If I seem to go from one extreme (barely sanded the Freedom at all) to the other (fairing this one by hand with a 17 inch long board), it's because I asked a friend (auto body technician) for advice.

I've always thought that it was extremely rude to ask advice of someone you believe to be an expert and then ignore that advice when it seems like too much work so you'll notice the long board in the above picture. Upside is that this one is already sanded better than the last was but I texted my friend tonight that the orbital may make an appearance yet. He assures me that the complex curves can be sanded using a roll of paper towels or a rolled-up magazine wrapped in sandpaper. I'll try it but have remained uncommitted as of this evening.

One advantage of hand sanding: I seemed to eat a lot less sawdust. (still on track to have it glassed by Christmas)
 
Looking good, and I like using a long board, I think it gives a better fairing. Although once I past 100 grit, i figure the actual material removal and fairing is finished ... I use an ROS for the final portion
 
For making it easier to install the Whiskey strip, I didn't strip all the way to the center on the first side. That way, I could easily fit the last few strips on both sides at once. I even made a great opportunity for an accent.

5034dc5a-baf2-4720-a472-b5dabbaef9f4.jpg


44944894-8ac5-4f40-8dfe-f5e367ced651.jpg


1734748597292.png


3b580641-e862-4931-8947-ec1c3b40833c.jpg


4beebc6d-13ac-478e-84bf-a90ef8eaef1e.jpg
8bc677f7-f0a2-4d31-948c-15fc723071a3.jpg
 
Last edited:
Jim: For whatever reason, your pictures are not coming through (the links work fine)

Screenshot (16).png

As for the carbon copies... maybe someday. For now, I really like the look of wood. I enjoy seeing what the different combinations of wood species look like and am physically able to carry a few extra pounds (in addition to those on my person).

I'm really looking forward to seeing the colors pop on this one... sanding more tonight & hoping to get glass on by Christmas.
 
Back
Top