• Happy National Pickle Day! 🥒

Solo expedition build

Another thing to consider... maybe...

Could you make amother pedastal that fits inside the original for a telescopic height adjustment and some how incorporate some pins to hold it in the up position?

May be too fiddley

Jason
 
Another thing to consider... maybe...

Could you make amother pedastal that fits inside the original for a telescopic height adjustment and some how incorporate some pins to hold it in the up position?

May be too fiddley

Jason

You could spring load it and it would be ajustable on the fly!!
 
What about a seat which pivots on a pair of parallel linkages? When it is forward, it is in a lower position and when the sit is shifted backwards, it rises to sit on a higher platform. The pedestal you show (post 292) would work to house the linkage and all that would really be needed is a built up area at the back of the pedestal. This elevated area could also be slightly canted to make kneeling more comfortable. A set of rare earth magnets embedded in the seat (say front and back edges) paired with a set in the pedestal (again front and back) would hold the seat in position during portages but allow for easy shifting between sitting and kneeling.

The biggest problem I see is that when shifting backwards, the seat might have to rise a little higher (through the arc) than the final height so you might need to shift off the seat during the transition.

Kolo
 
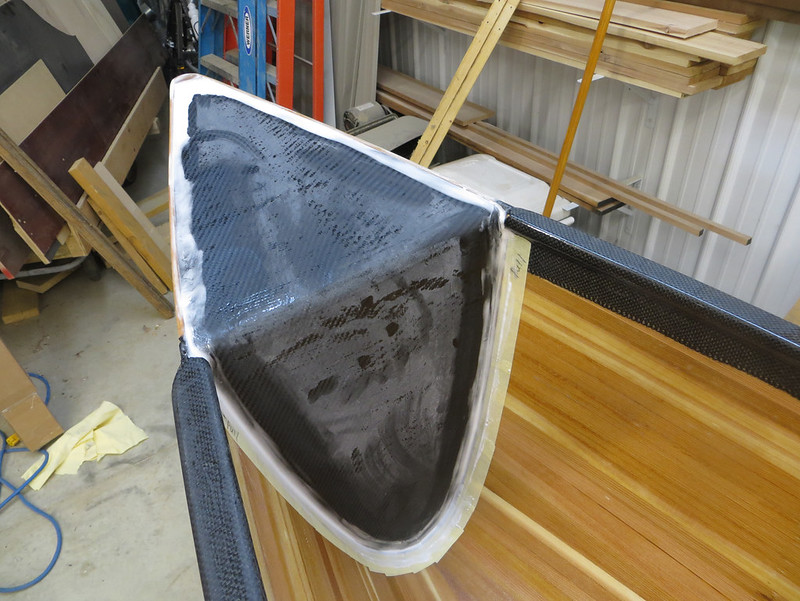
The boat finally looks different for the first time in a couple weeks! Tanks went in tonight.

First I set them in place and drew a pencil line about 1/8" away from the edge. Then I taped along the pencil line:

20150423_001 by Alan Gage, on Flickr

20150423_002 by Alan Gage, on Flickr

Thickened up some epoxy, smeared it all over the edges of the tanks, set them in place, and started smoothing the fillet with my fingers.

20150423_003 by Alan Gage, on Flickr

Then peeled the tape off, which left me with a nice edge on the canoe side.

20150423_004 by Alan Gage, on Flickr

The edge on the tank doesn't look so nice but it's pretty smooth and after a quick sanding, putting on the fiberglass tape reinforcement, and painting (to match the exterior) it should be fine.

Lesson learned for the night was that you can't get epoxy too thick. Every time I turned around it had seeped down into some of the gaps. So I'd mix in a little more cabosil and refill it only to find it had run down the gap again. This was repeated multiple times with the epoxy kicking and hardening as I went. It was to the point the epoxy was so stiff it was difficult to use but, sure enough, a few minutes later there was my little friend the gap again. So a couple areas will take another application tomorrow.

Alan
 
"Lesson learned for the night was that you can't get epoxy too thick. Every time I turned around it had seeped down into some of the gaps. So I'd mix in a little more cabosil and refill it only to find it had run down the gap again. This was repeated multiple times with the epoxy kicking and hardening as I went. It was to the point the epoxy was so stiff it was difficult to use but, sure enough, a few minutes later there was my little friend the gap again. So a couple areas will take another application tomorrow."

So you have a flotation tank full of epoxy.....:rolleyes:
 
Alan,
What now for the deck/hull joint beyond the gunnels?
I almost took the same route you did with my Kite build, but I couldn't decide how to handle that transition area. You saw that I carried my gunnels all the way to the stems. I kept my decks recessed below the sheer line, to avoid that transition between red opaque hull and stripped deck.

If you built this same hull again, including the white opaque outside, would you do anything different with the decks/bulkheads/gunnels?
I plan to build another Kite, but with smaller teardrop bulkheads and no decks, strictly a weight consideration.
But I'm always searching for ways to improve my builds by "borrowing" techniques from innovative builders...
 
Alan,
What now for the deck/hull joint beyond the gunnels?
I almost took the same route you did with my Kite build, but I couldn't decide how to handle that transition area.

Good question. Been wondering that myself for the past month and haven't come to a firm conclusion yet. One option is to not do anything special there. But the tanks and outside of the hull will be the same color so that might look a little bland. Another option, and the one I'm leaning towards, is to wrap carbon over the joint which would extend the look of the gunwales. This would hinge on having a nice, clean, line. That could either be accomplished with the tape method Holmes described in another thread or just letting the carbon run a little wild and using tape to mask it off when painting. A third option, along the same lines, would be to use black paint instead of carbon along the edge. Easier and cheaper with a similar look minus the carbon weave.

If you built this same hull again, including the white opaque outside, would you do anything different with the decks/bulkheads/gunnels?
I plan to build another Kite, but with smaller teardrop bulkheads and no decks, strictly a weight consideration.
But I'm always searching for ways to improve my builds by "borrowing" techniques from innovative builders...

I don't think I'll really know until I get it finished and use it a while but so far I'm pretty happy with everything. Extending the outwales all the way to the bow may have simplified things and wouldn't have been a lot of extra work. The short extension to the stems could have been a separate piece since the carbon wrap covers all the joints anyway.

I still think it would be nice to find a viable way to build composite gunwales off the boat. Separate inwales/outwales seems like it might be the best option but would take more material. Soller composites has heat shrink tubing for composite sleeving that would probably be an easier and possibly more effective alternative to vacuum bagging gunwales off the hull.

If this boat would see the standard duty most of my hulls see, which is relatively short trips, lots of miles, but little/no whitewater, I probably would have skipped float tanks altogether and just put in small carbon decks. I also would have further explored using foam rather than cedar for core material in the gunnels.

If going for a good compromise between strength and weight (but ignoring $$$) I've also considered building with ~1/8" strips (maybe 3/16" strips below the water line and 1/8" above?) and wrapping the outside of the hull with pure carbon or carbon/innegra weave with a protective layer of S-glass under the water line and using kevlar on the inside of the hull. I just noticed the other day a carbon/innegra weave is now available from Soller composites, the only place I've seen it available in small quantities. The carbon/innegra weave is less $$$ than pure carbon.

I'd really like to use a stripper as a plug, build an honest to goodness two piece mold, and build a purely composite hull. But for a one (or even two or three) off that's just a ridiculous amount of time and money (just for the mold!). Maybe I'll try molding a composite hull directly off a stripper one of these days since Jim is showing us how to do it.

Alan
 
I do recommend using a stripper as a plug for a one off !
The drawback is you still need to sand the outside. To me that's not that big of a chore. It's the inside I detest !

Building a female mold, is a lot bigger expense, unless you are going into production. Then it would save a ton of work.

I'd have to go back and look, but I thought I suggested using your build as a plug.:rolleyes: HA !

I think you still could, and you would have two canoes ! :)

I'd go with a Partal release, instead of my heat shrink plastic. That is my only complaint so far with my Kevlar build.

I'm also not going to use the Pink foam as a stiffing layer. I'm going to my original idea of a wood strip insert, just thinner than I had originally planned on my first Kevlar. With three layers beneath the wood, and one or two on top, I think 1/8" strips should be plenty.

Here is a pic of my first Kevlar and the insert I was going to use.
IMG_0135_zps6lokgnu0.jpg


Jim
 
Still here but not making much progress on the boat. With nice weather and more daylight I just can't bring myself to work in the shop until it's dark. And by then it's getting pretty late so I eat dinner and tell myself I'll do it tomorrow..... Looks like a rainy week so hopefully I"ll get back into it. But then again it's the big week of bird migration so unless it's raining hard I'll have a hard time not spending the evenings walking through the woods.

Not helping matters is a friend who came down over Easter and took me out for some long range target shooting (925 yards). I hadn't done any shooting in years and it was a lot more fun than I thought it would be. I tried to fight it but it looks like I've got a new hobby on my hands. No desire to drop big $$$$ on a gun like his at this point since I can just use his when we're out together but I did pick up a nice pellet gun that lets me shoot all I want in the backyard for practice and I'm about to buy a nice .22 (Savage MKII BV) for use out to a couple hundred yards.

This is not a hobby I ever saw myself taking up but I don't get to choose my hobbies, they choose me. I hope I can keep it under control but I don't have much control over that either.....;)

Alan
 
I best come up there and get you back on the right track ! It's that seat that's got you hung up ! HA !

A guy needs a little diversity for sure ! Otherwise this canoe building becomes WORK ! And that's not good !

Jim
 
HA ha Alan, I missed the gun addiction post! You know you can mix the two things together and take a rifle with you when you go canoetripping, even if it's just your pellet gun for plinking. Lots of times in groups trips I'll take a pellet rifle or pistol and plunk away at cans. I'm often carrying real heat too, but usually don't pull that out unless I'm solo. In that new big canoe you have, why not build an integrated carbon fibre gun rack?
 
Oh-oh... long range shootin' is incredibly addictive. A discipline that can turn a feller's reloadin' bench into something that resembles a full scale lab. A bookshelf full of manuals and a computer loaded with ballistics software. Next thing ya know you're haulin' a 14 lb rifle around the prairie in a drag bag with a beverage cooler keepin' the ammo stable in the summer heat.

And the addiction spreads... ya might find fancy with the big bore cartridges. Now ya get to add another press to the bench as your other two aren't large enough for the monolithic rounds. I'd add more but I really must dash.... my tumbler has finished its cycle and I need to assemble some rounds for a Ruger #1 500 Nitro Express rifle ;)
 
Not that I can't spend plenty of money on .22 rifles, glass, and lead but I'm hoping to draw the line there. I can try and squeeze all the yardage I can from that setup and when I want to go longer my buddy will be more than happy to come down with his fancy guns since I have local connections where we can shoot 1000+ yards on private land. There are no ranges within a days drive over 600 yards.

Certainly a nice .22 caliber is all I need. Why would anyone need more than that? Hmm, seems I remember saying something similar when I bought my first boat, a 13' Old Town kayak....:rolleyes:

Alan
 
Alan, Where did you go? I'm really interested to see where you go with the last bit of your build.

Momentum

Thanks for the kick in the pants. Spent a little time in the shop tonight mixing up some more thickened epoxy and working with the decks. Filled in those remaining gaps, which was easy now that they weren't bottomless (the original epoxy fill bridged the gap but kept sinking) and gave them a skim coat to even things out, which will be sanded back and smoothed. Also put the last small touchup pieces of carbon on some of the seat components so I should be able to actually start putting that together now.

The decks will probably need another light skim coat after sanding, then a layer of fiberglass, then fill the weave, then a layer of fiberglass tape over the gunwales, then fill the weave, then sand, then a final sanding (and maybe skim coat of epoxy) on the entire outside of the hull, then paint, then final finish. Phew, maybe I'm not as close to done as I thought....

Alan
 
I thought we lost ya...That's what I'm here for...a good kick in the pants. Like you really need one (wink)

I have an affinity for the fine art of marksmanship. I got my pellet gun when I was 12, and haven't looked back. I'm not a hunter, I just love the challenge, and technical thought that goes into hitting the target no matter how far away it is. It's a nice hobby as long as you stay on the correct side of the barrel.

Glad to see we can encourage you back into the fold. Looking forward to some more.

Momentum
 
Oh god. I have been down that road already Alan. Guns and long range work are very addicting but also very time consuming. More so than money I find that time is the thing I dont have enough of. I get about an hour a night to work on my canoes as it is...lord help us if I get bitten by the gun bug again. The only thing that saved me last time was most of it was on the governments dime.

Get your canoe finished and do the rest of the prep for the trip...dont put this one off or youi will regret it forever. There is a guy on myccr, Chris Randall, who has a Wenonah Rendezvous that he has taken the pedestal seat out of...he may still have it. You could always check with him, he is in Winnipeg.

Christy
 
Since Momentum gave me a little nudge I've been back to work doing a little bit here and there on the canoe. Finally making some visual progress so it's time time for lots of pictures!

First off Dave said he wanted me to be sure and weigh my carbon over foam decks/tanks but I forgot to do that before installations. But I do know that my hull weighed 40 pounds before installing the tanks and now it weighs 42 pounds. That includes the weight of the tanks, the thickened epoxy that holds them in place, and the thickened epoxy filler that was added to smooth everything out. Probably 3 oz. of epoxy. Both tanks are 15" long and the bow tank is 11.5" at the widest and the stern 9.5"

Pics of the tanks after fairing compound (thickened epoxy) was added:

20150510_001 by Alan, on Flickr

20150510_002 by Alan, on Flickr

If I remember correctly the mahogany decks on the tandem I did (which were 14" long?) were 12 oz. each and a good deal narrower.

20150201_006 by Alan, on Flickr

I'd originally planned to added carbon fiber around the edge of the float tanks to continue the visual line of the carbon gunwales but started to worry the carbon wouldn't be able to make that sharp turn. So I decided to glass it instead and will probably just tape off the edge and add black epoxy to continue the line.

Rounding off the edge to help the fiberglass conform:

20150510_011 by Alan, on Flickr

An interface pad is cheap and makes short work of the task:

20150510_012 by Alan, on Flickr

Then cut the cloth out on a bias so it can take that curve at the end and laid it in place:

20150510_013 by Alan, on Flickr

And here it is all wet out:

20150510_014 by Alan, on Flickr

The fiberglass will add some extra abrasion resistance, which the carbon fiber is lacking.

Alan
 
Last edited:
Back
Top