• Happy National Pfeffernusse Day! ⚪🇩🇪😋

Jack's - Morris - Special

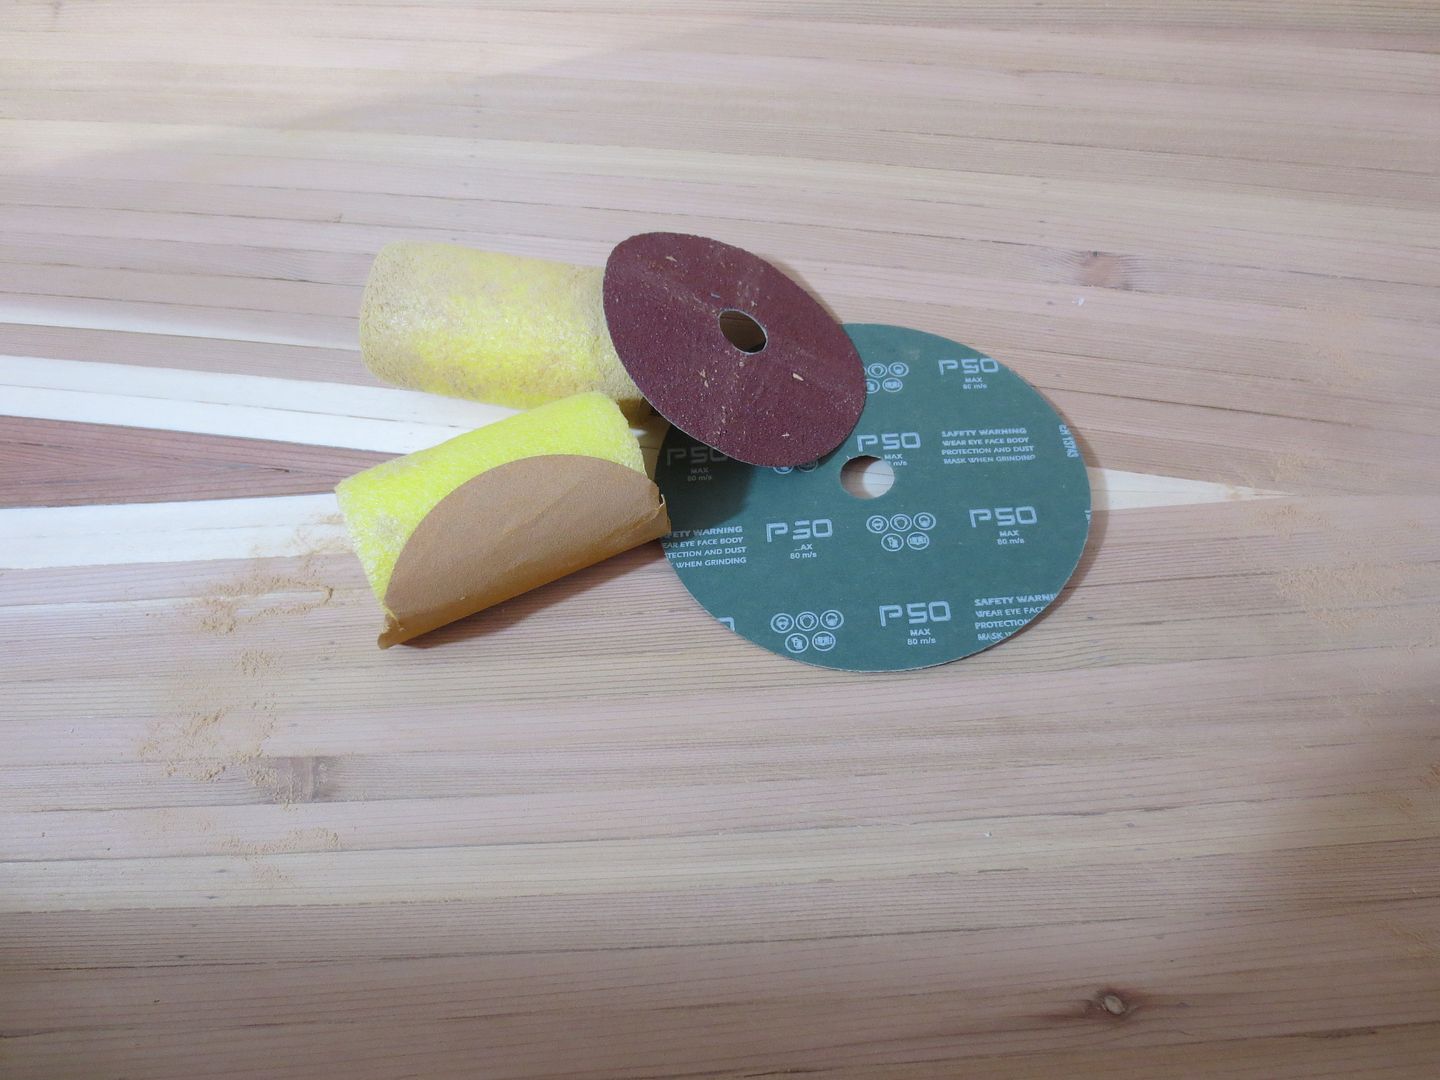
I've been using this trick to get into the tight spot in the stems. I buy one of those stiff and course sanding discs that go on a large hand grinder. They come in like 36 or 40grit, as well as 50 grit. I just use them with my hand.
They are stiff enough to hold one edge while the opposite edge is sanding.

Also in the pic is the pool noodle, for sanding the inside of the tumblehome.
Here's a pic.
IMG_0544_zpsgqydy0ur.jpg
 
Last edited:
Thanks for adding a photo Jim, I know how antsy these people get when there are posts without photo's.

I love dark wood and I love good texture and this boat will have plenty of eye candy on the interior when paddling. It went well enough, the ends aren't done completely, likely do that tomorrow after the bulk has set up and we can finesse the skinny end pieces. I have a plan and we will see how it goes tomorrow. One thing we learned when dealing with staple holes... they off gas and create dry bubbles under the glass, we had to be diligent to knock them down repeatedly but we won.

In the beginning, I worked the squeegee and Christy mixed batches, she would then follow up with the roller as I kept moving resin up the sides and to each end.


It went pretty well, total time was 90 minutes for the two of us. The center is already going off and beyond workability so later I will go out when the ends go to trim off the glass around the stems.


It is difficult to get good photo's when it is so shiny. Tomorrow I will finish rough sanding the rails and toss them in the soaking trough for the week. Still debating which colour of stain to use.


Good thing I don't have a pecker since I have resin everywhere possible to get it.
 
Looks great. Nice work. Grain looks purty.

Lately I've been fiberglassing the stems a day ahead of time. The cloth only extends inward 6-10" and, when laying the full layer, it just laps over the edge. Much easier working in the stems with small pieces and much easier working with the full layer when you don't have to worry about getting it all the way up into the stems. The seam is not very visible way up there, especially with decks. Even less visible when covered by a float tank.

Alan
 

In this picture it looks like the cloth is pulling away from the shear towards the right front (the end closest to us). Maybe I'm seeing it incorrectly or maybe you just haven't finished rolling/squeegeeing but I've had this problem before and found the best solution is to trim the 'glass to within 1-2" of the shear with a scissors after wetting it out. This lets the cloth stand straight up like a mohawk. When it drapes down over the outside of the hull I find it wants to pull away at the shear.

Alan
 
Since that photo was taken the issue has been resolved. The extra glass has been trimmed completely and all is well. It was good I did it early considering how much resin I found under that layer running down the outside hull.
 
I always breathe a little easier, once I have the inside glassed !

I sit back have a beer, (no Spam), and try and ignore the mistakes !

Looks good !

Jim
 
I know that feeling Jim. The difficult part is done, the ends will be reasonably easy today. Good thing we did it yesterday when the temperature warmed to near freezing, have a Blizzard warning for today so will try to get the ends and fill coat done before the temperature starts to drop this afternoon although the shop is plenty warm still.

Now the fun part can begin, fitting the inwales and outfitting. Lets see, I need to build custom decks, a seat and thwart...
 
So, the plan is thus, I make a pattern from the outside of the stem shape, lay it out on glass offcuts, cut the pieces to fit into the respective corners, tape it in place, then fold it back, wet out the wood, flip it back over carefully and it should be in it's proper place without any fussing. Christy is scraping out runs so I have to wait to finish the last piece.


Ok, so that didn't work quite like planned. Of all things, the danged $8 a roll painters masking tape refused to come off, thus distorting the perfectly placed glass after wet out. Small disaster. Live and learn.

Now just have to wait. Rails are soaking and started testing stain colours.


Tried Tung Oil on the left, nope. Middle is Chestnut, right side is Red Mahogany. I think I will pick up some Cherry stain and see how that looks before deciding. I have time.
 
After a 5 day soak the rails got very dark but went in lickety split. Considering I cut the 17 degree bevel on the inside for the tumblehome I will need to plane them flat towards then ends when they dry a bit so they sit level all the way through. Now I can begin planning out the decks...

 
So, all those clamps were really in the way of progress, so I used a Jim Dodd technique and put screws in to hold the rails while they dry, which also allowed me to move forward a bit.

Cutting down the sheer presented a problem. First was figuring out how to cut the ends off, which turned out the simplest way was the most effective. For the sheer line I tried numerous methods before just using the belt sander carefully to not hit the rails too much. Worked like a charm. I do have some fuzzy glass edges to contend with before I epoxy the rails on, but my Dremel with a sanding drum ought to clear that up easily enough. After they dry they will need to come off and be sanded, shaped and stained before going back on. Maybe next weekend.


I got to the thwart as well, and it is becoming my signature, third boat I have put a curved cherry thwart into. I was thinking old school shape originally but this boat is to be a blend of old and new so this still works. The ripples in the glass in this photo are mostly on the flat sawn wood. Nice texture but a bit** to sand and glass. I will refrain from using it on another build if at all possible.


Single car garage shop, space is limited. Due to the weather we brought the table saw in for the detail work and with the router and planer, it was just plain tight, so I'm spending today getting it organized better. The strongback is still inside, tucked up against the wall and makes an excellent bench. Christine is refinishing an old cabinet and will be staining tonight so I have to get it clean enough in there for her. Canoe work will commence again next weekend.

 
Looks great. Nice lines with the shear trimmed. Inwales look purty.

Alan
 
Looks great, and I agree those inwales look nice, really nice.

I like the stain in the middle...oh surprise surprise...it's Chestnut:rolleyes:
 
So, moving forward a bit. Last weekend was staining and bonding the rails to the boat. Monday night I bolted the thwart in and today I hung the seat. It will all need to come out to varnish of course and all that shiny stainless hardware is going to be painted brass colour. So I've started on the decks but that will take awhile...

Due to the fact I am using full hangers, it made it easier to align for drilling the rails. I marked the front of where the seat will be, then clamped the hangers to the rails and used the 6" bit that was used to drill the hangers to mark center on the tape. I then cross haired the spots for drilling. I drilled small first to minimize the bit walking off the spot, then followed up with a bit slightly over sized.


After drilling the holes I clamped the hangers and seat into place and used the hardware to mark where to drill the seat. I adjusted slightly to be in the center then drilled oversize holes again and hung the seat.

I used the seat I built last year for the Mattawa since it matches the theme well, I can build another if I go ahead and modify the bow seat in the Mattawa later this year.

At present there is 7" clearance under the front rail of the seat which should be enough for my feet when I kneel. If not, I can make new shorter hangers or adjust these a bit since there is a full inch cant forward.


I like the stain and the hangars look nice too. You're really moving along. I better get my butt in gear and catch up!

Alan
 
Although it is starting to feel like Spring here, finally, even early ice out would be end of April so I have plenty of time to finish. I'm working on the decks this weekend and they are 7 parts each to fiddle with, but so far it is going well. Maybe I will get them cut and fitted before the weekend is out. After that, lots of varnish, the interior I think will be a semi-gloss to cut the glare a bit but still see the nice wood. All trim will be Epifanes gloss.

The reason I will paint the s/s hardware is I don't like shiny ostentatious looks, like hordes of chrome on a vehicle and the brass colour will go well with the dark stain. For those wondering why not just use brass hardware for other than the seat, well, I've had nothing but issues with brass since they started making it in China. Even pre-drilling a tapered hole, run a steel screw in to cut threads, add a lubricant like wax, the brass screws still keep breaking. If you watch the screw going in, even by hand, you can see the thing twist with each turn. Not risking breaking anything. Need a nice NA made brass plated steel screw source.

I much prefer using silicon bronze hardware but my MN supplier no longer carries the 10-24 6" carriage bolts. There is a place in MA that carries them, Merton's, but they use UPS to ship so I would get zinged with a healthy brokerage fee to get them in the country.

After the present work I still need to cut and scarf outwales, sand the hull and paint it, then tape it out for the graphics. Getting closer though. If only I didn't need the danged day job.
 
Back
Top