• Happy Patent for Life Jacket Made of Cork (1841)! 🍾🏊

First stripper build: Prospector-16 Help & comments appreciated

I don't want to hijack this thread but I am a little confused here now. I what to make my boat bottom as strong as possible. I am NOT concerned about weight. My plans are to put a regular layer plus football layer on the outside. Should I do that on the inside to make it stronger. Mine is the wabnaki and is fairly wide.
 
I don't want to hijack this thread but I am a little confused here now. I what to make my boat bottom as strong as possible. I am NOT concerned about weight. My plans are to put a regular layer plus football layer on the outside. Should I do that on the inside to make it stronger. Mine is the wabnaki and is fairly wide.
I built a Wabnaki and put an extra football layer inside and out.
 
Mine is the Wabnaki also. I did single layer inside and single plus football outside. I'm considering adding the football patch on inside this winter.
Roy
 
And yet, I built both a Kipawa and Freedom 17 with single 6 oz cloth and they have both been fully loaded and tripping, with no sign of any give in the bottom.

I wouldn't want folks succumbing to the hysteria that boats actually "need" double layers to be useful. I agree that internal layers add strength and external layers give abrasion resistance .... but they ARE NOT REQUIRED to have a boat with a solid hull. They are extras ... addons ... above what the designers require and recommend.

The single 6 oz inside and out is sufficient for most home builds ... you can certainly add more layers to achieve additional abrasion resistance and strength .... but .... it is not required for normal use.

Brian
 
Again Every builder has that choice to make !
I built a few canoes with a single layer inside and out ,
My personal experience has taught me that, and extra layer on the outside ? Not only adds abrasion, but stiffness.
I am content with that !
Others have differing opinions.

Jim
 
Depends on how you want to use it. My first three or four canoes were single layer inside and out. They held up pretty well to some extensive tripping, but eventually they all got retired. They were being used by the school club too, so they had a hard life.

I would recommend an inside layer if you plan on running a lot of whitewater where you have the possibility of a good wipeout, with the associated broaching, or hitting rocks with the bottom of the canoe when you are at full speed. If you use a gps, you will be shocked at how fast you go through some rapids, it's faster than a little outboard can push you sometimes. Hitting a rock with the bottom of your canoe at these speeds can cause the inside layer to split. Ask me how I know, lol.

I would recommend an outside football if you intend to do some actual tripping, with dragging and beachings and some whitewater thrown in.

To be clear, a single layer will provide you with lots of strength. Decide on how you want to use it, and build it to that use.
Right! Builder needs to decide how / where the canoe will be used and that will dictate whether reinforcement is needed, how much, and where!
 
I just finished glassing the inside of mine. My goal on this one is for it to be lighter. I usually do two fill coats. I stopped at one. A compromise !

The extra fill coat on the 15' 6" solo, required 18 oz of resin.
 
Last edited:
Pat (and others): Hijack away! the replies and original questions help me a lot, and probably others as well. I'm using walnut for all trim, except decks, which will be walnut and cherry. I'm going a little under 3/4" square, and I'm rabbeting the out-wale so it will cover the strip edge. scuppers will be approximately 5/16 wide, by about 6" long, with the same length left solid. I'll be laying them out tomorrow first thing, and hopefully getting everyting cut tomorrow, so I can install them this weekend. Have the stock scarf joined, and sanded to thickness on a drum sander. I turned the dust collector off, and got about 2 gallons of matching walnut dust. Good thing my gunwales aren't more than 4" longer than needed, or they wouldn't have come all the way out of the sander without hitting the wall.

I'm also tapering the last 32" to the ends down to about 3/8", and tapering the bottom of the outwale slightly (3/4" at hull, to 5/8" at outer edge. The tapering is mostly so the gunwales don't look so "boxy"

Got concerned about accurate measurement of the strip edge, and making sure I don't have any high spots. Made a quick gauge that I can slide along the edge of the hull to find high spots, and thickness that will fit. Just checked the hull, and a "strong 1/4" (less than 9/32") will work just fine. Surprisingly, I only have a couple bulges in the glass that a light sanding will take care of.

Got me thinking though. If I'm covering the strip edge with the gunwales, the wales will be about 1/4" higher. Do I need to (or should I) cut the strips down a 1/4", so my canoe isn't 1/4" higher than designed? On one hand, I say "yes, cut it down". But, the edge of the strip is nicely coated, between glassing outside and inside. If I cut it, I'm back to raw wood.

Here's my fancy gauge, that I slid along the strip edge to check for fit, and find thick spots. And yes, I knew I wasn't going out to 1/2", but as long as I was cutting the grooves, I just kept going.
 
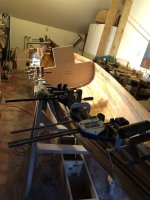
Well the first in-wale is on. Took longer to cut the parts than I had anticipated.....what's new. Not sure how long I'll leave it clamped before I do the other side. Probably at least 2 days. Hate for it to pop loose. Didn't really need all of these clamps, but had them handy, so I used them.

IMG_2392.jpg

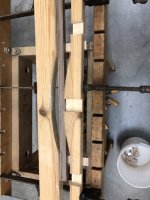
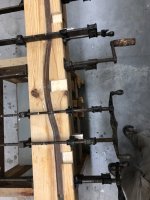
While I'm waiting, started on the seat frames. Doing curved seats, so made a quickie bending jig. Sure like walnut for bending. The slots had clamps in them, just snug enough to keep the strips aligned with each other. Took them off for clean-up after the bar clamps were tight.
IMG_2397.jpgIMG_2398.jpg
 
Lots of clamps are good, I'd rather not have one of those "Oh No" moments if something popped off. I'm guessing you didn't use screws on your gunnels? I like walnut also. Next seats I make will be curved. Did you have a pattern to go by for figuring out the curve of your seats?
Roy
 
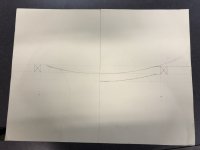
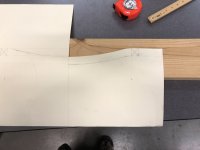
I just created my own seat pattern. Started with how wide I wanted my seat to be, and the drop I wanted. Also, the height of my seat frame rails. For mine, I decided 1" high seat rails, 16" wide seats, 1" drop, continuous curve (not flat on the bottom). Drew 3 parallel lines, 1" apart. Marked the seat frame sides (shown with an "X"). I drew a 4" radius to begin the curve down (this is a comfortable bend with 1/4" walnut strips). Did trial and error to find an arc that was tangent to these two curves, and just a bit below my bottom line. I think I had 22 3/4" radius or something like that.

I drew the full pattern, just so I could see what it looked like. When I transfered it to a 2 by 6 for a clamping mold, I only used half the pattern, then flipped it for the other side, in case my drawing wasn't symmetrical. I had intended to remove a 1" slice out of the clamping jig (the height of my rails). I tried it with just the single cut, and was able to clamp the strips no problem. Added lots of alignment marks, since the two halves of the jig were over 2" apart before clamping. Didn't want to end up all crooked. All in all, worked pretty well.

I applied SLIGHT pressure (just enough to start gripping the wood) to the two end clamps. Then clamped the middle until it was tight, then tightened the ends within about 1/2" of final. Added top bars between middle and ends. Sorry, but lots of lines are hard to see. I drew them light on purpose, so I wouldn't get confused and cut the wrong lines.
IMG_2389.jpgIMG_2390.jpgIMG_2391.jpg
 
Thinking ahead, I believe I have most of the rest figured out. One rather important item I'm still working on is tie-down points & hardware. Anyone have anything they'd like to share?

I saw one that had a brass tube drilled through the stems, about 6" below decks. I like the way this looks, but is it strong enough? I'm concerned it would tear through the stem/hull. If anyone has any thoughts to share, I'd appreciate it.
 
I saw one that had a brass tube drilled through the stems, about 6" below decks. I like the way this looks, but is it strong enough? I'm concerned it would tear through the stem/hull. If anyone has any thoughts to share, I'd appreciate it.
It will certainly be strong enough.

Alan
 
Hi Kliff .... you are following almost exactly what I do, you may find some ideas on my last build thread, not sure if this link will do what it is supposed to, but seats start at post #161


With that style I find cleats work really well

Brian


not sure if this link will do what it is supposed to, but seats start at post #161

You did it right, Brian. To link to a particular post in a thread, click on the number of that post and its exact URL will appear in the address bar. Then paste that address on a new line in your reply so the URL will "unfurl".

Kliff, very nice progress. I think you'll really like the curved seat if you get the dimensions correct.
 
Back
Top