• Happy National Pickle Day! 🥒

Solo expedition build

I don't know, It looks good there and that is what I got from other boats I've had or have in the yard over the years. Hellman sets it at that, and I think most Royalex canoe have it in that neighbourhood....

I know that NOLS put them real low for lining purpose.
 
I thought about that too since I really didn't want something dangling in the water and gurgling away. I decided that I won't use a separate grab loop and instead will tie the painter directly to the "eye". Tying it with a relatively large bowline should allow it to function as a quick grab loop without uncoiling the rope, which will be bungeed to the deck or carry handle to keep it pulled up and out of the water. Or at least that's the plan...

Need to start practicing my lining. Never done it before.

Thanks,

Alan

That should work fine, and if it doesn't work, you can always drill an other hole further up and plug that one....:rolleyes:
 
I'm sure you'll be fine with that set up Alan. I've done a lot of lining, and my ropes are always just attached to the decks, can't bring myself to drill through the canoe. Solo lining takes a bit of getting used to, just remember to keep hands on both ropes. If you are going downstream and the stern starts to suck into the current, just let it go and retrieve with bow line. Same goes if you are pulling upstream, and you loose the bow, don't try to fight it. One of the best summaries for lining is "no guts, no glory".
 
Alan
I'm waiting for you to get a REAL LAZER ! I have several boats that need modification ! ;)

Are you going install access into the flotation chamber ?
That would give you the opportunity slather in some reinforcement around the insert.

We could try it out on the Lizard !

Jim
 
Very happy for you Alan. I have quietly followed your build as I have nothing to offer in the area of boat building. But I understand the deep satisfaction of designing and building purpose built things, and then having them perform the way you wanted / expected them to. So when are you leaving for Canada? Looking forward to the Bloodvein trip report. Dave

Thanks, Dave. The boat isn't perfect and I think there would be a couple things I'd change if I built it again but so far it seems pretty close. It really is a neat feeling.

I leave in two months for my trip. First day I have scheduled off from work is Aug. 17th. It's staring to come fast!

Alan
 
Are you going install access into the flotation chamber ?
That would give you the opportunity slather in some reinforcement around the insert.
Jim

I probably will do that yet. Should be easy enough with a hole saw and a glue-on hatch.

Alan
 
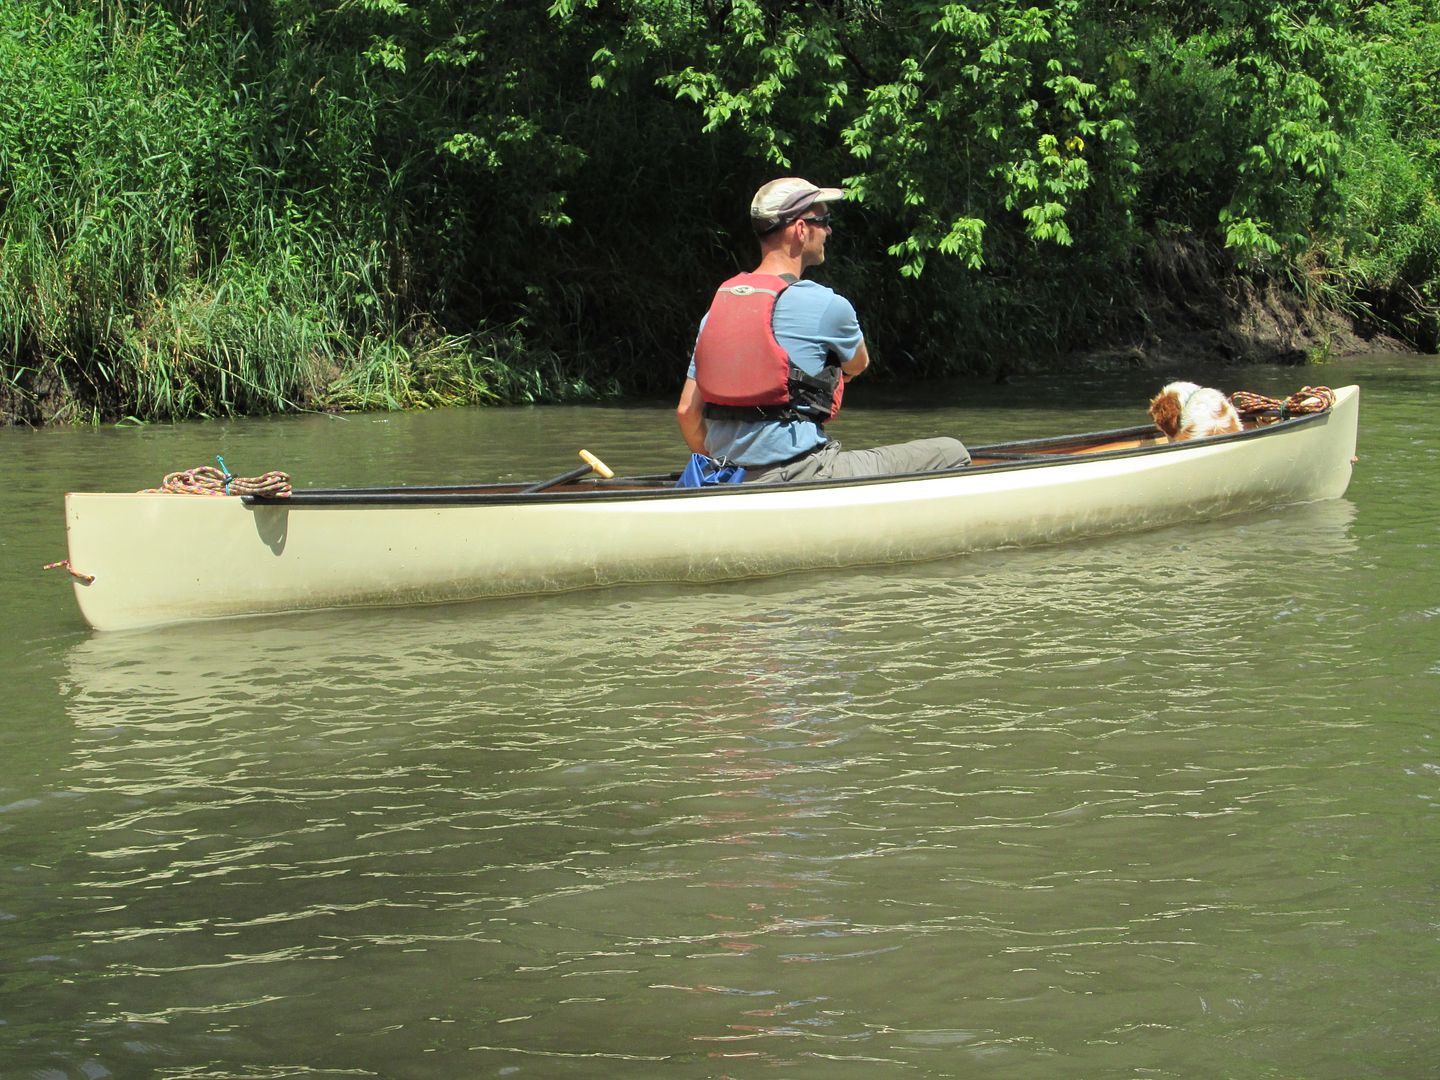
Out on the water with Alan and Sadie. It was a fine day, and a fun trip
We paddled the Lizard Saturday, and though the level was a little lower than expected, it was fine
Alan's Build preformed great ! Alan was even able to paddle back upstream through some mild rapids. Their is no doubt in my mind as to Alan's ability to paddle or build ! This canoe will serve him well on his Expedition !
Here's my best pic.
IMG_0410_zpsecweha1t.jpg

Jim
 
Looks like a nice comfortable fit. Not sure what I think of the painter lines being low like that... Probably more practical, wonder if I can make it look right on my own build, which is going to be a little more... exhibitionist... about it's woodgrain.
 
Thanks for posting the picture, Jim. Had a great time paddling with you Saturday and enjoyed a change of scenery. I look forward to paddling Lizard Creek again. Certainly a little gem.

Sunday I went back to the Blue Earth River to try and get some idea of what I'll be up against on my trip. Paddled 9 miles upstream through decent current (I'd estimate a 2mph average) with lots of small rapids. Some areas were pretty easy and others, like 3/8 mile sections of swift water where you can see the river gradient gradually rising in front of you with no current breaks were not pleasant at all and very slow going. Probably had to get out and walk the canoe up 10 different rapids/riffles that I couldn't paddle up. Some of those were fairly long walks in the areas mentioned earlier. I was surprised at some of the rapids I wasn't able to paddle up as well as some of them that I could. Good practice for ferrying and eddy hopping. It was quite a workout but not as bad as I thought it might me. It took me 5 hours to paddle the 9 miles upstream. It took 1 1/2 hours to make it back to the put-in going downstream.

Most of the time I just dragged the canoe by the bow painter but I did get one opportunity to line with both. It worked pretty slick but I found out that I could either concentrate on getting the canoe to track properly or concentrate on not tripping as I stumbled over underwater rocks and holes. Trying to do both at the same time proved quite challenging.

Alan
 
Alan, you figured out yet how you are going to attach a yoke for portaging?

It's on the agenda along with a foot brace, which I sorely miss. A couple ideas, nothing fancy, bouncing around in my head to try out in the shop soon. I was hoping the foot brace and carry yolk could be one in the same. I need to store in somewhere when not in use so why not put it to work? But the hull is too narrow in the foot brace position for it to pull double duty.

Alan
 
Hmm... Can't resist the math...

That means that your average paddle speed in relation to the water was 4.2 MPH & the current speed averaged 2.1 MPH. Of course, that is a gross oversimplification, and does not account for the time you spent lining at all...
 
It was a fun time on the Lizard Alan !

I also noticed you struggled a lot less than I did going upstream in the rapids, and still carrying about the same payload. But in my defense, I'm almost twice your age !:rolleyes: Some guys will use anything for an excuse !

Looking forward to your foot brace/portage yoke ! And of course paddling with you, DOWNSTREAM again !

Jim
 
OK, back to work. I don't like paddling without a foot brace so time to address that. Been running lots of ideas through my head but ended up copying a simple yet effective design Sawyer used on the Cruiser I own. Scrounging through my aluminum pile I had everything I needed. 1" angle, 1" tube, 7/8" tube, and rivets. Only thing I had to buy was a couple springs.

After measuring where the brace would go and how much adjustment I wanted I cut some 1" aluminum angle brackets to length and hacked some kerfs into them with the chop saw. Getting the spacing right took a bit of trial and error and all the slots had to be slightly wider than the blade. After painting them black:

20150706_002 by Alan, on Flickr

The components of the brace itself:

20150706_004 by Alan, on Flickr

7/8" (I think) tube on the right slips inside the 1" tube on the left. But before the two pieces of tubing go together first the springs are slipped inside the 1" tube. The rivets (there's one you can't see on the back side) provide a stop for the springs.

Once assembled and compressed the springs provide outward pressure to keep the brace locked into the brackets. The bar will be painted black.

20150706_005 by Alan, on Flickr

20150706_006 by Alan, on Flickr

20150706_007 by Alan, on Flickr

20150706_008 by Alan, on Flickr

Very simple, easy, cheap, and effective. Not the sexiest but easy to adjust and no locking knobs or bolts to fiddle with or lose. Total weight, including the brackets, is 12 ounces so pretty lightweight too.

Up next is the removable yoke. Been doing a lot of thinking on this one too but I think I have a plan to go forward with. Again nothing fancy or unique but it should be effective. So far I've got the yoke itself made. Copied a wooden one I have on hand. 17oz vs. 6oz.

20150706_001 by Alan, on Flickr

Alan
 
Great ideas Alan. Where do you get your inspiration from? Seems like there is always a way to solve a problem.

Did you have to go through your hull with bolts to install the Aluminum angle? Or did you glue in place some posts to attach them to?
 
Nice job Alan! How many layers of carbon did you use? Is it going to have slots for adjustment as well?

Just one but it's heavy stuff. 18oz/yard carbon sleeve over 3/4" foam. Same thing I used for my thwarts. Very stiff. Seems to have less flex than the wood version. If it wasn't so dang expensive I'd break one just to see how strong it really is.

I'm going to try to not cut adjustment slots in it. Afraid that could be its downfall if they're too long/large as the foam might want to compress in that area. Hoping I can add a little adjustment on the clamp itself. We'll see what happens. A large washer would help with compression as well.

Did you have to go through your hull with bolts to install the Aluminum angle? Or did you glue in place some posts to attach them to?

Rivets through the hull. I know some people don't like punching holes in their hull or like the way rivets look, and I understand that, but they don't bother me. The Sawyer canoe that I copied the design from had the aluminum angle fiberglassed to the hull so no fasteners required and a pretty clean look. But also not possible to quickly and easily remove.

Took the boat out for a paddle tonight and the foot brace was a welcome addition. Doesn't look too bad now that it's painted black.

Alan
 
Hi Alan
Wondering about the saw tooth angle cutting into packs ? Maybe you have that area designated for your barrels ?

Do you need that much adjustment, beings it will be mostly you paddling ?

I remember Mac McCarthy tying a piece of wood to the thwart of his Wee Lasses, with a short piece of cord. It resembled a swing. He used this as a foot brace. Though I don't have foot braces, I do see their advantage !

Love the yoke ! What kind of foam did you use ?

Jim
 
I probably don't need that much adjustment just for myself but with an adjustable seat it's nice to have the option of a fully adjustable foot brace too, even if it is normally in one position 98% of the time. After trying it out last night I realized I could probably get by moving the brackets back a couple inches. I thought about them rubbing on the pack too, I'll find out when I load it up for a test run. I did round off all the edges to they aren't sharp at least.

I used regular construction foam (XPS) for the yoke.

Alan
 
I thought about them rubbing on the pack too, I'll find out when I load it up for a test run. I did round off all the edges to they aren't sharp at least.

If the exposed metal edge abrading packs or etc is a concern you could just slip a piece of black plastic car door protector edging along the unused portions of the foot brace rails.
 
Back
Top