• Happy Halloween! 🎃🎂

Snaps?

I was thinking that the three peace cover in your photos is what I wanted to make, or have made.I do like the way it's made, and the water dam is some good thinking
The cover is going to be the biggest job for me, since I only paid 200 bucks for the canoe I feel that the cost of a cover can be justified.

So, does CCS still make these covers? If so, what do I do to get one made?

I don’t see the Teton in the CCS list of canoes for which Dan already has a template.

http://www.cookecustomsewing.com/information.htm#typesofskirts

No matter; even if Dan had the template it would almost undoubtedly be for his stock in trade full cover.

Also I don't think Dan makes three piece covers. But it does not seem to make sense for a two hundred dollar canoe to spend two hundred dollars on covers.

That’s the nice part about the “Custom” in Cooke Custom Sewing. Dan made partial covers for two of our canoes, and a bow cover in the same fashion for a friend’s boat.

A partial would be a custom order. A three piece bow-center storage- stern cover is going to be almost as costly as a full cover. I hadn’t looked at canoe cover prices in the CCS website in some years; the current price list for his usual full cover style starts at around $450 - $500.

$200 canoe, $500 cover. . . . yikes.

How to make a canoe spray cover template for cutting and sewing material (with a little help from CCS)

Sizing and cutting the material for a spray cover is actually fairly straightforward, considering the bean pod curves of the sheerline. For canoe models where Cooke doesn’t already have a template he sends a giant piece of transparent Mylar. You just roll that out atop the gunwales, leaving some overlap all the way around.

Tape that transparent material down in a couple spots to hold it in place below the outwales. Trace out the bottom of the outwale edge (and deck plates) all the way around with a Sharpie. Mark the locations of the seats and thwarts. Mark the (___) curves for the open cockpit area if making a partial cover.

Calculate enough material to hem the edges, with the snap rivets positioned in the hemmed material about an inch below the outwale, and leave enough material to hem the ends to encase the minicel water dam.

I’ve used that template method using visqueen plastic for DIY covers, but I hate sewing enough that I will never attempt to DIY another cover.

A $500 custom made cover on a $200 canoe, eh, only you can decide. You could work up a rough list of DIY materials cost, nylon pack cloth, snap rivets, washers, Velcro for paddle retaining straps and see if the delta is worth making your own.
 
Rider, you went and poked the bear. Just to throw more design ideas at you, some other spray cover work

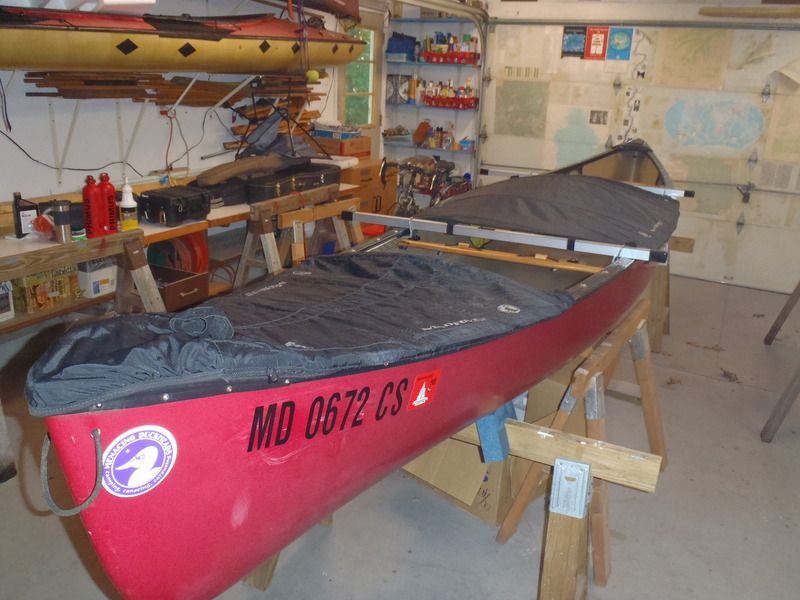
Tandem Cronje with full, skirted covers.


A couple details to note there. The painter lines are best attached to a through hull bow loop or a Tug Eye, and somehow retained on the covers. Actually, because it is hard to grab the gunwales or carry thwart in a spray covered canoe I bring the bow painter back to my seat and secure it in an open cam cleat.

In this case I simply ended the cover part way up the deck plate. Inelegant, but I can unsnap two rivets to reveal the bow carry thwart.

If you look at the Cooke covers on the Penobscot photos you’ll see that the bow loop runs though a short piece of hose forming an external carry handle; Cooke’s spray skirts wrap around the entirety of the deck plates and those ends are impossible to free to get to the stem carry handles, and that little piece of hose is more hand kindly than a naked rope.


I like the removable Velcro skirt around the Cronje bow seat. I’m not fond of (or that fast at) getting in or out of a skirt and it’s nice if at least the bow paddler can quickly hop ashore and control the canoe.


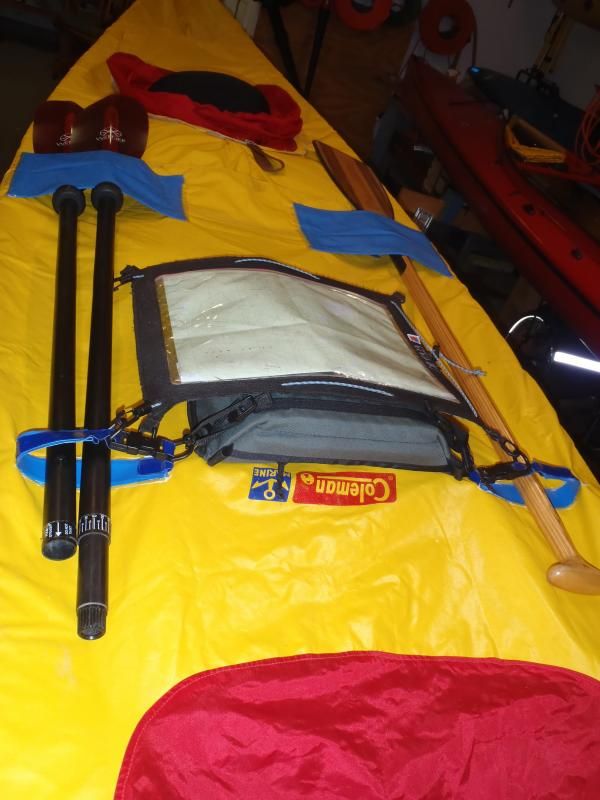
I ended up DIYing some accessories atop that cover. Most importantly, from a design perspective, paddle sleeve and straps; resolving the quandary of what to do with the paddle/spare paddle when using a full spray skirt.

Map case hooks, and a deck bag for miscellaneous day gear. With a fully skirted cover it is a PITA to access gear down in the canoe.


Yes, that is an old Coleman Marine cover, courtesy of a trade with Doug D. That it was a near perfect fit on the Cronje was serendipity. It is some seriously heavy duty vinyl impregnated cloth, but it still fits inside a medium sized stuff bag.

I don’t know what your cover plans are for the tandem Teton, but because of the way those 2-piece covers fit on the Cronje I have them arranged so that I can use only the stern portion when paddling the canoe backwards solo from the bow seat.

Sad to say we don’t use the Cronje much. It is a nice Royalex canoe, and fully outfitted, complete with minicel knee bumpers and foot braces for either tandem or paddling backwards solo, D-rings, minicel knee bumpers, spray covers and etc. I’d sell it but I hate dealing with Craigslist scams and low ballers – someone make me an offer.

This one is a 2 piece Mad River IQ spray cover adapted to a Revelation. Big bow partial, open bow seat, huge “belly” section with arched stays, open stern seat. (Ignore the aluminum bars, they are outriggers for motor use)


The integral stays make those covers a PITA mass to store and transport.

My old duckhunting canoe had a DIY camo cover with a huge arched stay in front of the seat, so I could store and retrieve my shotgun from underneath that yawning cavern. That giant arch did help with rain runoff, and it was quite the elegant stay, made from half an old hula hoop.

Put your thinking cap on, and let us know what you come up with.
 
I found this while online yesterday looking for fabric to make the cover on my canoe. I think it might work and if not, I can all ways make a good rain fly. Any thoughts?

For a snap riveted cover I don’t see a need for anything in the kit besides the fabric. I have a health supply of cord locks, carabineers, bungee cord and 2.2mm Zing-it cord in the shop, but it’s easier to buy the last two in larger quantities.

Is the length/width of fabric in that kit enough for bow, stern and center storage covers for the Teton? That would be a long dang hammock.

Cooke uses 400 Denier urethane coated packcloth. I think he also offers (or once offered) his covers in 1.9 oz sil-nylon.

Maybe the 420D waterproof packcloth from Seattle Fabrics. They have always proven to be a good company to work with.

http://www.seattlefabrics.com/nylons.html#fpc

Oh, look, it is available in fluorescent pink!

And other colors. My Cooke covers are the same color as the hull, which is aesthetically pleasing. For remote trips or fly out stuff perhaps a bright contrasting color would be advantageous.

I know our home sewing machine struggles with heavy duty fabrics, and I struggle mightily with any sewing machine. If I ever made another DIY cover I’d make and mark a template, find someone experienced with a heavy duty machine to sew it for me and add the snaps myself.

Not sure how you find that person. Maybe out of work seamstresses gather outside Jo-Ann Fabrics in the morning.
 
I found this while online yesterday looking for fabric to make the cover on my canoe. I think it might work and if not, I can all ways make a good rain fly. Any thoughts?

No, hammock fabric is breathable so would leak big time. Use the Hyper D from RBTR. It will sew fine on a home machine. It is worth buying the Gutterman thread at the same time. Kyle is a good person to deal with. I have always had good service.
 
No, hammock fabric is breathable so would leak big time. Use the Hyper D from RBTR. It will sew fine on a home machine. It is worth buying the Gutterman thread at the same time. Kyle is a good person to deal with. I have always had good service.

Good call on buying a proper thread along with the material. And about finding a material easier to hem on a home sewing machine than 400D coated nylon.

I looked at the HyperD on the Ripstop by the Roll site. They don’t mention it being waterproof but describe it as “The premium choice fabric for projects such as hammocks, stuff sacks, synthetic quilt/comforter shells, breathable/lightweight garments, or lightweight bags”.

Is HyperD a breathable waterproof material? The breathable part doesn’t much matter on a spray cover, but the waterproof part does.
 
No, hammock fabric is breathable so would leak big time. Use the Hyper D from RBTR. It will sew fine on a home machine. It is worth buying the Gutterman thread at the same time. Kyle is a good person to deal with. I have always had good service.

I was looking at that Hyper D 300, and they say that it's what they make tarps out of, but the add said nothing about it being waterproof... hum...is there a link for RBTR.? Thanks for the thread idea, I was thinking on what type to use.
 
Link for Ripstop by the Roll

http://ripstopbytheroll.com/

I found this on a discussion of HyperD:
“All the HyperD fabrics are treated with a DWR for moisture repellency”

DWR is Durable Water Repellant. I have no idea how DWR treatment compares of a urethane coated nylon in terms of canoe spray cover use.
 
It's a bit confusing as they often have several different options on a base fabric. With the HyperD there are couple of uncoated options and weights, they only have a water repellent coating, then there is the 300 weight that has a full polyurethane coating. The specs say that it has a 4 meter (15ft) waterproofing rating so should be OK for a cover. The olive yellow is really nice colour. I'm not sure I could cope with staring at Blaze Orange all day!
The Gutterman thread is a bit heavier than the normal Sew-All stuff sold in fabric stores and sews fine with an 80/12 needle, though I have also used a 90/14 when adding reinforcing patches to a tarp and it works fine with no discernible hole.
 
1.1 oz Silnylon | Ripstop by the Roll
I know this is a light weight fabric, but take a look at this and tell me what you think. Keep in mind, that I'm not going on a 5 week tripping xpo. I'm just trying to keep the rain and dew out of my canoe on a two or three day run. Light is good, if I can make it work.
 
http://ripstopbytheroll.com/products/1-1-oz-silnylon"]1.1 oz Silnylon | Ripstop by the Roll[/URL]
I know this is a light weight fabric, but take a look at this and tell me what you think. Keep in mind, that I'm not going on a 5 week tripping xpo. I'm just trying to keep the rain and dew out of my canoe on a two or three day run. Light is good, if I can make it work.

I was going to suggest 1.9oz coated ripstop. That's what I used with good success on my OT Pack Bow and stern covers. I also decided to thread a perimeter line around my entire hull which acted as both an anchor point for the cover and a way to lash things inside with no snaps or hooks to catch on fingers or brush or what ever.

Jason

Wow! What some nice thinking, and would give me a good way to attach the cover, without snaps or hooks. I hope you want mind me using some of your ideas.
Thanks you all, for the helpful ideas for my new cover.
Now, all I have to do, is remember how to sew! I haven't sewn anything in 20 years, maybe it's like riding a bike.
I can only hope, to do a job as nice as yours.
I'm going to batten down the hatches now. Have a good night!
Thanks again.
Rider1
 
No Title

I sewed up a two piece wind/rain/spray cover back around 2009 and used it every year since.

I used:
lightweight ripstop coated poly as it won't stretch like nylon when wet;
a heavier poly edging to hold the snaps and for abrasion resistance over the gunnels;
one-way snaps (I originally used velcro but, for me, found it picked up way to much debris when upside down in camp);
a hard paper triangle template to ensure placement of the boat-side snaps;
a black marker for cover snaps; (just laid the cover over the canoe snap, marked the center for cover snap placement)
as I put a cover snap on, I left them on moving from side to side to keep everything even and correct tightness;
the snaps in the canoe itself are fairly close under the gunnel so I don't rub my knuckles;
like most, I put one set of velcro and slot for a spare paddle at the front and another behind me for my double-blade;
for map positioning, I used two clips at the top of the map case and a one-third length of velcro on the bottom. That way I can quickly and easily flip it over;
right in front of me I attached four smallish mesh pouches (velcro to close) for GPS, compass, camera, etc.;
one small velcro bit to hold the end of my painter close to me for easy access when landing.
I also screwed a bicycle water bottle holder under my rear thwart to hold a water bottle.

hope this helps somewhat
Ted


(Robin took this photo in the Daks a few years back) ted-daks.jpg
 

Attachments

  • photo3699.jpg
    photo3699.jpg
    210.8 KB · Views: 0
Last edited:
I used:
one-way snaps (I originally used velcro but, for me, found it picked up way to much debris when upside down in camp)

I used Velcro to attach the first cover I made and had the same issue. Not just picking up crud when upside down in camp; over time the Velcro seemed to pick up debris when just sitting stored at home in a box, and even with gently brushing out the stray hairs and fibers it lost a good bit of its tenacity over time. The Velcro on the covers was a minor hassle, but the Velcro attached to the canoe was a gunk magnet, picking up a weird collection of stray hairs, fibers, spider egg sacks, willow and cottonwood fluff.

I’m not a fan of Velcro in any exposed application. The Velcro paddle shaft restraints on my covers pick up some minor gunk over the course of a trip, but Velcro attached to the canoe was far worse. If using Velcro some design to use it attached only to the cover itself would help,and I would avoid Velcro attached to the hull.

I’m not sure, but in Latremorej’s Velcro use design it looks like he may have attached the Velcro strips only to the cover, running the strips under a piece of cord below the outwale and back onto the cover. If so that would cleverly eliminate the difficulties with Velcro permanently attached to the canoe itself, and allow some cover adjustability to accommodate over-gunwale loads.

I did something like that with one set of partial covers. I used the outside-the-hull portion of float bag lacing and simply tied small dangling toggles (short pieces of plastic pipe) to the cover. To install the cover I just loosened the a taut line hitch at the ends of the lacing for some slack in the perimeter cord, tucked the toggles under the cord on the outside and pulled the taut line hitch back tight.

In practice it worked better to loop the toggles once around the perimeter cord and not just tuck them under, and to set the last toggles at the open cockpit ends further back, to help pull the ends of cover towards the middle and take out any sag.

The cover security was bombproof if ugly, mostly because I should have painted the white plastic pipe toggles a hull matching green before attaching them. On the plus side the slight adjustability of those toggled covers meant that they fit equally well on a MRC Freedom Solo and a Mohawk Odyssey, and since both of those canoes already had through-hull float bag lacing I needed to make no alteration to the boats.

Were I to replicate that type cover attachment today I’d probably use nylon J hooks instead of plastic pipe toggles, and dangle them via a short piece of bungee for easier attachment and auto-adjustability.

http://www.amazon.com/10-J-hooks-Lashing-Hooks-Bungee/dp/B00L0LJVA8

Kinda sorta the way Northwater covers attach. A random link showing Northwater attachment points:

http://northwater.com/products/portage-cargo-hatch

Latremorej, nice work on the Pack. The first cover I made was the Velcro one, a camo cover on my duckhunting canoe.
That canoe was an OT Pack. I had a lot of fun in that boat.
 
.


I’m not sure, but in Latremorej’s Velcro use design it looks like he may have attached the Velcro strips only to the cover, running the strips under a piece of cord below the outwale and back onto the cover. If so that would cleverly eliminate the difficulties with Velcro permanently attached to the canoe itself, and allow some cover adjustability to accommodate over-gunwale loads.


That canoe was an OT Pack. I had a lot of fun in that boat.

Yes, there is no velcro on the boat. Been there done that. It don't do well for a few reasons. I haven't had any issue with this set up yet. I had a need and at the time, decided to use what was handy and left over from other projects. If i were using this cover more often the velcro would have probably started to lose it's grab a little by now but at one maybe two weeks a year (if I'm lucky) it should last a long time.

We're I to do it again, I think Mr McCrea has a winner with the bungee perimeter cord on the cover with little J hooks hanging down on the side hooking onto the boat lacing. The sturdier you need the cover, the thicker the shock cord you buy.

Thanks for the compliments, I love passing ideas around!

Jason
 
I think Mr McCrea has a winner with the bungee perimeter cord on the cover with little J hooks hanging down on the side hooking onto the boat lacing.

Using toggles was an OK compromise for canoes that already had float bag lacing in place, and it was simple fortune that the covers fit both the Freedom Solo and Odyssey 14.

The downside is that the covers are attached just barely below the outwales, where the float bag lacing was installed, so there isn’t a lot of cover material extending down the side of the hull. They work fine for shedding rain or splash, but it is a high and not very tight fit, so when punching through a wave some water comes up between the cover and hull

Northwater resolves that issue by installing the perimeter cord 5 inches below the gunwales, and covering the low set holes with an interior patch. In the Northwater attachment system there is a small loop of cord protruding through the holes every 10 inches or so along the side of the hull, and the line (or bungee) on the cover hooks onto that loop.

I know folks who use Northwater covers like the adjustability of that system, but the idea of drilling and patching thirty some holes drilled 5 inches below the gunwales always gave me pause. Because that system leaves nothing on the inside of the canoe except a vinyl patch over the loop hole I would need to drill another 30 or so holes through the hull for float bag lacing.

The Freedom Solo and Ody 14 are both vinyl gunwaled canoes, so there is not a lot of outwale lip protruding for the cover material to wrap around. Hooking a cover to existing float bag lacing might work better with a wood gunwaled hull, where there is more outwale lip to capture.

I have not tried using hooks instead of the plastic toggles. If I were to do so I’d use a hook with a hole that was oriented in the other direction. The hole orientation in the standard lashing hook would require a half twist at every attachment point, which might be more prone to slipping off the perimeter line. (Or not, I’ve never tried it).

J hook/lashing hook

http://topkayaker.com/index.php?main_page=product_info&cPath=2_133&products_id=425

Maybe something like this:

http://topkayaker.com/index.php?main_page=product_info&cPath=2_19&products_id=1141

There are also bungee cord clips, which would be more secure, and also more of a PITA to unhook when freeing the cover.

http://topkayaker.com/index.php?main_page=product_info&cPath=2_19&products_id=360

Reversing course and walking back the potential advisability of using bungee hooks, either of those hooks is 1 ½ inches long, which would necessitate setting the attachment cord lower than the usual float bag lacing. A standard J-hook is only 1 inch long, and shorter still would be better still.

Anyone know of a ½ inch long hook with the right hole orientation? That might be the ideal hook solution for attaching to float bag lacing just under the gunwales.

Of course hooks or clips of any size would be nasty knuckle scrapers on a full cover, so that solution would only work with partials and a bow cover set out of paddle stroke range. Even so I wouldn’t want to have 30 hooks sticking out along the side of the canoe to catch on things when paddling a tight brushy stream or swamp.

The search for an ideal DIY spray cover attachment system continues. I’m still a fan of rivet snaps.
 
Like this-

PACK%20HOOK.jpg


Made by ITW. I buy them from Hudson4supplies. Use 1/2 inch webbing to sew them along the edge of the spray cover.

Alternatively sew cam lock buckles on to the top of the cover and run webbing from the buckle to the edge of the spray cover then down under the cord and back to the cam lock buckle. The buckle would be out of the way of your hands so that would work for a full cover.
 
I see your point. I will be sewing up two covers this spring. Maybe I will stick with the loop over like before. I still don't want to fuss with snaps

What about replacing the velcro with a strong magnet sewn into the cover?

Jason
 
Back
Top