Looking to make a cover for my canoe, any help well do. Where and what kind material and snaps do I need to buy, to make my spray cover?
-
Happy World Aquatic Animal Day! 🐟🦦🐊
You are using an out of date browser. It may not display this or other websites correctly.
You should upgrade or use an alternative browser.
You should upgrade or use an alternative browser.
Snaps?
- Thread starter rider1
- Start date
My cover is a Cooke Custom Sewing cover. The snaps release only if pulled in one direction .They don't pop off. They seem to be these..
http://www.dotfasteners.com/pull_the_dot.html
They can be hard to snap on but applying pressure with the flat side of a knife works very well
Coated polyester packcloth for the cover
http://www.dotfasteners.com/pull_the_dot.html
They can be hard to snap on but applying pressure with the flat side of a knife works very well
Coated polyester packcloth for the cover
Last edited:
I did this. I bought a cover for a Pennobscott 16 from Old Town. I emptied every hardware store in the area of snaps, rivits, and backing washers. I like the cover, but when it is off (most of the time,) I smash my knuckles in the snaps. If I do it again, I will use North Water's lashings.
My cover is a Cooke Custom Sewing cover. The snaps release only if pulled in one direction .They don't pop off. They seem to be these..
http://www.dotfasteners.com/pull_the_dot.html
They can be hard to snap on but applying pressure with the flat side of a knife works very well
Coated polyester packcloth for the cover
Is there any how to videos that well help me with placement of the snaps, or is it a do or dare type of thing?
About one every eight inches.. The hard part is matching.. If you install the female end on the covers then run two or three layers of painters tape to the hull then press hard on each female snap to get an impression on the tape on the hull. Install the male rivet and then remove the tape.
This is one time you want to measure re measure and re measure to be sure. You don't want to have to find out the snaps are a little out of line re each mated pair.. Its hard to pull on the fabric then to get each half to line up.
This might help a little
http://www.jimmuller.com/2015/07/installing-the-cookes-custom-sewing-canoe-cover-on-wenonah-cascade/
G
Guest
Guest
Install the male rivet and then remove the tape.
Instead of running a full length of tape under the outwale an pressing the female rivet head on the cover into the tape to leave an impression I used a 4 inch length of 3-layered duct tape and moved it along the next approximated hole location after marking and drilling.
Using a couple layers of tape makes the impression easier to see. I put a little Sharpie dot in the center of the snap rivet impression for more accurate aim. Drill through the Sharpie hole and then remove the tape before install the rivet in the hull, otherwise you’ll be riveting the tape to the hull.
I can get a half dozen or so rivet impressions and Sharpie drill holes in the piece of tape before it gets impression cluttered, and then I discard it and make a new layered piece. Not to be Captain Obvious but it helps to fold over a graspable corner on the duct tape for easier removal.
Other things you will need: The right length rivets, depending on the hull material/thickness at the sheerline. A rivet gun nosepiece that will fit inside the rivet heads. Washers to place on the pop rivet inside the hull.
About that last item. Since you will be drilling holes in the hull every 8 inches or so (hint: hopefully spaced to miss the butt ends of thwarts and yoke) you will have the opportunity to install some kind of tie down or mini-ring instead of a washer. Cook Custom Sewing carried teeny stainless steel D-rings for that multi-function purpose. DO NOT use the 1 inch rectangular “rings” that Wenonah sells for that use; stainless steel my arse, they rusted in a few months time.
I forgot the sharpie part.. That's what we did.. I knew there was something missing! No we did not rivet the tape in its layers to the hull
G
Guest
Guest
Looking to make a cover for my canoe, any help well do.
Have you given much thought to the design of the cover? If you are planning to DIY a cover I’d look at the Cook Custom Sewing and Northwater spray cover pages with an eye toward the features and options they offer.
http://www.cookecustomsewing.com/canoecovers.htm
http://northwater.com/products/canoe-spray-deck
Most manufactured covers are “full” covers, with a skirted area for the paddler. Those are no doubt preferable with big waves breaking over the boat or in a deluge of rain. But at the same time many (most) photos of spray covers in use show the sections rolled up out of the way providing an easier open “cockpit”.
I have installed covers on four canoes and have come to prefer partial covers that fit across the bow and stern areas, leaving an open seating area. Those work well for my 90 percentile use; I’m dressed for the weather and the partials occlude most of the rain, splash and wave while allowing me easier access/egress and presenting less entrapment hazard.
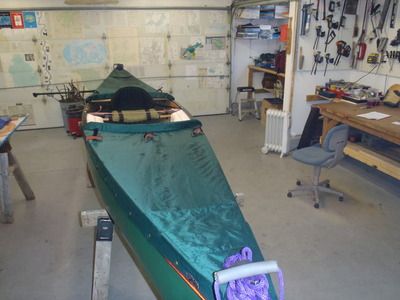
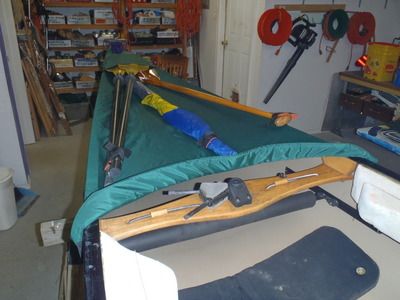
Using partial covers also had a couple of unexpected advantages. I sometimes use only the bow section, leaving the stern open and uncovered for easier gear loading and unloading. The front partial takes care of wave splash and paddle drips and gives me handy storage for paddles and sail. And since I have no exposed rivet heads in paddle stroke range my knuckles stay undinged.
If your spray cover desires are based on shedding big waves that might pour over the gunwales, or to stay dry/warm from the waist down, a full cover would be more desirable. And honest assessment of how, when and why I use a cover 90 percent of the time led me to prefer partials.
G
Guest
Guest
No we did not rivet the tape in its layers to the hull
I cannot say the same. I forget to remove the impression tape a couple of times, realizing that only after the satisfying snap of the rivet gun. Yes, more than once.
Look at one of the forum header pictures. That is Shearwater with a DIY he sewed himself. Maybe he can share details
And OOOH OOH I know why! You did yours all by yourself. I cheated. Dan Cooke sent instructions with the spray cover I bought from him and installed, reading print. Otherwise I would have been chiseling tape for sure.I cannot say the same. I forget to remove the impression tape a couple of times, realizing that only after the satisfying snap of the rivet gun. Yes, more than once.
About one every eight inches.. The hard part is matching.. If you install the female end on the covers then run two or three layers of painters tape to the hull then press hard on each female snap to get an impression on the tape on the hull. Install the male rivet and then remove the tape.
This is one time you want to measure re measure and re measure to be sure. You don't want to have to find out the snaps are a little out of line re each mated pair.. Its hard to pull on the fabric then to get each half to line up.
This might help a little
http://www.jimmuller.com/2015/07/installing-the-cookes-custom-sewing-canoe-cover-on-wenonah-cascade/
I was thinking more on the lines of making a partial cover that will be used to keep the rain out. One on the front, and one on the back, with the paddle area open. I've seen one before, but have know idea, as to how to make it with an arch in it, to keep the water from running into the cockpit. I'm pretty confident that I can make it, if I can find out what to use for that rise in the cover.
G
Guest
Guest
And OOOH OOH I know why! You did yours all by yourself. I cheated. Dan Cooke sent instructions with the spray cover I bought from him and installed, reading print. Otherwise I would have been chiseling tape for sure.
Kim, you get half credit. The tape oops was with CCS covers and I dang near memorized the installation instruction he provides.
The “why” was simply that once everything is laid out and ready to go the actually snap installation on the hull is quick and easy. Press for impression, Sharpie mark, drill, remove tape, install pop rivet.
Sometimes too quick and easy. Press for impression, Sharpie mark, drill, install pop rivet. . . . oh crap, I left the tape in place. Time for another beer.
G
Guest
Guest
I was thinking more on the lines of making a partial cover that will be used to keep the rain out. One on the front, and one on the back, with the paddle area open. I've seen one before, but have know idea, as to how to make it with an arch in it, to keep the water from running into the cockpit. I'm pretty confident that I can make it, if I can find out what to use for that rise in the cover.
Rider, you awakened my spray cover beast within. Apologies for the blather, but I am an obvious fan of partial spray covers. Keep it simple partial spray covers.
I have used covers with arched stays, either sewn into the cover or installed across the boat each time at the launch. I did not like them, mostly because they are problematic to transport and store. The partial covers I have from CCS easily fit in a shoe box sized stuff bag.
The solution on my partial covers was a Dan Cook idea. The open cockpit edge of the covers have a narrow strip of (I guess, feels like) minicel sewn into the hem. When the cover is installed the last set of snaps, set a bit lower on the hull than the other cover snaps, pulls that lip into a vertical semi circle that drains water off of the cover, over the side into the river.
Even if the nylon cover is rain damp saggy I can just rock the hull a bit and any pooled water flows off.
I couldn’t have conceived that simple, effective design. Thank Dan for the nylon dam solution.
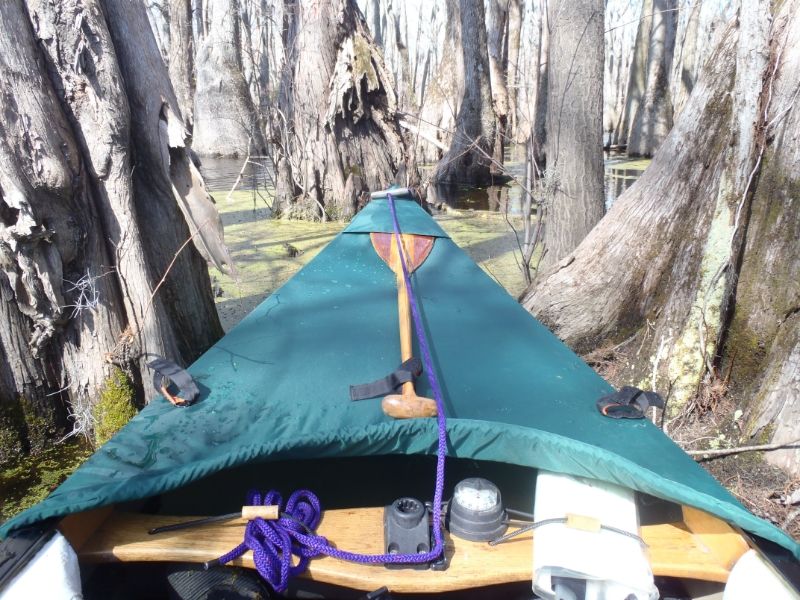
Even with those little minicel lips the covers fit easily in a small stuff bag, so transport and storage is cake.
About the cover material. Poly or nylon? There are advantages and disadvantages to each.
Nylon covers need to be originally fitted to the hull in moderate humidity. Nylon stretches when moist and if you install the hull pop rivets in nylon-sagging high humidity the cover will be bear to snap on in dry, low humidity conditions. Nylon covers also sags when rain dampened.
The advantage to nylon is that if the cover is hot, desert dry and over taut to install, or if you were maybe a little off positioning one snap (moi?. . . almost never), you can just fill the stuff bag with river water, wait a couple of minutes and then install the damp, easily stretchable cover. If you have some gear above the gunwales wetted nylon will stretch enough to accommodate that protrusion. Cook uses nylon and snaps.
Poly doesn’t stretch, or sag when damp. Or damp expand to cover above-gunwale gear. Northwater uses a hook and perimeter line system to hold their covers in place, which allows adjustment latitude with the unstretchable poly.
Both Cook and Northwater offer options of elastic bands, bungie or ladder locked webbing straps across the cover, to allow some tightenable play in the material for adjustment with above gunwale loads. I have none of those in my nylon Cook partials and am happy with the clean and simple no-frills design.
Other considerations in partial cover design. I allowed some open area behind seat for easy access to day gear. I wanted a space there where I could reach behind the seat to retrieve my camera case, lunch or essential bag without forging blindly under the stern cover.
As earlier noted I sometimes use only the bow portion of the cover. I can use the open stern area for above-gunwale gear and it makes it much easier to load or unload half the gear without dealing with the snaps, especially the ones on the far side of the hull. At fugly landings, steep banks or in exposed waves I can extract half of the gear (and weight) before dealing with the covered area.
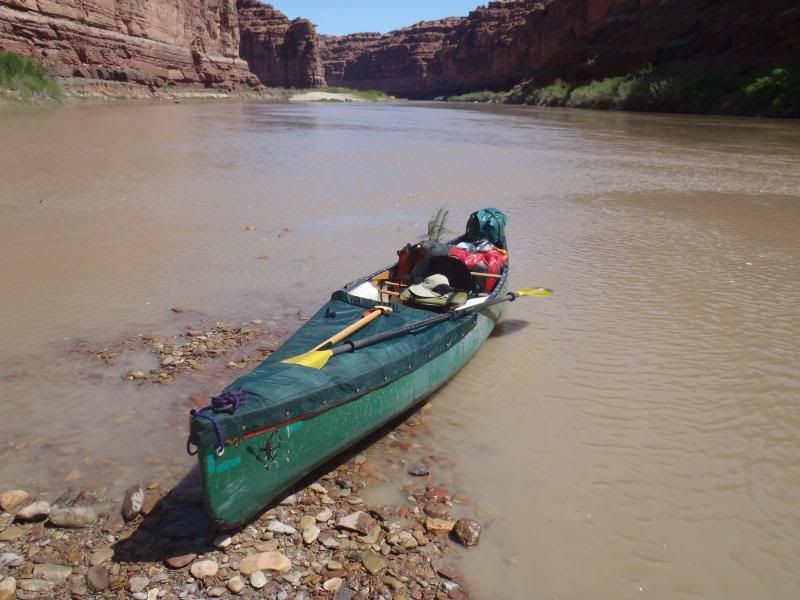
Partial covers are all well and good for my purposes. Except in camp. If I have already have that much of the hull covered I wanted to be able to occlude the open seating area as well, so I could leave my all of paddling gear dry and protected inside the canoe, and not have to flip the hull over or sponge out dew or rainwater the next morning.
With partial covers in place a simple rectangle third section provides an easy storage cover.
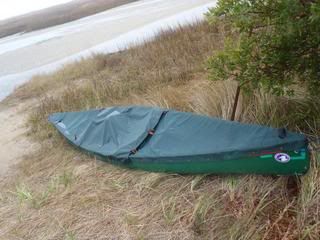
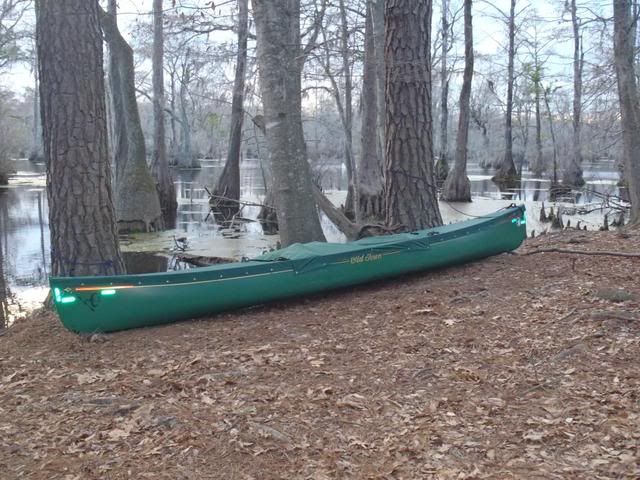
I really like having the ability to walk out to the boat in the morning, undo a couple of snaps and have all my paddling gear already in the canoe, dry and ready to go.
Dry, ready to go and hidden from prying eyes and sticky fingers. On a couple of occasions I’ve had things stolen from my canoe at group sites where the boat was beached distant from camp. We once had a local delinquent try to sell us one of our own knives.
I think having the hull completely covered removes that visible target of opportunity. If I’m leaving pricy paddles, PFD, rescue knife, compass or sail in the canoe I’d rather have them hidden from sight.
I'm almost positive but not quite that my CCS covers aren't nylon. They stretch very little in Florida humidity. That said because they have an extra length of fabric with a snap it is possible to adjust a bit for that (dam 7 gal water jug that stick above the gunwale). Just use that end snap and leave the one in the vicinity of the protrusion undone. I have thought about putting a hoopish tubing under the area right in front of the cockpit. I have such an assembly that fits in a sleeve built into the underside of the spray cover of my Placid Boatworks Rapidfire. It's segmented like a tent cord. Has shock cord through all the tubing. Could be something DIY if you can find some 120 degree bent Alu corners.
I'd take pics but it's night and we leave tomorrow morning for Florida in a newly named storm that just decided we need tomorrow a snowfall equivalent to our entire winter total so far
Anyway maybe some ideas
Have canoes. Need skis maybe
I'd take pics but it's night and we leave tomorrow morning for Florida in a newly named storm that just decided we need tomorrow a snowfall equivalent to our entire winter total so far
Anyway maybe some ideas
Have canoes. Need skis maybe
- Joined
- Jan 15, 2016
- Messages
- 177
- Reaction score
- 0
Cooke and Northwater offer spray covers as mentioned above, and Cliff Jacobson details a nice spray cover design in his book 'Solo Canoeing'.
Cliff's information is also available in his book Canoeing Wild Rivers including DIY designs, jigs and tips. A great read with exceptional information on a variety of topics.
I'm pretty sure Dan does use nylon, at least according to his website he uses nylon packcloth, and from the look of the gear that I have seen that is what he uses. Good polyester cloth at the right weight is hard to find. It tends to be quite stiff. Rockywoods has some nice textured polyester but it is 600d so a little heavier than needed. They also have a lighter diamond ripstop made from a nylon polyester blend. Ripstopbytheroll has some sweet HyperD 300d poly ripstop that could make a great cover.
Sailrite.com has the best choice of high quality snaps including the self adhesive ones I posted about before.
Sailrite.com has the best choice of high quality snaps including the self adhesive ones I posted about before.
No apologies necessary Mike, I was thinking that the three peace cover in your photos is what I wanted to make, or have made.I do like the way it's made, and the water dam is some good thinking . I have an old 16' by 36" Mad river Teton that the cover will be going on. I bought it used from a young man a few week ago. The M.R. was in bad shape, with all the supports and seats long gone and the hull had collapsed in on itself. At the moment I'm still trying to remover the old camouflage paint and reshaping the hull to spec's. So far, it's going as plain, and hopefully I'll have it in the water this spring. The cover is going to be the biggest job for me, since I only paid 200 bucks for the canoe I feel that the cost of a cover can be justified.Or that's what I'm going to tell the wife!
I want be using it in any fast water, being on the North Carolina coast. However rain, wind, waves and early morning fog, and dew is the main concern.
So, does CCS still make these covers? If so, what do I do to get one made?
I want be using it in any fast water, being on the North Carolina coast. However rain, wind, waves and early morning fog, and dew is the main concern.
So, does CCS still make these covers? If so, what do I do to get one made?
Last edited:
Open you wallet. The CCS covers are made by Dan Cooke and he probably has the pattern for the Teton. If not he sends you mylar and tracing instructions. Then you send in the marked mylar and a couple of weeks later comes your cover However his covers do not come with stiffening metal arch, though if you specify, he may do that
I have a couple of CCS covers and a hate relationship with my sewing machine, so I bought. If you have sewn covers before I would try making your own, especially with a budget in mind..My cover with no stiffeners does tend to sag in front of me which I don't like in the rain. I think this is my own fault for not asking for some sort of stiffener. The fabric could be nylon but it is a packcloth. Check out Seattle Fabrics for fabric. They specialize in outdoor fabric.
Also I don't think Dan makes three piece covers. But it does not seem to make sense for a two hundred dollar canoe to spend two hundred dollars on covers.
Similar threads
- Replies
- 5
- Views
- 190
- Replies
- 29
- Views
- 1K
