• Happy Card Playing Day! ♠️♥️♦️♣️🃏

Rebuild of a Mad River Traveler

Thanks Mike, for the info and offer of shop treasures. I'm still waffling on the hatch idea. I'm not sure the tank bulkhead is rigid enough to take fasteners well, so I might have to reinforce it, and then that becomes more weight (and work). However, I have made some progress closing the stern tank, so I think I'm going down that road (Approach #1) and will get there before spring.

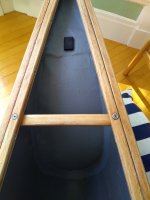
All the thinking about Approach #3 (gratuitous outfitting foam) and the joys of minicell reminded me that I have a box of random pieces of the stuff. The hard part of closing the top of the float tank is that there's nothing to push against, and any "scaffolding" in the tank would be in the tank for good, or at least until I decided to do an access hatch. However, a wedge shaped chunk of scrap minicell holds its position pretty well in the sharp stems, well enough to hold a piece of glass.

First I marked off the lines where I wanted the top of the tank to meet the hull. Then I cut a 2" x 2' ribbon of glass, and used the minicell wedge to hold it in the stern, just below the holes for the grab loop.
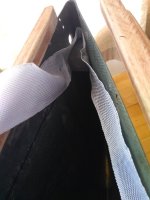
IMG_20220206_120732246.jpg

Actually laminating that glass in that position would have been a mess, but with the boat on its side it was easy enough to superglue it to the hull below the edge-of-tank-top line (I think that superglue trick comes from @Alan Gage).
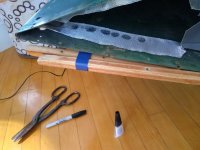
IMG_20220206_130031859.jpg

Doing that on both sides, and filling in more glue right along the sharpie line so the fabric wants to fold there, I then had a pair of very floppy "shelves" meeting in the stem. Eventually the wedge wiggled out of position but by then there was enough glued that I didn't need it.
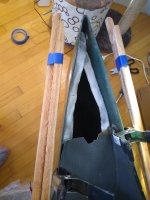
IMG_20220206_134144304.jpg

That was almost enough to gently laminate on top of, although I did add a scrap piece as a bridge (no photo). I closed the gunwales up again before I did the deed, so it would be in the right shape.
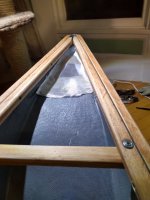
IMG_20220206_191150348_HDR.jpg

It was crowded under the inwales, but with popsicle sticks and a Q-tip I was able to get the epoxy where it needed to go. Glass just wants to do the right thing when it's wetted out. I still have to do the bow, but now at least I have a plan.
 
I've made some progress on this boat. Having it indoors helps.

The float tanks turned out fine. They have a few lumps and ridges, given the awkward nothing-to-push-against lamination, but I'll take the B and move on.

IMG_20220226_114603305.jpg

MR made the tanks fairly large, so the tops of them ended up just a couple inches below the gunwales. With some attachment scheme I should be able to use them for securing painters, which is great since I was planning to go deckless.

It turns out that the porch paint I had lying around, Glidden Steel Gray, is a close-enough match for Mad River Inside Gray. I just went a brush width beyond the tank. The old inside paint is in good shape, whatever trauma tweaked the shearline must have been open side down.

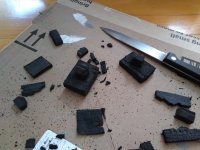
I drilled holes in the tanks to avoid pressure change issues, which meant that I needed some kind of closure. I considered wine corks, but that would have required uncomfortably large holes. Eventually I figured out some custom minicell plugs would work. With minicell scraps and a steak knife who needs a 3d printer?

IMG_20220226_113206902.jpg

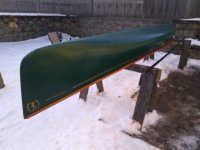
I did some "automotive" work on the outside of the hull. The gelcoat was faded but in pretty good shape, so I hit it with some Turtle Wax and buffed it. That made it look more shiny and highlighted all the scratches, so I did it again with more feeling. The decals had taken a few hits but were all there, and I like having the bunny and the model inscription, so I gave them a couple coats of Armor All. Overall I'm happy with the appearance and I'm glad I didn't need to paint the outside. Pretty clean for a 33 year old tripping boat.

Finally it was time for this canoe to leave the house so I could do some stinky work, stain and turpentine-BLO on the gunwales.

IMG_20220305_162850298.jpg

At this point the boat is ready to paddle, although it could still use some outfitting, most significantly a footbrace. I'm not sure what I'm going to do for that, maybe a Sawyer style floor mount.
 
Considering how tough a shape it was in you have brought back to life and have done an excellent job of it! I am happy to see it go to someone with skills to do that and also take it out and use it! The patch job on the float tank turned out nicely! A job well done!
 
Outfitting update on this canoe. It's in service, I haven't tripped in it yet but I've done a dozen or so day paddles.

I don't go anywhere far without a footbrace, so as soon as I felt like the seat setup was confirmed I started thinking about how to do a footbrace. I've installed several of the Wenonah sliding type, and they're OK, but I wasn't all that keen on drilling holes for pop rivets. For all its history, this boat is very clean in the chines. I decided to try making a floor mount footbrace sliding on wooden rails, like I've seen in some Sawyers.

I measured everything out, taped, measured somemore, etc. Given the shearline issues in this canoe, any measurement against the gunwales is at best +/- 3/16". However, this is a Mad River, and the Vee is where the Vee is, so I could use the keel line as a straight reference.

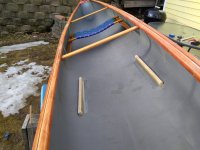
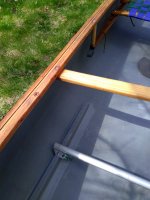
For wood, I used scrap from the gunwales. I sure got a lot of mileage out of that 9' poplar board: gunwales, middle of the laminated thwarts and grab handles, now footbrace rails. I had to do quite a bit of hand planing to get the rails to sit flat against the curved and tapering hull. First I epoxyed them in, with some extra guides to make sure the two rails stay parallel, then I added strips of 2" glass to add some "push outward" strength. Everything took twice as long because the boat had to be tilted up at the correct angle for each side, but eventually I had a couple wooden rails securely attached to the hull.

IMG_20220314_161731195.jpg
IMG_20220315_165829145.jpg


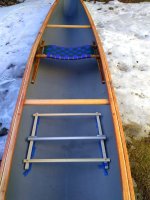
The footbrace itself is a roundish aluminum tube with two short sections of 3/4" L-bracket riveted on, and it's attached to the rails with two stainless steel wood screws. I haven't figured out a toolless adjustment mechanism, but I always have a short philips head screwdriver in my repair kit anyway.

The L-brackets are leftovers from the piece that became my skillsaw fence, and the tube is part of the handle of a dead Steam Mop my wife threw away (plastic trash is trash, but aluminum is gold). Scraps, shop spares and garbage, this kind of project builds scavenger karma.

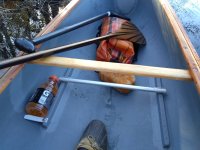
This last picture shows the footbrace painted (three coats of porch paint) and on the water. After finding that a water bottle fit nicely between the rail and the hull, I added a small tab on the left side so I could stash a gatorade or nalgene bottle there without it wiggling out. This footbrace is on the low side, but I'm fine with that. It's still too cold for barefoot paddling, but everything is smooth so it should be toe safe come summer.

IMG_20220424_174354639.jpg
 
That’s great! I like the water bottle happy accident too. Since your bar is low, some foam pipe insulation should make it about perfect! The stuff makes my bar effectively too high in my Prism. I need to find some thinner insulation.
 
I’m really enjoying following this rebuild. Along with the TW Special refurbishment Canoe Tripping has two ex-Scooter & Hal canoes currently being resurrected.

The Traveler hull is impressively unmarred for its age and dereliction, and I like the floor mounted foot brace keeping the chines pop rivet free. I will make minor exception to this:

“plastic trash is trash, but aluminum is gold). Scraps, shop spares and garbage, this kind of project builds scavenger karma”

Scrap aluminum tubing and L’s are gold, but some scrap plastic is at least silver. I’ve found a dozen uses for squares of scrap Royalex from Doug D, and have a scrap of rigid black plastic attached to the side of my office desk so things don’t fall off the side where it abuts the concrete block footer. I’m saving a big flat piece of plastic in case I ever want to put giant, old school top mounted deck plates on some canoe.

So, any thought about adding a D-ring or two, or webbing loops on the ends of the thwart carriage bolts?

“Since your bar is low, some foam pipe insulation should make it about perfect! The stuff makes my bar effectively too high in my Prism. I need to find some thinner insulation”

About the foam pipe insulation the black rubbery stuff is a thicker and more durable than the grey foam stuff.

Thinner insulation? Maybe a neoprene sleeve; I’ve seen cable management sleeves about the correct diameter for a foot brace bar.

BTW, Woodpuppy, I somehow inadvertently got all lovey with your post. My bad, I have no idea how that happened, and I figured out how to remove it.
 
I’m really enjoying following this rebuild. Along with the TW Special refurbishment Canoe Tripping has two ex-Scooter & Hal canoes currently being resurrected.

The Traveler hull is impressively unmarred for its age and dereliction, and I like the floor mounted foot brace keeping the chines pop rivet free. I will make minor exception to this:

“plastic trash is trash, but aluminum is gold). Scraps, shop spares and garbage, this kind of project builds scavenger karma”

Scrap aluminum tubing and L’s are gold, but some scrap plastic is at least silver. I’ve found a dozen uses for squares of scrap Royalex from Doug D, and have a scrap of rigid black plastic attached to the side of my office desk so things don’t fall off the side where it abuts the concrete block footer. I’m saving a big flat piece of plastic in case I ever want to put giant, old school top mounted deck plates on some canoe.

So, any thought about adding a D-ring or two, or webbing loops on the ends of the thwart carriage bolts?

I hear you about the plastic, and I confess that I do have a couple pieces of sheet vinyl that look like they might become something-I-know-not-what if heated and shaped. Probably not a deck though, I'm living the deck free lifestyle these days. Now that you mention webbing loops, I have a shoebox full of webbing scraps for just this kind of thing, so I guess that's more nylon/polyester fiber aka silver/plastic.

Because the sliding seat rails extend a foot or so forward of the seat in its usual position, the front seat drop bolts look like a convenient spot for attachments. I added a couple loops there and I'm going to see how they work out. While I wouldn't attach anything large at that point since it would be in the footwell, I expect it will be a good spot for e.g. a mesh bag full of small items that don't float. You can see those loops in the picture below, although it's gray webbing with a gray background so not much contrast.

Also, when I shaped the footbrace L brackets to remove corners and rough edges I drilled extra holes sized to accept a small carabiner (green in the picture), which gives me another low attach point. I'm not sure how useful those will prove to be, but they're out of the way so why not.

A couple more outfitting minutae visible in the picture: the loose paracord near the sliding seat rail is because I haven't figured out how to anchor the seat yet (a spring clamp is awkward), so the current scheme is a cord from one front seat drop to the other through the seat frame, tied with a taut line hitch so I can adjust it. Finally, the 1" minicell pad on the floor in front of the seat is a head pad (for portaging) and also a dry place to put a camera / granola bar.

IMG_20220501_130217532.jpg

“Since your bar is low, some foam pipe insulation should make it about perfect! The stuff makes my bar effectively too high in my Prism. I need to find some thinner insulation”

About the foam pipe insulation the black rubbery stuff is a thicker and more durable than the grey foam stuff.

Thinner insulation? Maybe a neoprene sleeve; I’ve seen cable management sleeves about the correct diameter for a foot brace bar.

...

Thanks guys. Come summer I'll find and install some kush. This should be a good barefoot boat, the inside fiberglass has a bit of texture but it's not rough.
 
While I wouldn't attach anything large at that point since it would be in the footwell, I expect it will be a good spot for e.g. a mesh bag full of small items that don't float

Paddler friend Topher made something he called a “Nutsack”, a mesh envelope 12” or 14” long by 4” deep, with a bungee cord rand in the top hem. It clipped to tie points under the inwale to contain small items easily at hand without having some bag or container on the floor underfoot.

The bungee rand kept the items within the mesh pouch secure in event of a capsize, but easy to access or put away.
 
Back
Top