• Happy National Pfeffernusse Day! ⚪🇩🇪😋

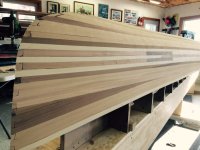
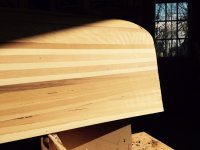
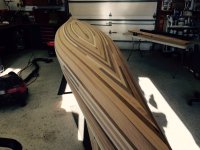
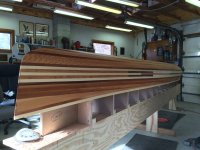
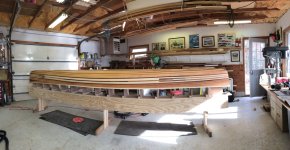
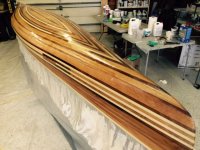
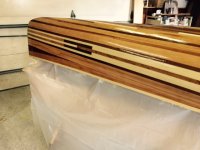
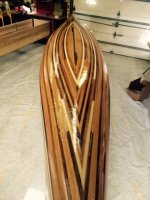
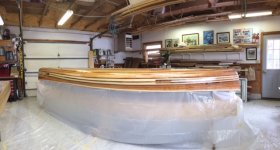
My first stripper in progress

No Title

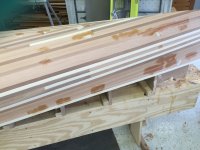
Lots of sanding over the weekend, lots. Currently I am taking down the high spots with 50 grit using an ROS hooked up to the shop vac, then onto 80 and a finish of 120. The lack of dust is simply amazing, however just to be safe I'm wearing a respirator as well as I have heard of a nasty allergenic reaction to the cedar dust and I don't want future issues.

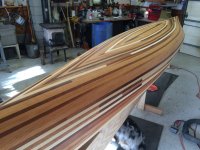
On the bow and stern, is there a suggested angle of entry from the bottom of the canoe to the top, or does one just remove wood until it "looks right"?
Also, a few of my strips have a very pretty grain to them, sort of rippely as the harder wood veins are spaced rather wide. This causes a subtle texture. Does anyone have a suggestion to make the surface smooth or, perhaps it levels out in the glass/resin process.

Mac
 

Attachments

  • photo3661.jpg
    photo3661.jpg
    361.5 KB · Views: 1
  • photo3662.jpg
    photo3662.jpg
    333.6 KB · Views: 1
  • photo3663.jpg
    photo3663.jpg
    423.8 KB · Views: 1
Looks great. That's going to be a sharp looking pattern on the bottom.

I don't think there's really anything you can do with the ripples in the flat sawn pieces at this point. After fiberglassing and sanding the surface smooth they'll be gone.

As for the entry angle: What I usually do is sand it until it looks right, then take off a little more, then cuss, and then mix up thickened epoxy to fix the hole I just made.

You don't get a whole lot of leeway on the entry angle since it pretty much has to follow the shape of the forms. I'm not sure at what point you're at in the pictures you posted but in the first picture I think a lot more material needs to come off the stem. The tip of the stem should be where the two strips come together. Sanding to that point should give you the correct profile, as intended by the designer, with just a little extra room to sand out any deviations if needed.

Alan
 
Mac, it's looking very nice.

The flat-sawn pieces can be a problem in sanding because they give up the soft grain easily, and the harder ridges remain. Perhaps the best one can do with flat-sawn boards is hand-sand them at 45 degrees (alternating), using 100 grit paper on a stiff but flexible foam sanding board at least a foot in length.

But once valleys have been created, it becomes a problem to fill them.

If there are high ridges, you might try a VERY sharp spokeshave with VERY little blade exposed-- again, at 45 degrees and focus only on the ridges. If the soft grain is already too low, however, you will have to consider some sort of fill.

If you plan to paint the outside it doesn't matter how you fill-- but if you want the strips to show, you will have to think carefully about the filler. Filling with epoxy and wood dust makes rocky material even harder than those ridges-- and a lightweight fairing compound like 410 won't match the wood colour and it totally hides the grain.

What to do.

Here's something to consider, but it is labour-intensive: put the cloth on when the hull is ready, but before fillling those valleys. After the cloth is nearly cured come back and fill those valleys with CLEAR epoxy and baby-sit it until it kicks-- otherwise it will slide down the hull. You may have to do this a few times to fill it, but once you sand it level, it will be transparent and the valleys will be flush with the rest of the hull. It will take a couple of days, but you might consider it.

I'm sure others have some better ideas, however. Good luck with the rest of your beautiful project.
 
Last edited:
I have a fair bit of flat sawn in my boat too and I love the grain it gives. Although I do have the ridging issue you are talking about, it is really minor and I am not going to do anything with it. The inside of mine will be clear to show the wood and I doubt the minor depressions on the flat grain will be an issue. I hope to glass the interior this coming weekend so will find out then.
 
No Title

Too many out state conferences and down days due to a nasty cold kept me out of the shop. But now I'm back and hard at it. The putty work went well. I have sanded from 50 to 80 and yesterday wetted the canoe to pull out grain for a final 120 later this week. After reading three books and several on-line accounts about building cedar strip boats, I completely appreciate that everyone does it a bit differently. Likely some of my procedures are over-kill and a few will be chalked up as part of the learning curve.

Looking at the posted pictures, it appears that the stern is way goofy, odd angle of sorts, at the edge. This is a real optical illusion as there is no 'flare' nearer the top of the canoe. However it does look accentuated from the pics. I better give it another eagle eye review.

This weekend I am fiberglassing the exterior. Two friends have volunteered to participate in the wrap. Although I have researched a wealth of materials, how about a few tips from some gifted builders to a guy who wants a finished product to be proud of.

Thanks for your talented insights, Mac
 

Attachments

  • photo3799.JPG
    photo3799.JPG
    310.8 KB · Views: 1
  • photo3800.JPG
    photo3800.JPG
    240.2 KB · Views: 1
  • photo3801.JPG
    photo3801.JPG
    259 KB · Views: 1
  • photo3802.JPG
    photo3802.JPG
    235.5 KB · Views: 1
  • photo3803.JPG
    photo3803.JPG
    305.1 KB · Views: 1
That looks great wetted down!

Only fiberglassing words of wisdom are: "don't sweat it". Most people worry about this step and many seem to find it easier than they thought it would be. You'll be fine.

Trim the overhang while the resin is still green. At this point the hull won't be wet any more, maybe just a little tacky if you press hard with your finger, but the wetted out fiberglass hanging below the shear will still be pliable. A sharp razor blade knife will easily and cleanly slice it off. This is also a good time to easily shave off any drips or runs with a sharp chisel. Depending on the resin you're using and the temperature of the shop probably 6-8 hours after wetting out the hull. If you can't get back to it while the resin is green no big deal. It will still trim fine, just not quite as easily.

What are you using for resin.

Alan
 
Looks Great! Like Alan said, fiberglassing the outside is one of the easier processes in the build. I usually reinforce the stems with a few strips of fiberglass before I cover the hull. Other people do it after the wetout, some don't do it at all. I find trying to wrap the cloth around the stems during wet out to be a pain, so that's why I do it before the wetout.
 
Anything you build yourself is something to be proud of.

I only added one layer of glass on the stems since I am using stem bands. Did it at the same time as wet out I think. I had pieces precut on the bias and they went on pretty good.
 
I usually apply 2 to 3 layers of glass at the stems. Alwys bias cut, or else it will not wrap too well.
If it's a rough service hull, I do 2 layers of glass and 1 or 2 layers of Dynel.
BTW, it's looking pretty nice.
Keep a squeegee nearby, and acetone and paper towels for clean up. Be sure of your mixing ratios and measurements.
Take your time and enjoy the ride!!
 
Just a few questions Jack.
Are you planning on a seal coat ?
Double layering the bottom ?
What epoxy?

Some things I always think of , is getting everything lined up ahead of time. It's not good to be running around looking for something while the epoxy is mixed.

Heat your shop up just before starting that first batch. If you can 75+degrees, then when you start applying epoxy during both the seal coat, and the wet out coat, drop the temp about 5 degrees or a little more. This will nearly stop outgassing, or bubbles in your epoxy.

I apply my fill coats, and as soon as the wet out coat cures past the tacky stage.

I apply fill coats while the previous fill coat is still tacky, about two or three hours apart. This aids greatly in reducing runs.

Stay with the epoxy while it cures, if you leave, you can come back to problems !

Wish I could be there to help !!!

I go with two bias strips on the ends. Wide one first. These I do just after wetting out the cloth.

Scraping runs, and trimming cloth is best done, like already mentioned, that first 24hrs after glassing.

Mix your epoxy accurately, and long enough !

It's nerve racking sometimes, but stay the course, and you'll be fine !

Best of Luck!

Jim
 
Last edited:
As I have been using the experience of Dennis at Northwest Canoe and his available products, thus I am likely going with the MAS resin system and 6 oz fiberglass outside and inside the boat. I will have great temperature control and plan to begin with a bow to stern seal with a resin coat, followed by three strips of bias upon the ends layered 1/3, 1/3 and 1/3 so they smooth across the stems with maximum protection. Perhaps I'll go with two, narrow inside the wide. This will be followed by the fiberglass and filled in after, as everyone suggests, 3-4 hours.

Once the outside is done, how long can I expect to wait before popping the product from the forms and flipping over? Should I varnish the hull before or after the inside is complete? Or perhaps polyurethane? I plan to oil my gunnels.
 
Once the outside is done, how long can I expect to wait before popping the product from the forms and flipping over? Should I varnish the hull before or after the inside is complete? Or perhaps polyurethane? I plan to oil my gunnels.

How long to flip will depend on the temperature, speed of the hardener, and whether or not you want to do the final sanding before or after it's taken off the forms. While it's still on the forms is a nice time to do the final sanding after fill coats to flatten the surface but you might be looking at 5 or more days after the last fill coat until you can do this.

I usually pull mine off the forms a couple days after the last fill coat, when the epoxy is hard and can't be scratched or dented with a fingernail, and start working on the inside. After the inside has been fiberglassed I'll flip it back over for the final sanding on the outside. This also takes care of any scratches or knicks that occurred while I was working on the inside.

I know some people do all the sanding and varnishing of the outside before pulling the canoe off the forms but they must be a lot more careful workers than I am. The outside always seems to pick up some scuffs and scratches from getting jostled while sanding the inside and fitting gunwales. I prefer to do the final outside sanding just before the gunwales go on (harder to sand after they're on) and I wait to do the varnish as the final step after everything else has been installed.

Alan
 
Ya, I'm the opposite of Alan, I sand the exterior before I pop it off the forms. If I have the time, I will often varnish it then as well.
 
Sorry Alan Mem and I are teamed against you on this one !

I sand my hull while it's on the forms. Keeps it from moving around. But I wait to varnish until I've sanded both sides, like Alan.

Every builder develops their own style ! I've tweeked mine a lot over the years, and I still have some tweeking to do !

I differ a lot with Dennis, but fully respect his experience !

Good luck

Jim
 
Last edited:
On another thread Jim discussed a hot glue block tip that is real is real keen and used to pull the hull back to the form prior to finishing if necessary. On the canoe I'm glassing, hopefully this weekend, I have pulled the fine nails I used to set my sheer line at the beginning of the project. The sheer strip is no longer tight to the forms, maybe up to a 1/4 sprung off. Would you suggest the block/hot glue to remedy this or will the hull tighten up when I add the thwart, seat etc?
 
I have pulled the fine nails I used to set my sheer line at the beginning of the project. The sheer strip is no longer tight to the forms, maybe up to a 1/4 sprung off. Would you suggest the block/hot glue to remedy this or will the hull tighten up when I add the thwart, seat etc?

You'll be fine leaving it as is.

Alan
 
On another thread Jim discussed a hot glue block tip that is real is real keen and used to pull the hull back to the form prior to finishing if necessary. On the canoe I'm glassing, hopefully this weekend, I have pulled the fine nails I used to set my sheer line at the beginning of the project. The sheer strip is no longer tight to the forms, maybe up to a 1/4 sprung off. Would you suggest the block/hot glue to remedy this or will the hull tighten up when I add the thwart, seat etc?

In the thread you refer to, The hull was raised UP in the middle. Gluing the block to the hull. pulling it down, and fastening it worked great.

As Alan stated, you'll be fine.

Jim
 
No Title

The deeper I get into building a canoe, the more enjoyment I am getting. The fiberglass work went very well. Only one extra set of hands could participate, but I think three of us would have been super overkill. I took a couple of pictures, but learned that resin and iphones don't like each other. Nor am I able to articulate fine photography with multiple pairs of gloves on.

My friend Paul and I applied a seal coat, three layers of keel guard pieces, the full sheet of glass and two coats of resin and then had to call it for the day as my father-in-law, suffering from lung cancer, has had a turn for the worse and my presence was needed elsewhere.

The glassing project was really pretty easy to do and I shouldn't have been intimidated. As I review the procedure I wish I had used the medium speed MAS hardener rather than the slow hardener. It just seemed that there was a lot of "extra" time that could have been used more efficiently. I did use squeegees as when I applied the resin with the rollers I purchased I had a foamy mess.

I checked the work today and was very pleased with what I saw. However I am going to scuff it up tomorrow and apply a third skim coat of resin as it is not all smooth as glass. No dry-fabric texturing, but semi-visible in areas. The sand out will also allow me to improve the ends where I wrapped the excess fabric around the bow and stern. I think I will be able to do a better job on my next canoe.

Oh yea, prior to the fiberglassing I touched up my ends to be a bit more uniform and straight up. My wife gave me her artistic eye and a thumbs up upon completion.
 

Attachments

  • photo3903.jpg
    photo3903.jpg
    137.6 KB · Views: 1
  • photo3904.jpg
    photo3904.jpg
    101 KB · Views: 1
  • photo3905.jpg
    photo3905.jpg
    117.8 KB · Views: 1
  • photo3906.JPG
    photo3906.JPG
    87.4 KB · Views: 1
Glad things went well. Looks fantastic!

I'm surprised you had so much foam with your roller. What kind did you use? I usually use a combination of roller and squeegee on the outside. I do the flat parts with the squeegee and the sides with the roller. Then the squeegee over the whole thing to take off the excess. On the inside I usually use the squeegee exclusively.

I wish I had used the medium speed MAS hardener rather than the slow hardener. It just seemed that there was a lot of "extra" time that could have been used more efficiently.

Slow is good. The difference between the slow hardener (30 min. pot life) and medium (15 min. pot life) is huge. You can start running into problems with it kicking in the cup/tray before you've had time to get it on the hull. The faster the hardener the quicker it goes when it kicks. While the slow resin can sometimes seem painfully slow it's much appreciated when you run into a snag or have to stop and fix something. At some point you'll get on the wrong side of the curing curve before you're ready and wish you had an even slower hardener. This winter I've been using resins with 45-60 minute pot life when doing multiple layers in one session. I do keep fast setting hardeners around for smaller projects.

It won't seem so bad as you get more familiar with the process. You probably spent a lot of time babysitting it to check for runs and waiting for the resin to get hard enough for a fill coat. That's a good thing to do but after a couple boats you'll just walk out of the shop and come back 5 or 6 hours later, or the next morning, when you know it's ready.

Only thing I think you should have done differently was to trim the fiberglass closer to the hull before wetting out it. Save those big scraps, they'll come in handy for something sometime. Actually, I usually cut up some of those scraps on the bias and use them as my extra stem reinforcements.

Alan
 
Back
Top