• Happy Patent for Life Jacket Made of Cork (1841)! 🍾🏊

First stripper build: Prospector-16 Help & comments appreciated

Welcome to site membership, Kliff!

Feel free to ask any questions and post messages, photos and videos in any of our forums. Of course, you've already ripped out to a running start. Please consider adding your location and an avatar photo to your profile. We look forward to your boat build and other future contributions to our community.
 
I see I was Lax in welcoming you Kliff !

I was so excited about a new build thread ! I Wiffed it !

A Warm Welcome !

You have landed a great site ! Jim
 
I ignore Jim's advice at my own peril, but I too have used the table saw with enough success to make it my method of choice. I have a unifence that I can slide towards me, supporting the work only just passed the blade.

I skip the bead and cove and bevel my strips directly on the form, as needed. This has a couple of advantages, the obvious one being that you skip the whole bead and cove operation. The other is that strip alignment will be a little less than perfect which means having perfectly uniform strip thickness a rather moot point. Disadvantages are that you have to become a bit of a maestro with the glue bottle and there is more fairing involved. Probably not advisable to try it stapless, though.

Good luck and keep us updated!
 
Being pretty new myself, I didn’t realize you were also a new member @Kliff welcome aboard! I will be observing in rapt amazement, often having no idea what the experienced builders are talking about.

@Jim Dodd what is the “skilsaw” method? Why is it superior to a table saw? This seems back’ards to me, but my carpentry experience is framing and hanging doors mostly.
Yes ! Many are amazed that I didn't use a tablesaw. When I started building over 30 yrs ago, I didn't have money for a tablesaw, or the space to use it. After doing all the research, I bought every building book I could get ! The Minnesota Canoe Association had a Builders book. In there was described the Skilsaw method. You simply use your strongback as a saw horse. to hold you planks, I'll link two threads.

Imagine pushing a 1x12x16' plank through a tablesaw ? Yeah , back in the day you could find 1X WRC planks 12" wide ! 16' was as long as I could find. Now again imagine pushing one of those planks through a table saw, and getting any kind of uniformity out of the strips ? Dream on ! In comes the Skilsaw. It solved all the problems of the tablesaw. Affordable, half the space required, I could easily do it outside, and most of all ? Accurate ! The uniformity of the strip thickness is amazing !
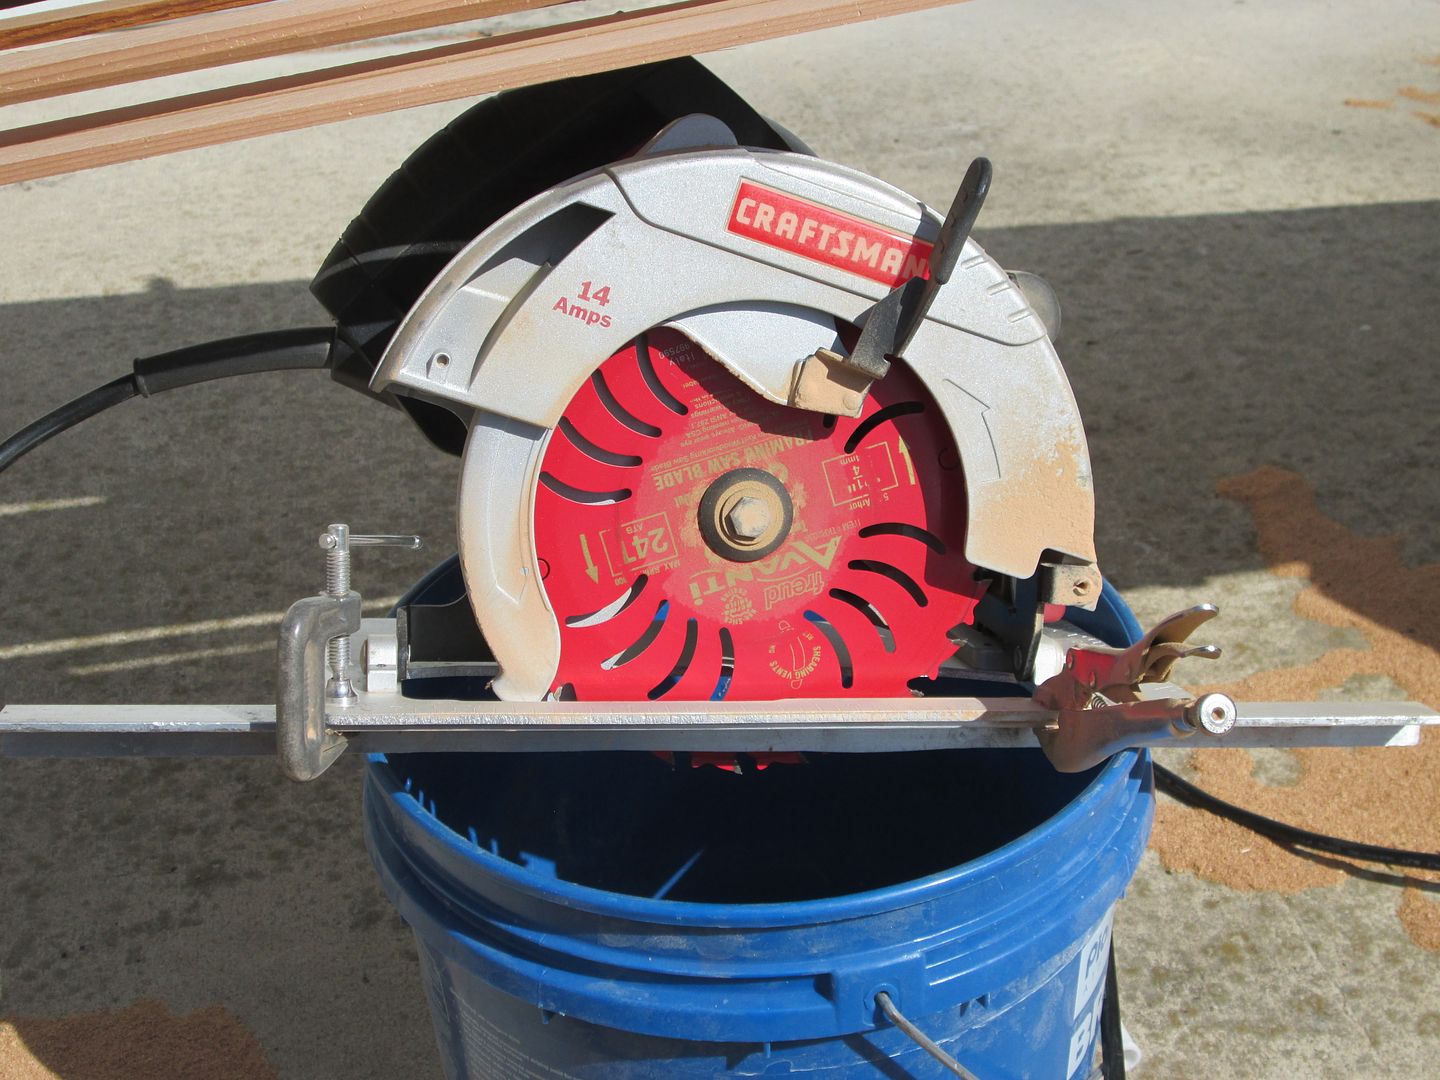
With an inexpensive 24 T blade, Freud's "Diablo", 7 1/4" blade fits the bill perfect. Coupled that with a Skilsaw ( Brand of your choice) of at least 13 amps, and a piece of Aluminum angle clamped to the base, you are good to go. The Thin kerf saves a lot of wood, meaning more strips.

By the way 2, 1x12x16' planks was enough to build a solo canoe ! 30yrs ago they cost $26 a piece.
Here are the links, in this site.

Skilsaw method

Skilsaw method of cutting strips

Jim
 
I'm planning to use 1 by rough stock. Not sure on widths yet. Most likely 8" nom, as that'll be most widely available. I'm going to one lumber yard this weekend that's holding some clear WRC for me. If I don't like that, I'll go with the big box sorting. I'm assuming if you're getting it at Menards, that's Northern White Cedar?
 
Here in Iowa, Menards has WRC, in #3 and better, finished on 3 sides. Unless something has changed in the last year ?
Don't forget the 11% Rebate !

WRC Menards

I still have two clear, WRC, 1x12x16' planks from years ago.
At Todays prices ? I hate to cut into them !

I don't think you can find NWC that is clear.

Good luck in the lumber hunt !

Jim
 
Well, I didn't get the strongback & forms set this weekend as I hoped. As I was cleaning out the garage the build will happen in, I found a 1/2" aluminum angle. Almost as if Jim put it there, saying if you don't try it, you'll regret it. So, I drilled and tapped one circular saw, and mounted a short piece, have it ready to give a shot. Family obligations kept me from getting any further.
 
It's a journey, not a destination, take time to enjoy the process
There are different timelines, skill levels, tool and environmental constraints. I think I could probably bang one out in a month if I put my head down. Yet my first one took me about 8 months and this current one has been in the shop going on 14. If I set myself a deadline, that would stress me out, and I'm fairly sure it would show in the build.
 
Agree with Cruiser !
Enjoy the process.
I'm often asked " How long does it take ? "
To me it's fun and enjoyable. I don't keep track. Does a Golfer, time how long it takes to do 18 rounds ?

a Small C-clamp, and a small vise grip work great to clamp that aluminum angle, that I placed in your shop. ;)
Don't forget a 5 gal bucket to place your saw in, when you set it down. Makes it handy and protects the blade !

IMG_0281_zpsoxusqebj.jpg
 
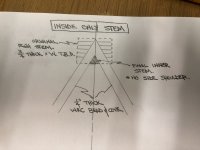
Still kicking around the idea of inside stem only. To address concerns of glassing the inside, what if the stem does not have a side shoulder, but rather ends at the strips with a straight chamfer. I've done a rough sketch to sort of show how I'd do this. Basically, I'd start with a stem that is a little wider. It would result in more planing/sanding, and a bit of wasted material, but I should be able to glass this area much easier. My thought is, this gives me the benefit of a surface to attach the stips to, that remains part of the finished canoe. I can glass this surface, so I don't have a "seam" in the laminate. Exterior is stemless.

Drawing is NOT to scale, and inner stem would end up being bigger than it appears in the sketch. Approximately 1" wide by my initial calculations.IMG_1988.jpg
 
Your idea and drawing are fine !
It looks good, until you get to the keel line That is where the glassing gets to be more of a challenge, the inner stem rises above the strips in the keel area.

Maybe someone here, can post a pick of how they glass, and get a good seal of the stem and keel line ?

You are doing great to analyze every step ! That is how you make improvements to conventional thinking !

Go for it.

I choose Stemless, as it saved a lot of time for me. eliminating one unnecessary step, of laminating stems.

For me ? The glass over lapping, in the stem area, adds plenty of strength. I've dumped enough canoes off of my truck, gong down the road to prove that !
I also add bias strips on the outside. More on that later.

Jim
 
Last edited:
Jim: I've seen your posts on bias strips. I have no doubt stemless would be at least as strong (probably stronger). I see the stem as a "weak seam" If the glass doesn't wrap it inside and/or outside.

I guess either one can be done perfectly well, or butchered all to heck. For me, I guess it comes down to two factors.

1. The look you prefer
2. The method you're more comfortable with.

I'm in no rush, this isn't going to be for a business, so I'm not concerned about skipping steps, or additional steps. Ironically, I'm already planning my second build, and what I'll do/try differently.
 
I said the same thing Kliff, one boat lead to three trying to improve my work and the next thing I knew I was working at a boatyard and ended up starting my own boat business. I worked on everything from a little 10’ canoe to 200’ mega yachts. The small boats were my favorites but didn’t pay as well as the mega yachts.
Jim
 
Like Jim, I built "stemless". But I have to say that the word "stemless" is a bit of a misnomer for the technique because there is an internal stem -- it is just that the internal stem is a fillet made out of thickened, rock-hard epoxy rather than steam-bent layers of wood. This inner epoxy stem holds everything together on the inside at least as effectively as an inner wood stem and provides tremendous strength.

While running some Class II+ rapids last Fall, I hit a submerged rock very hard and tore a chunk off the bow of my cedar stripper below the water line right where the the bow turns under the canoe. But I had no idea it happened until I loaded the canoe back on my car because that internal, thickened epoxy stem kept everything together and watertight.
 
Welcome to the shared insanity of canoe building.

a little addendum to this particular bit of advice:
only use enough resin on the inside to wet out your cloth, anything more will just make your hull more slippery under foot, and heavier on your shoulders. Additional resin inside does not add any appreciable strength.

Be aware of conditions where you canoe. I end up in situations where I track in a lot of sand and fine silt. It tends to stick in the weave if you choose not to do a fill-coat on the inside.
 
Welcome to the shared insanity of canoe building.

a little addendum to this particular bit of advice:


Be aware of conditions where you canoe. I end up in situations where I track in a lot of sand and fine silt. It tends to stick in the weave if you choose not to do a fill-coat on the inside.
I agree, if there's a lot of sand at least 2 coats of epoxy on the bottom
 
Back
Top