• Happy National Hot Sauce Day! 🌶️🥵

First stripper build: Prospector-16 Help & comments appreciated

Another point about using a thinner epoxy to get better flow and penetration through multiple layers, you don't have to continue on with the same epoxy to do the fill coats.

So you can bed the glass with a thinner epoxy and use something with a higher viscosity for the fill coats.


Brian
 
Jim ... you can't seriously be comparing a full composite build layer strategy with a stripper build strategy. Of course another layer of glass is going to make it stiffer. The prospector build is pretty standard at 6 oz cloth, I don't disagree that another layer of glass won't make it stronger, and another layer will make it stronger again ... you won't be able to lift it after a few more layers, but it will be STRONG. As has been mentioned so many times, you start with a standard recommendation and then build to suit your usage.


Brian
My current stripper build, is built with 3/16" strips. Yes, I'm trying to lessen the weight and using 4 oz S-glass inside and out, with a 6 oz E-glass over the football. I don't know if it will be much lighter, but time will tell, as I have built this same hull with 1/4" strips and 6 oz E-glass, plus the extra layer. I'll be able to get a real comparison as to the weight savings.
 
My standard build is to use clear coat for wet out, and whatever I can find for fill, usually system three general purpose, or the mirror one, or even west 207.

As for single layer, it works great for the intended purpose. I have a couple of canoes with single layers only. However, I don't use them for tripping canoes where i will be running a lot of white water and dragging through shallows, stuff like that.

I had donated two single layer canoes to our school club, and they did very well, but after about 7 years of hard use, and many repairs, they had to be retired.

And as Brian says, real hull strength increase will come from additional inner layers. I can testify to this as I have split two canoes in white water frolics. The glass on the inner hull split open, the outer glass remained intact, but it made for some very nervous paddling to get to the extraction point. I put that outer layer on for abrasion protection, we have lots of pointy rocks up here. I have punctured to the wood with single layer, but not yet with double layer.

To the OP, sorry to muddy the waters, lol. Building strip canoes is actually a very forgiving process, there are few hard and fast standards, but lots of opinions.
 
Quite honestly, I added the extra layer because this is my first build, and the "suggested glass layers" by those that obviously know a heck of a lot more than I do suggested 6 oz cloth, double stem strips, additional football layer inside and out. I'm not trying to shave off every possible ounce, as this likely will not be a distance portaging canoe. I'm also not going to be running any rapids in it.

I truly appreciate all of the feedback, comments, and help I've received throughout this process. I am confident of this: I could not be where I am without all of the help and suggestions I have gotten.
 
Jim ... you can't seriously be comparing a full composite build layer strategy with a stripper build strategy. Of course another layer of glass is going to make it stiffer. The prospector build is pretty standard at 6 oz cloth, I don't disagree that another layer of glass won't make it stronger, and another layer will make it stronger again ... you won't be able to lift it after a few more layers, but it will be STRONG. As has been mentioned so many times, you start with a standard recommendation and then build to suit your usage.


And I have a Kipawa (at 16'6") and Freedom 17 both built with single 6 oz glass in and out. Both have been loaded, both in heavy water (what I consider heavy at least) both heavily loaded and both are just fine after quite a few trips. Anecdotal information is useful at times, but it can also create misconceptions, I suspect there are lots of plain 6 oz hulls running around out there that have had no issues. In fact it seems to me StripperGuy had a light weight Freedom 17 with thinner strips and lighter cloth that seemed to survive just fine (maybe you could refresh my memory on that SG)


Brian

Brian et al,
I had built competition cruiser scaled down to 17 ft in 1984...I used a layer and a half inside and out 4 oz cloth, straight edged cedar strips cut to 3/16", sanded to much less, using (gasp) polyester resin. It weighed 37 lbs.
That hull suffered much abuse and survived well until it was pinned and partially crushed in 2012.
I have built 3 more boats of that same hull design, with weights varying from 40 to 45 lbs, all with epoxy resin and heavier trim.
For the purpose of building a strip canoe, whether the half layer is over or under the full layer really is personal preference. Any strength variations are more a function of the cloth weight (especially inside layers) and substrate thickness. Please keep in mind that I am an opinionated retired design engineer, with a lifetime of predictive analysis and testing experience in aerospace systems.

We all have our preferred methods and habits, but each of us boat builders need to arrive at techniques that suit our needs and expectations, either through our own experiences or through others with similar goals and expectations.

In other words, whatever floats your boat!!

Back to you Kliff, your build looks great so far, I bet you are anxious to get it wet!
 
The extra layer will add to the canoes life, be it abrasion resistance, or resistance to oil canning.
When you put the time and money into building a canoe ! You want as much life as you can get out of it.
That is my goal.
I too apologize for side tracking your thread Kliff ! You are doing far better than I did on my First canoe !
Keep iy up !

Jim
 
I think there may be an assumption in this discussion about putting the extra layers on ... I think that assumption is that the extra layer is going to be feathered, but in reality if you add an extra layer on the football, that may not necessarily be the case.

Jim's point is completely valid (IMO) if you are going to scrape the "bump" flat, whether that is for the football area or the extra stem strips ... if you put them under the cloth AND scrape you will get that thinner area ... a weak spot. The however, is that I suspect one of the reason to put in under the main layer is to just skip the levelling step altogether.

If you put a partial layer under the main layer, and don't feather, there will be a small strength reduction where the cloth goes over the edge, the little hump area. This impact will likely be proportional to the thickness of the cloth being used, the impact being less as the thickness is reduced.

Brian
I totally agree with you Brian. I've done it both ways but when I've done the football under I don't feather.
 
Geez, all this talk about second layer top, bottom, scrape, not scrape. Now you're really getting me thinking about my next build, and I'm no where near done with my first. I did just cut and grind a bunch of scraper blades for doing the inside of the hull. Hoping to pull it and flip it before the weekend.
 
Yep. When you mentioned the football patch, I knew this discussion was coming. I find it a worthy, and entertaining, discussion. I to ponder 🤔 on this.
 
Now I'm glad I didn't bring it up before I glassed the outside. While all this discussion is interesting and certainly something I will think on before my next build, or perhaps while I'm stripping, I'm confident I wouldn't have made a decision on which way to proceed for quite a while. The only thing certain to me is there's more than one way to skin a cat, or glass a canoe. It's obvious they all have pros & cons. Since you all have more experience than me, I welcome all viewpoints. It's interesting to see so much discussion about a topic that I barely gave any thought to. I'm just glad to be somewhat confident I haven't messed up bad yet.
 
I'm enjoying following this build. You're doing a really nice job! One technique that hasn't been mentioned when the football is applied over the base layer is to painter tape out the football beforehand and wet out to that. No chasing errant cloth strands around a ragged football edge. You have to babysit it a bit, but there's a point in the cure when you can easily trim the excess cloth back to the taped edge. The next day the football "step" can be feathered in with a scraper. On my build I did an S glass football (for increased abrasion resistance) over an E glass base layer. I think I read about this technique in one of Dogbrain's build threads.
 
Ooh, maybe off the forms this weekend?
That’s one of favorite steps, and you can weigh it and get a good estimate on the final weight.
Be sure to have some help, the hull glassed only on the outside can be a bit fragile.
Also be sure to verify the profile and rocker when you’re ready to glass the inside. It’s possible to distort the hull if not supported well.
 
I cut all my station forms using a cnc router with a 1/2" bit. If only I had started with plywood that was about 4" bigger in each direction, I could now attach those to the strongback as a series of cradles. I realized this not so fatal flaw early on, and wrote it on my "list of things to do differently".

I'm kicking around the idea of cutting another set of forms, so I have the outside shapes to do it this way. I'd be supporting the hull every 12" and it wouldn't move around while scraping, sanding, glassing. Only takes about 15 minutes per station.
I usually find I need about 3 stations to do an adequate job on holding the flipped hull. I like to use 1/2" water pipe foam insulation on the form edge to 1) prevent abrasion to the outter hull 2) you can size for a slightly snug fit i.e. make it 1/4" oversize, the foam takes up the slack

This way it is held snug enough, but not enough to deform the shape ... in your case, pieces of split pool noodle may let you use those off cuts just fine, as they are quite a bit thicker and pretty inexpensive.

Brian
 
I was thining either pool noodles or pipe insulation to protect the hull. I'll probably cut new outer shapes on the bandsaw. I've got the CNC set up for something else. I was planning on using stations 5-2-0-2-5 (0 is center). I'd rather over support it than under support it.
 
One thing to keep in mind for the inside and that is the need for access. the idea of support is fine, but to cleanup the inside you will likely find that planning on some sort of tilt is a really good idea. I know Jim tilts the whole strongback, I tend to turn the canoe on its side ( https://www.canoetripping.net/threads/light-weight-solo-tripper-build.105054/post-109785 ) .... so support is good after cleanup, but plan to get good access during cleanup.
 
I just slap together (or reassemble) a cradle with two slings made from leftover carpet.
The exterior of the hull is nicely protected, and I can slide the hull to tilt it, making sanding easier.
I do put a couple forms in place temporarily, just before I glass it, to be sure the shape is true to the design.
 
I screwed some 2x4s to my strong back and then screwed carpet strips to those to make a cradle. I used a few of the original forms on the inside when needed to, but I worked on most of the inside without any supports. Maybe it was a wonder I didn't crack it?
Roy
 
It's nice to be able to roll the hull to one side while sanding. Make it easy on yourself
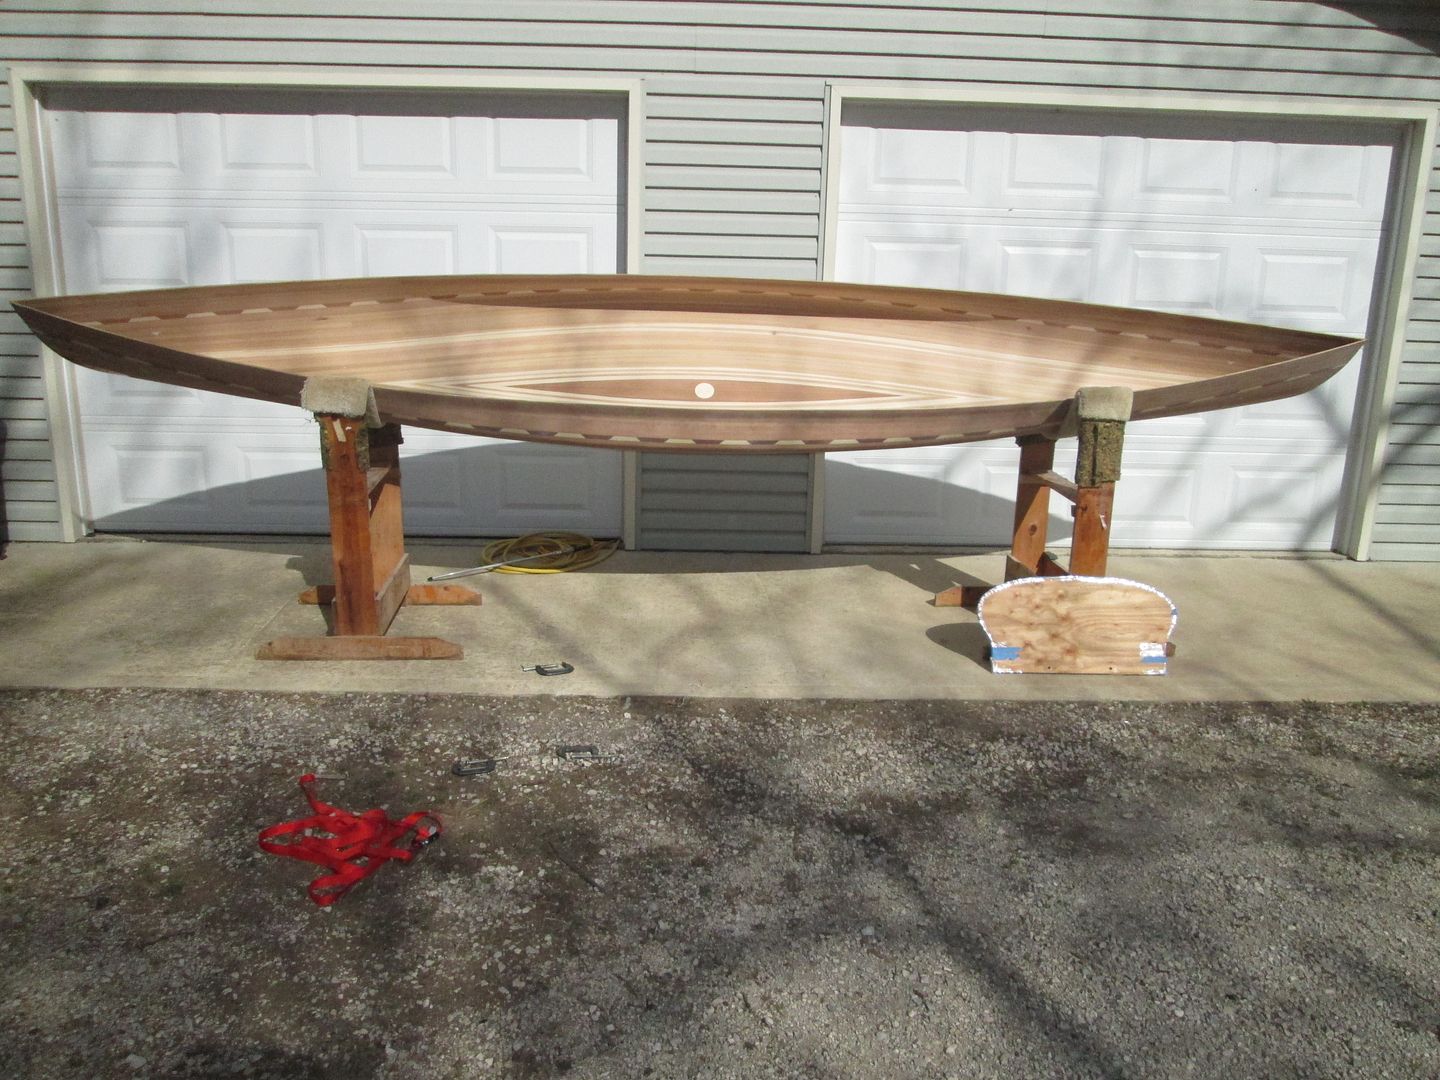
Carpeted saddle stands like these make it easy to lay the hull on it's side to work the interior.
I keep the center form strapped in place to maintain the hull shape, while working on the interior Then pull it and finish sanding in that area.

Here is a pic, with the form out for photo.

IMG_0966_zpskv6xviwd.jpg
 
I like the idea of keeping one (or more) forms strapped in place. I was going to get fancy and make my strongack tiltable. I still might, but I'm going to start with the carpeted cradles first. Heck, if they work for you, they should work for me.
 
Back
Top