Wow, Brian:
As with your solo tripper thread, awesome detail and pictures, not to mention incredible craftsmanship. Just as I'm looking for information on paddle making to while away my winter work time, I come across your thread. How fortunate for me! I'm planning to make 4 straight shaft and 2 bent shaft paddles next week. I haven't made any before, but I have done glue-ups similar to your designs for other purposes. For your "feather" design, which I call herringbone (I like feather better) I do the glue-up all at once. I don't have a photo to share, but I will when I am back in that shop early next week. I've got a sketch of it here.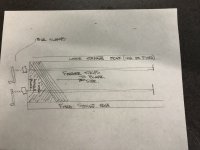
Basically, I have a flat base, with a fixed straight edge. I leave the other straight edge "loose" to accomodate different width glue-ups, but once that is determined, I clamp it in place leaving a little wiggle room for the individual strips. On one end, I have a fixed angle block. On the other end a moveable angle block (not shown in sketch). These blocks are cut at the same time on a miter saw at chosen angle. One side becomes fixed, other side moveable. Once all of the strips are coated with glue, put them in place and 2 bar clamps.
I ALWAYS dry fit any glue-up to make sure it looks right, and my clamps are all set.
I ALSO COAT THE FIXTURE AND LOOSE PARTS WITH A FAIR AMOUNT OF PASTE WAX.
I've also cut curves similar to your paddles with the free form curved stripes. I've done it in cutting boards, that I call "lazy river". Basically, I cut my curve out of 1/4" plywood. This I made longer than any project I envisioned using it on, with multiple curves, so I can pick a different section every time I use it. I have a piece of 1 by 6 that just serves as a spacer to lift the plywood off my project. The spacer is back from the plywood by 1/4-1/2" Using a flush trim bit with a bottom bearing, I follow the plywood template, cutting about 1/4" deep. Separate the two halves using a band saw or scroll saw. Trim the rough edge with the same router bit. I have it set so I don't have to change depth at all. I don't have any in progress pictures, but here's on of the router, bit, template, and finished glue-up. this gives me edges smooth enough for a tight fit with wood glue. No gap filling epoxy needed.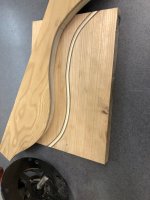
As with your solo tripper thread, awesome detail and pictures, not to mention incredible craftsmanship. Just as I'm looking for information on paddle making to while away my winter work time, I come across your thread. How fortunate for me! I'm planning to make 4 straight shaft and 2 bent shaft paddles next week. I haven't made any before, but I have done glue-ups similar to your designs for other purposes. For your "feather" design, which I call herringbone (I like feather better) I do the glue-up all at once. I don't have a photo to share, but I will when I am back in that shop early next week. I've got a sketch of it here.

Basically, I have a flat base, with a fixed straight edge. I leave the other straight edge "loose" to accomodate different width glue-ups, but once that is determined, I clamp it in place leaving a little wiggle room for the individual strips. On one end, I have a fixed angle block. On the other end a moveable angle block (not shown in sketch). These blocks are cut at the same time on a miter saw at chosen angle. One side becomes fixed, other side moveable. Once all of the strips are coated with glue, put them in place and 2 bar clamps.
I ALWAYS dry fit any glue-up to make sure it looks right, and my clamps are all set.
I ALSO COAT THE FIXTURE AND LOOSE PARTS WITH A FAIR AMOUNT OF PASTE WAX.
I've also cut curves similar to your paddles with the free form curved stripes. I've done it in cutting boards, that I call "lazy river". Basically, I cut my curve out of 1/4" plywood. This I made longer than any project I envisioned using it on, with multiple curves, so I can pick a different section every time I use it. I have a piece of 1 by 6 that just serves as a spacer to lift the plywood off my project. The spacer is back from the plywood by 1/4-1/2" Using a flush trim bit with a bottom bearing, I follow the plywood template, cutting about 1/4" deep. Separate the two halves using a band saw or scroll saw. Trim the rough edge with the same router bit. I have it set so I don't have to change depth at all. I don't have any in progress pictures, but here's on of the router, bit, template, and finished glue-up. this gives me edges smooth enough for a tight fit with wood glue. No gap filling epoxy needed.


