• Happy Birthday, Grandma Moses (1860-1961)! 🎨🖌️🖼️

Time to build again - Short solo/kid's tandem

Previously I went over the hull twice with 40 grit sandpaper. Once real quickly to knock off the glue drips and the really high spots. Then once a little slower for a more general smoothing. Today I went over it with 60 grit while paying a little more attention by eye and hand. This sanding gets the hull almost ready.

After that it was time to address the cracks and holes. I always use dust collection with my sander so I had a nice bunch wood powder I'd just sanded off. I mix this in with the epoxy to thicken it and give it a color that will closely match the hull. I find wood powder of the same species always comes out a little dark so I also mix in some microballoons to lighten the color slightly. The combination of wood powder and microballoons makes it easy to sand.

I then coated the entire hull with this thickened epoxy using a squeegee. This filled all the staple holes, cracks, gaps, and gouges. I then scraped it all back off the hull so the only thickened epoxy left was the stuff that was filling holes. As the epoxy started to get gummier I found it easier to remove by pushing the squeegee rather than pulling it. I'm guessing about 10 ounces remained on the hull.

In addition to the obvious benefits of filling the big holes it also fills all the little cracks and holes so there will hopefully be no epoxy leaking through to the inside of the hull when applying the fiberglass. Epoxy runs and drips on the inside make that already tedious task even worse.

Wood powder

20240528_202324.jpg

I intentionally left excess epoxy at the stems. It will sand easy enough and they need a little final shaping.

20240528_213858.jpg

I also left it proud at the planer divots. The squeegee wanted to pull the epoxy from the divots so I used my finger to smear it on. Again, this should easily sand down.

20240528_213950.jpg

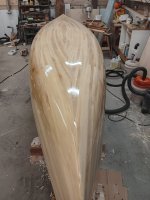
After scraping the epoxy back off the hull

20240528_213844.jpg

Remember all the gaps and holes that were visible from this view before?

20240528_213933.jpg
 
Typically on a build, I like to watch the strip fit and glue drips and all the other stuff that will create work come finishing time. Not suggesting that I end with a hull not requiring "touchup" and I agree that almost anything can be cosmetically disappeared (mostly).

Once you finish the hull, no matter how careful you are, there will be areas you will want to address ..... this will likely be proportional to your own level of "fussiness" (and we aren't all the same in this category). Over in the Hammock Forums we have an acronym "HYOH" or "Hang Your Own Hang", in other words, do what works for you.

Allan, I think you are clearly demonstrating an important aspect of building, There are decisions to be made and potentially consequences for each one and that usually the consequences are addressable, albeit with additional work. The important lesson here is determining what was worth living with and what should have been corrected as you built and that this is sometimes a bit of a "know thyself" moment, then apply that lesson/knowledge going forward to the next build/project.

Issues caused by decisions like following the shear or leaving strips wide (like I did on my last build) are more like "lesson learned for next build" knowledge, because you don't realize the issue till you have moved past the point of easy correction. However, there are some issues that are just better fixed on the spot i.e. glue runs/drips are easier to cleanup when they occur, not later .... yes you can do it later, but it is a lot more work ... irregular strips ... it is almost always easier to just replace the strip in question at application time than to go back later and do a cosmetic operation, again you can do it, but it is a lot more work.

I think Glen and Gamma have the right idea ... get started, make decisions and start learning .... I have never talked with anyone who completed a build, that wasn't ready to make changes "next time".


Brian
 
Typically on a build, I like to watch the strip fit and glue drips and all the other stuff that will create work come finishing time...
...There are decisions to be made and potentially consequences for each one and that usually the consequences are addressable, albeit with additional work.


Good points. Similar thoughts were running through my head last night as I was applying the thickened epoxy. Am I really saving any time/work by addressing these issues after the fact rather than fixing them while laying the strips? I honestly don't know for sure.

Even if I'm not saving any time the conclusion I came to was that I was happier doing this 'extra' work than I'd be re-cutting and re-fitting strips.

I'd originally planned to paint the hull, as I've done on my last couple boats, which led me to be a little sloppier than normal. Then I started wondering if, even despite the sloppiness, I could make it look good with a clear finish. That turned it into a bit of a challenge.

I've already been in the habit on my last few builds of applying thickened epoxy to fill staple holes and small gaps and it wasn't too much extra work this time to coat the entire hull.

Sanding time was increased on this build but mainly because the cottonwood sands noticeably harder than cedar.

Alan
 
Will that also suffice as a seal coat so the wood isn't as saturated during wet-out?

Probably somewhat. I'll go over the hull one or two more times for a final sanding so I don't know how much of that seal coat will be left.

Alan
 
I suspect, the Cotton wood doesn't bend quite like the WRC, that we usually use.

So this isn't going to be a "Museum Piece " ?
Dang.
Seriously ! I get caught up in trying, and haven't yet, going for perfection.
In reality, it is a canoe, that will take you places, only a fish can go.

It's most important to make your self happy !

My first canoe, I built from a $50 dollar kit, purchased through an Outdoor magazine. It didn't end up looking near as pretty, as the add. Weighed at least 85#, and only 14' long.
Oh ! Did I have fun with it !
That is the true goal ! Fun !

Enjoying your build Alan !
Keep at it !

Jim
 
The canoe has been fiberglassed and fill coats done.

Then I sanded it smooth a couple days later to get rid of the orange peel texture and to clean up any runs or heavy spots.

I then used a foam brush to put on a very thin layer of epoxy to bring back the shine and leave a smooth finish. I'll let this cure until the weekend when I plan to use this as a mold for a composite version.

Below are some pics as it sits now including close ups of those ugly areas pictured earlier in the post.

20240603_191931.jpg

You can see some white marks on the left side of the hull. I had a small run and scraped it off this morning.

20240604_071912.jpg


20240604_071838.jpg20240604_071759.jpg20240604_071747.jpg20240604_071959.jpg


I'm quite happy with how it turned out. The imperfections aren't really visible from regular viewing distance and structurally they should be fine.

Alan
 

Attachments

  • 20240604_071912.jpg
    20240604_071912.jpg
    122.8 KB · Views: 1
Below are some pics as it sits now including close ups of those ugly areas pictured earlier in the post.

The imperfections aren't really visible from regular viewing distance and structurally they should be fine.

Indeed. The gaps are filled and smooth and some just look like inset dark lines. It actually adds some visual variety to the hull.

I'll let this cure until the weekend when I plan to use this as a mold for a composite version.

I missed or forgot this. What is your thinking as to why you would want both a strip and composite version of the same hull? How much lighter would you expect a composite version to be, if at all?
 
I missed or forgot this. What is your thinking as to why you would want both a strip and composite version of the same hull? How much lighter would you expect a composite version to be, if at all?

I have leftover cloth from years ago and I don't know what else to do with it. And two of the kids I want to paddle this hull live in Minneapolis. I figure I'll keep the stripper for myself and send the composite version home with them. They don't get down here much in the summer so this will give them more opportunity to use it.

Alan
 
Looks Great Alan ! That didn't take long ! !

What lay up are you planning for the composite ?

Jim
 
What lay up are you planning for the composite ?

From the outside to inside I'm thinking carbon, 6 oz. glass, and then kevlar. There will be a foam core under the kevlar up to the bilge turn. There will be some partials at the stems.

I'll see how that feels and add more as needed.

I thought about using a cedar strip insert, like you do, but I've always wanted to try a foam core so I'll give it a shot. It's scored and scrimmed so it should lay in the hull nice without having the shape it. I'm thinking I'll vacuum bag it into place before covering with kevlar.


Alan
 
From what I read. it seems that a layer of glass over the carbon is preferred ... to protect the carbon from abrasion

Good advice and that's what I've always done before. There will be a couple extra layers of exterior fiberglass at the stems but I'm banking this canoe will only see light use with minimal abrasion so I'm going to skip a full layer.

Alan
 
Good advice and that's what I've always done before. There will be a couple extra layers of exterior fiberglass at the stems but I'm banking this canoe will only see light use with minimal abrasion so I'm going to skip a full layer.

Alan

Alan,
Are you using the stripper as a plug to form a female mold over it and then take boats out of the mold? Or will you lay up the base layers of the hull as a "slip boat" off the exterior of the stripper and then add the inside layers, like the foam core and Kevlar over that after taking the first layers off the stripper? If you want just the one composite hull, the female mold would be a lot of extra work and expense. It is the preferred and easier way to pop multiple hulls out though.
 
This composite will be a one-off hull so I'm just using the stripper as a male mold. As you figured out the plan is to remove the composite shell after the layers of fiberglass and carbon have been laid. Then the foam core and kevlar layers will be laminated on the interior.

Alan
 
I'm really sold on the cedar inserts !

Will you vacuum bag the foam ?

That would reduce the amount of resin needed for sure.
 
Last edited:
This composite will be a one-off hull so I'm just using the stripper as a male mold. As you figured out the plan is to remove the composite shell after the layers of fiberglass and carbon have been laid. Then the foam core and kevlar layers will be laminated on the interior.

Alan
I think you're overbuilding it a bit if you wanted a light boat, but if it's for the "kids" (and their kids?), you might want it that way anyway. One thing you could do to maybe make the job a little easier is put the Kevlar along the sides of the boat as the first layer, extending so that it goes slightly under the foam layer, then put the S-glass and carbon layers on and let them set up. If you're using peelply on the interior for ease of bonding and reduce sanding, that would go on first, of course, as a football larger than the foam. After that's all set, pull the composite hull off the stripper and remove the peelply if you used it, or sand and then put down the foam football and Kevlar football (slightly larger than the foam). It would keep you from having to do the last full Kevlar inside the boat, and you just do the football layer of foam and Kevlar over it. I did a boat like that about 45 years ago and it worked well, I thought. I don't still have that boat.

As Jim Dodd mentions, bagging the foam in would save resin and weight, especially if you could do the Kevlar layer on top at the same time. Complicates things, though, especially if simultaneously bagging the Kevlar. I don't know where the cedar inserts he mentions would go. That application is probably in some other thread or earlier in this one and I haven't looked (and don't remember).

Good luck with the project.
 
I like the idea of using peel ply as the first layer on top of the male mold to give a textured finish for bonding after the composite shell is removed from the mold. Unfortunately I wet out the first layer of fiberglass earlier this evening so that idea is out.

One thing you could do to maybe make the job a little easier is put the Kevlar along the sides of the boat as the first layer, extending so that it goes slightly under the foam layer, then put the S-glass and carbon layers on and let them set up.

I'm a little leery of partial layers when the hull is on the male mold. I tried that one time thinking the bulges wouldn't transfer through too bad but I was wrong. It took a lot of work to smooth out the exterior and I never did get it perfect before I gave up.

I am planning to vacuum bag the foam into place. I had thought of only doing a partial kevlar layer over the foam and bagging them at the same time but I think the chances of me pulling that off gracefully are pretty slim. A full kevlar layer on the interior, while adding some extra weight, will keep me from having to keep a clean edge on the Kevlar. This way the gunwales can cover that ugliness.

Alan
 
I like the idea of using peel ply as the first layer on top of the male mold to give a textured finish for bonding after the composite shell is removed from the mold. Unfortunately I wet out the first layer of fiberglass earlier this evening so that idea is out.
Story of my life, too little (or too much), too late.
I'm a little leery of partial layers when the hull is on the male mold. I tried that one time thinking the bulges wouldn't transfer through too bad but I was wrong. It took a lot of work to smooth out the exterior and I never did get it perfect before I gave up.
Not putting the selvage (factory) edge down in my experience can reduce that quite a bit, but maybe it takes practice. I'd built quite a few boats by that time. The peelply down first would have been a partial layer, too, and that would have complicated things a bit. As it's usually a pretty thin fabric (at least nowdays), maybe not something to worry about? Too late in any case.
I am planning to vacuum bag the foam into place. I had thought of only doing a partial kevlar layer over the foam and bagging them at the same time but I think the chances of me pulling that off gracefully are pretty slim. A full kevlar layer on the interior, while adding some extra weight, will keep me from having to keep a clean edge on the Kevlar. This way the gunwales can cover that ugliness.
It would be more difficult bagging in the fabric as a partial layer over the foam, especially at the same time. You could bag the foam down and then bag the partial Kevlar layer over it, less chance of a problem, but you likely want that full Kevlar layer inside the boat anyway, so I'd recommend just doing the full Kevlar layer as a hand layup (not bagged, that sounded like your plan anyway). Bagging it would leave a slippery surface if you pulled all the wrinkles out of the bag. In my experience, a hand layup of Kevlar makes for a somewhat tougher boat -- that layer, anyway, and more noticeable in multilayer Kevlar laminates. I'm not sure if it's the extra resin or extra thickness that does it. Maybe both? Weighs more, of course. And the hand layup inside layer wouldn't be as slippery as a bagged one.

Good luck, and keep use apprised as to the progress when you can.
 
Back
Top