At the request of Mr. McCrea I'm going to start what will surely be a multi-part thread about the Royalex Explorer I am slowly rebuilding. The plan is to refit this canoe for solo paddling, primarily for use in whitewater up to Class III.
For you builders/restorers, this is going to be old hat. I have no novel techniques or superior woodworking skills. I have built a cedar stripper from scratch. This should be a little easier.
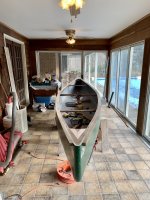
I acquired the hull in July from a neighbor for $100. Here it is when I acquired it.
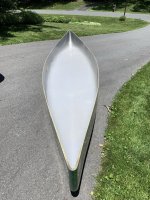
There's a dent visible in the photo on the left, just past center. That's the only damage. Very light scratches on the outside. It's in remarkably good condition other than the fact that the gunnels were totally gone. But the owner did have the old tandem seats (not useful to me because I want to position the solo seat closer to center) and yoke and a bag of stainless steel screws nuts, bolts and washers.
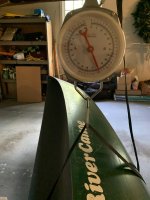
I'm not a gram weenie like some but I decided to weigh the bare Royalex hull so I'd have before and after weights. Spot on at 50 lbs.
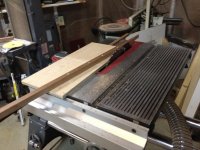
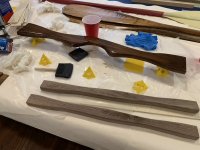
First up I needed some gunnels. I have a lot of leftover walnut from a project that never got built, so walnut it is. I jointed and planed and ripped the boards down to 3/4" by 3/4". The boards are all about 8/9 feet long so they needed to be scarfed to get me at least 16' for this Explorer. Luckily, I still have a scarfing jig I made back when I was building my cedar stripper. The jig couldn't be simpler. A hardwood runner dimensioned to fit in my table saw's miter slot, a piece of plywood screwed on top of the runner, and a hardwood fence set at an angle to achieve an 8:1 taper on 3/4" thick stock. Here's a old photo of the jig resting in the miter slot of my trusty Shopsmith (world's greatest canoe building machine) getting ready to scarf a 3/4" x 3/4" gunnel with a couple of cut offs from prior scarfs. Full disclaimer: this is a photo from building my cedar stripper and shows sapele, rather than walnut. I didn't get any pictures of the scarfing operation this time around.

Also not photographed was gluing the scarfed sections together. It's not rocket science: mix up some epoxy, add microfibers until you've got a non-sagging mix (builders often say it should be the consistency of peanut butter, but do they mean natural, smooth or chunky???), apply to the scarf and clamp lightly.
After scarfing, I finish all 4 edges of both gunnels with epoxy. I'm never sure which edge will be against the hull and I want to be sure it is water tight. I end up completely sanding off the top edge during installation, but whatever. Here I am lazily using gravity to give the gunnels a rough pre-bend to conform to the hull.
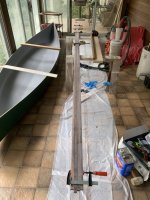
Just the weight of the unsupported gunnels and clamps on the end were doing a great job bending them to rough shape.
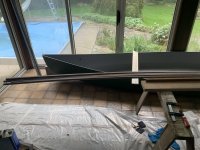
I left the gunnels like this when I went away for a month. A couple of days after I left, my wife noticed my gunnels were "warping" and helpfully decided to put them on the floor to prevent further "damage." When I got back and noticed that my gunnels were on the floor, she was so proud of having "helped" save my project that I didn't have the heart to tell her she had just effed up my month long gravity bend. Oh well.
Gunnels going on the canoe! Some builders (read more talented builders) taper the inwale all the way to the end. I just cut the inwale short to accept an inset deck (more on that later). Cheap Harbor Freight c-clamps and an extra set of hands are helpful for this job.
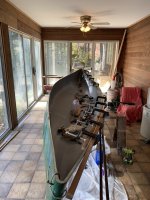
Zoom in on the above photo Mike -- there's your free Explorer yoke if you want it.
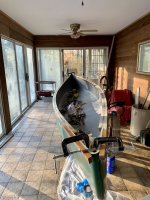
You may notice some vertical blue painter tape strips on the hull. The story there is I wanted to use the old gunnel screw holes. So before attaching the gunnels, I ran strip of painters tape below the holes and then drew a plumb line through the center. After the gunnels are clamped, I use a little jig that is just two pieces of scrap wood glued into an L. The long arm of the L rests across the gunnels. The short end of the L hangs down toward the floor. A hole is predrilled the same distance down from the hull as Mad River originally drilled the gunnels. A sight line on the jig lines up with the plumb line draw on the painter's tape and voila, you drill through the gunnel, into the old holes in the hull. I'd say I was about 75% successful. About 1 of 4 holes came back with green Royalex shards, meaning I missed. Oh well. I don't think this is really necessary but if in theory if you were to regunnel the hull enough times and drilled all new holes each time, you might eventually and up with a perforated tear line. Oh, I drill from the outside in. Other builders go the other way, I'm told. On my stripper I plugged the holes with contrasting wood plugs. It looks great but I'm not bothering with it this time. The screws will be visible. The horror!!
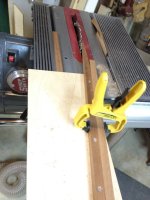
Next up I milled the decks. I decided to go with a little trick I read in Canoe Craft. Mill up some strips of contrasting wood, glue them into a rectangle. Then cut along the diagonal. Here's the deck blank about to be cut on the diagonal on my Shopsmith using an Incra5000 miter sled. That's a very accurate piece of equipment.
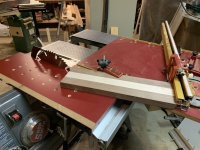
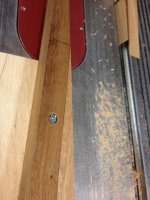
And another angle of the setup.
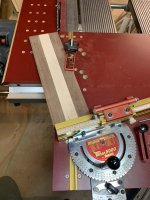
Once they are cut you have two right triangles. Flip one over and glue the two hypotenuses together. Because clamping a triangle is a pain in the butt, glue/clamp both decks at the same time. Here they are wating for the thickened peanut butter (epoxy) to dry.
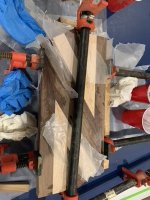
Now comes the fitting. This would be a good time to mention that when you make the deck blanks, make certain that they are going to be long enough and wide enough to fit the space! You can do this by tracing a template on cardboard. I dispensed with the template and just used some trigonometry that I had to relearn when my youngest kid was in school. (If you aren't doing a fancy deck, just take the masurements; but if you are making this type of deck you'll need a little trig to figure out how the long the blank needs to be for when it is cut and turned into this triangle/pie wedge shape). Whichever way you go, I do not advise tansferring the template to the deck when it comes time for fitting.
To fit the decks, I run a piece of surveyers' line from bow to stern to get the center. The deck is then placed on top of the gunnels, centered, and temporarily clamped. Then run a pencil from below along the end of the inwale, along the hull and to the other inwale. A word of warning, the pencil has thickness and the line it draws under your deck blank will be too narrow unless you make sure to tip the pencil so the angle of the pencil tip is always flush to the hull.
Now just cut out the line you've traced, right? Wrong! The hull is coming in at a V. Band saw proud of the line you've traced. Now get the angle from the gunnels to the hull. I think this was about 4 degrees. To the beltsander! tilt the table to the right angle and start sanding to your line. Many trips back to the hull to make sure you don't go too far!!!
Here it is progress. I've got more gap than I'd like where it meets the inwales, but a little walnut wood dust mixed in with the thickened epoxy will take care of that and the clamping pressure will help close up that joint a little too. Did I mention that I cut a decorative semi-circle at the bottom edge of the deck? Used a 12" sanding disc to trace the arc and bandsawed. If's a good idea to have a curve here. Prevents things from getting jammed and stuck between the deck and the gunnel. Things like gear, arms, legs, whatever.
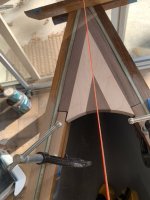
The hull is a little uneven towards the bow and stern both at the rounded point and just uneven thickness wise. Get as close as you can. And then when you go to glue it in with thickened epoxy, add a little wood dust and only you will know.
I like to prefinish/waterpoof the bottom of the the deck with epoxy before installation. When the drips come over to the other side, I decided just to do both sides to get a sense for what the deck will look like. The epoxy makes the deck pop, huh?
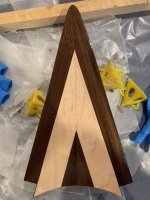
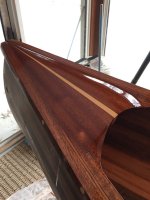
After screwing in both decks, I take a random orbit sander to the gunnels to smooth them down exactly level to the hull and to blend the decks into the gunnels.
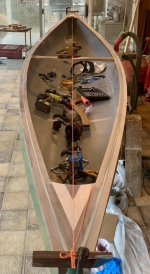
Not a bad job. A little roughness on the right will get filled with a little more thickened epoxy/wood dust.
Oh, what about the yoke installed and holding the square up against the surveyer's line? More photos of that later. Long story short, I used a pattern from Gilpatrick's book on strip building. Same pattern used for my cedar stripper. It is a bit more heavy duty than the Explorer yoke (it's all yours Mike).
Well, that's enough for now.
For you builders/restorers, this is going to be old hat. I have no novel techniques or superior woodworking skills. I have built a cedar stripper from scratch. This should be a little easier.
I acquired the hull in July from a neighbor for $100. Here it is when I acquired it.

There's a dent visible in the photo on the left, just past center. That's the only damage. Very light scratches on the outside. It's in remarkably good condition other than the fact that the gunnels were totally gone. But the owner did have the old tandem seats (not useful to me because I want to position the solo seat closer to center) and yoke and a bag of stainless steel screws nuts, bolts and washers.
I'm not a gram weenie like some but I decided to weigh the bare Royalex hull so I'd have before and after weights. Spot on at 50 lbs.

First up I needed some gunnels. I have a lot of leftover walnut from a project that never got built, so walnut it is. I jointed and planed and ripped the boards down to 3/4" by 3/4". The boards are all about 8/9 feet long so they needed to be scarfed to get me at least 16' for this Explorer. Luckily, I still have a scarfing jig I made back when I was building my cedar stripper. The jig couldn't be simpler. A hardwood runner dimensioned to fit in my table saw's miter slot, a piece of plywood screwed on top of the runner, and a hardwood fence set at an angle to achieve an 8:1 taper on 3/4" thick stock. Here's a old photo of the jig resting in the miter slot of my trusty Shopsmith (world's greatest canoe building machine) getting ready to scarf a 3/4" x 3/4" gunnel with a couple of cut offs from prior scarfs. Full disclaimer: this is a photo from building my cedar stripper and shows sapele, rather than walnut. I didn't get any pictures of the scarfing operation this time around.

Also not photographed was gluing the scarfed sections together. It's not rocket science: mix up some epoxy, add microfibers until you've got a non-sagging mix (builders often say it should be the consistency of peanut butter, but do they mean natural, smooth or chunky???), apply to the scarf and clamp lightly.
After scarfing, I finish all 4 edges of both gunnels with epoxy. I'm never sure which edge will be against the hull and I want to be sure it is water tight. I end up completely sanding off the top edge during installation, but whatever. Here I am lazily using gravity to give the gunnels a rough pre-bend to conform to the hull.

Just the weight of the unsupported gunnels and clamps on the end were doing a great job bending them to rough shape.

I left the gunnels like this when I went away for a month. A couple of days after I left, my wife noticed my gunnels were "warping" and helpfully decided to put them on the floor to prevent further "damage." When I got back and noticed that my gunnels were on the floor, she was so proud of having "helped" save my project that I didn't have the heart to tell her she had just effed up my month long gravity bend. Oh well.
Gunnels going on the canoe! Some builders (read more talented builders) taper the inwale all the way to the end. I just cut the inwale short to accept an inset deck (more on that later). Cheap Harbor Freight c-clamps and an extra set of hands are helpful for this job.

Zoom in on the above photo Mike -- there's your free Explorer yoke if you want it.

You may notice some vertical blue painter tape strips on the hull. The story there is I wanted to use the old gunnel screw holes. So before attaching the gunnels, I ran strip of painters tape below the holes and then drew a plumb line through the center. After the gunnels are clamped, I use a little jig that is just two pieces of scrap wood glued into an L. The long arm of the L rests across the gunnels. The short end of the L hangs down toward the floor. A hole is predrilled the same distance down from the hull as Mad River originally drilled the gunnels. A sight line on the jig lines up with the plumb line draw on the painter's tape and voila, you drill through the gunnel, into the old holes in the hull. I'd say I was about 75% successful. About 1 of 4 holes came back with green Royalex shards, meaning I missed. Oh well. I don't think this is really necessary but if in theory if you were to regunnel the hull enough times and drilled all new holes each time, you might eventually and up with a perforated tear line. Oh, I drill from the outside in. Other builders go the other way, I'm told. On my stripper I plugged the holes with contrasting wood plugs. It looks great but I'm not bothering with it this time. The screws will be visible. The horror!!
Next up I milled the decks. I decided to go with a little trick I read in Canoe Craft. Mill up some strips of contrasting wood, glue them into a rectangle. Then cut along the diagonal. Here's the deck blank about to be cut on the diagonal on my Shopsmith using an Incra5000 miter sled. That's a very accurate piece of equipment.

And another angle of the setup.

Once they are cut you have two right triangles. Flip one over and glue the two hypotenuses together. Because clamping a triangle is a pain in the butt, glue/clamp both decks at the same time. Here they are wating for the thickened peanut butter (epoxy) to dry.

Now comes the fitting. This would be a good time to mention that when you make the deck blanks, make certain that they are going to be long enough and wide enough to fit the space! You can do this by tracing a template on cardboard. I dispensed with the template and just used some trigonometry that I had to relearn when my youngest kid was in school. (If you aren't doing a fancy deck, just take the masurements; but if you are making this type of deck you'll need a little trig to figure out how the long the blank needs to be for when it is cut and turned into this triangle/pie wedge shape). Whichever way you go, I do not advise tansferring the template to the deck when it comes time for fitting.
To fit the decks, I run a piece of surveyers' line from bow to stern to get the center. The deck is then placed on top of the gunnels, centered, and temporarily clamped. Then run a pencil from below along the end of the inwale, along the hull and to the other inwale. A word of warning, the pencil has thickness and the line it draws under your deck blank will be too narrow unless you make sure to tip the pencil so the angle of the pencil tip is always flush to the hull.
Now just cut out the line you've traced, right? Wrong! The hull is coming in at a V. Band saw proud of the line you've traced. Now get the angle from the gunnels to the hull. I think this was about 4 degrees. To the beltsander! tilt the table to the right angle and start sanding to your line. Many trips back to the hull to make sure you don't go too far!!!
Here it is progress. I've got more gap than I'd like where it meets the inwales, but a little walnut wood dust mixed in with the thickened epoxy will take care of that and the clamping pressure will help close up that joint a little too. Did I mention that I cut a decorative semi-circle at the bottom edge of the deck? Used a 12" sanding disc to trace the arc and bandsawed. If's a good idea to have a curve here. Prevents things from getting jammed and stuck between the deck and the gunnel. Things like gear, arms, legs, whatever.

The hull is a little uneven towards the bow and stern both at the rounded point and just uneven thickness wise. Get as close as you can. And then when you go to glue it in with thickened epoxy, add a little wood dust and only you will know.
I like to prefinish/waterpoof the bottom of the the deck with epoxy before installation. When the drips come over to the other side, I decided just to do both sides to get a sense for what the deck will look like. The epoxy makes the deck pop, huh?

After screwing in both decks, I take a random orbit sander to the gunnels to smooth them down exactly level to the hull and to blend the decks into the gunnels.

Not a bad job. A little roughness on the right will get filled with a little more thickened epoxy/wood dust.
Oh, what about the yoke installed and holding the square up against the surveyer's line? More photos of that later. Long story short, I used a pattern from Gilpatrick's book on strip building. Same pattern used for my cedar stripper. It is a bit more heavy duty than the Explorer yoke (it's all yours Mike).
Well, that's enough for now.
Last edited:

