• Happy Mathematics Day! ❌📐♾️

Small Hand Tool Shop Storage?

  • Thread starter Thread starter Guest
  • Start date Start date
So far, the best uses for the magnetic strips for me are for chisels, screwdrivers, shaping rasps and odd drill bits. No searching for them, no fiddling to get them out or in .... just grab what you need .... and you just put it close to back and it snaps right in.

Brian
 
I finally put a dehumidifier in my shop. Even in winter, the best I can get is about 50% humidity unless there's an especially cold front that comes through. Thing runs continuously.

For that reason, my best tools (handed down from my dad) are kept on a shelf in my gear room. Hand chisels are in a compartmented tray. Planes just sit on the shelf. Out in the shop, I keep my clamps well oiled and on 2x4 racks high above the work bench. Other tools sit on shelves. The most common ones (screw drivers, hammers, pliers, etc) just have nails/hooks they go on. The hammers almost all have a hole drilled in the handle and hang on a nail driven into the pine shelving. The small power tools all sit on the shelf under the bench.
 
I added a dehumidifier in the basement this summer because of the rust. I have a pellet stove in the winter, it's very dry down there now and very warm on those really cold days we've had this year. I've spent a lot of time getting that rust off.
 
I find in a small shop, that floor space is at the highest premium ... hence pegboard for vertical small tool storage (no floor space required), for small tools and supplies I made this cabinet setup ...

X5f0_RoIcMgEICt7lUCQqQQ5j10mu_2WTIBV-aEGhsK75aksNNv0ko9mJrCjkgsCV1VMmjbYO4Wwm8vWm13WRR1e9UiAjJucY6RLdQcG9dQgltUOlVDTeOvqD8bWg7VX29I0_eLtR5ISF1jq-WQwKcATTAfLRI03JkiDfIcqMaNyCR9Lt_d9aJqpY-BUOqLOSU13FshS8CgXwU8apW7ihLhJYwmgbOqyq4qC8crB2B00OskJ7Zetabv_lvQNW8a59ULbzcDK0q1Af09isNjVR84Q_zOydKJYA0XIQOvVm6lClrVjZy-vacmZ0W5j2ER2iEodwAb0y2UcUZtkJmQhJHTRJYJZyjIXjSpHjpAt0MLwFlVS8vElsFAE8a8xer5F1UgVN3KblrR6BRHFgIY_3eErTjm0e8GOXeLr3vtihgnOr02vqpxXk8HNl5hMEyCYwD1qUc-jHzlyRF8iZxATSHm_sol9h6WwqfYkBSBEDDIPraih4w5ROx1G-NF2eZH9dqO-QuNY7rrjSrih2GiUHOxQ_YQxqRpE24RSJ6LCVhfE7P-Eiq32XixnB-lXRh7ctiZHICx6qUDPCxQGiD5y8O72Pjutsdv2oofGTeQ=w806-h1074-no


The cabinets hold drills, ROSs, planes ... all my power tools, as well as epoxy and epoxy related supplies. On the top, I left space for my rigid vertical belt sander, below there is space for the vacuum, router table and planer ..... if anything is going to live on the shop floor it has to make best use of every square foot.

Brian
 
So far, the best uses for the magnetic strips for me are for chisels, screwdrivers, shaping rasps and odd drill bits. No searching for them, no fiddling to get them out or in .... just grab what you need .... and you just put it close to back and it snaps right in.

I blame you for this Brian. I ordered a three pack of the least expensive magnetic bars I could find.

https://www.amazon.com/KOVOT-Magnet...ons&keywords=kovot+magnetic+tool+holder&psc=1

ASAP installation Monday turned into lets have a look Friday, but they went up in seconds and oh. . . .my. . . .gawd. . . . that is so much more convenient. Yeah, I need at least another three pack, er, maybe six more.

I do not blame you for the part that took only seconds to install. I blame you because I am now in the process of reorganizing the entire hanger arrangement on the peg board for enhanced convenience at the bench. Something I should have done years ago.

I can not finish that task that without another delivery of magnetic tool bars. More are on the way. Thanks, or something.

I like those Pegboard Multitool Holders. I use them mostly for my round and triangular files at the base of my pegboard

Sweeper, the little rat tails and triangle files fit fine in the wire circle peg board hangers, but my large flat and half round files and rasps were the bane of my circled pegboard hanger use. I had to bend the circles open wider to accommodate the files, and getting them in and out of the wire circles was an awkward hassle at best. No longer.

The more I futz around in the shop the more I realized how little I know. Magnetic tool hangers eh?, whoda thunk those would make shop work that much easier. Live and learn.

BTW, if you are not a pegboard user there are magnetic tool bar hangers on 16 inch center for wall studs.
 
Put two pieces of 1x3 together to form an 'L'-shaped shelf. Swiss cheese it with holes and slots of various shapes and sizes, then mount it a convenient height above your work bench. Fill the holes with small, frequently used hand tools. That's how grandpa did it, and I copied him.
WBench - 2.jpg
 
Chip, I am somewhat precluded from that tool organization style because I have 5 inch deep shelving above the main bench to hold the oddities I use most frequently. Boxes of single edge razor blades, Scotch tape, file cleaning card, boxes of specialty bits, stud finder, electrical tester and other everyday bits and pieces that do not hang well on the peg board.

P2090516 by Mike McCrea, on Flickr

Yeah, yeah, that is a lazy man electric pencil sharpener on the short shelf. I had no idea how convenient that little electric pencil sharpener would become, and still do not fully appreciate it until I work in a shop without one and find myself whittling a freaking pencil point. I would rather go ahead and sharpen several pencils, or all of them I can find, once and done, while I am at it.

Minutes of less than satisfactory Whittlewhittlewhittle sharpening, or three seconds of mbzzzzmbuzzzzmbuzzzz to sharpen every dang pencil in the shop. No contest.

The petroleum jelly is there for when I get really frisky with a boat late at night. And for anything suction cupped.

It is amazing how much better, and longer, a suction cup works if lightly coated with petroleum jelly. Car windshield mounts, house window thermometers, kitchen sink stuff and shower hung shelves with two kinds of shampoo and three kinds of fruity conditioner. . . . . whatever, I wash my hair with bath soap and call it good. Even some suction cupped boat stuff.

I painted the shop peg board white before I hung it, thinking that would make the tools stand out better to my colorblind vision, and the white wall surface is nice for reflected light shop brightness.

One added benefit, the correct sized hangers fit even more snugly once the peg board had been painted.

P2090517 by Mike McCrea, on Flickr

P2090517 by Mike McCrea, on Flickr

All photos are pre magnetic tool bar reorganization. I am slow, but I am working on it.

It is a sizable expanse of peg board to contemplate. 14 feet long x 48 high above the main bench, with a 4 foot wide section of pegboard L along a corner wall, and another peg board L along a wing wall that separates the seated height main bench from the standing height aux bench.

The main bench is surrounded by peg board on three sides. And I can rearrange it, yet freaking again, in better, more conveniently space allocated order.

This requires more thought.
 
Shop Reorganization, round 3

That is three times in near 30 years, so not bad. But what I work and the tools I use most often have changed with the times. My shop organization has lagged a decade behind. And, as usual, one reorganizational thing lead to another.

Before I got to revising the peg boards hangers using magnetic tool bars I realized that the wall hung tool rearrangement, while much needed, was not going to help much with the little everyday oddities that still constantly clutter the bench for lack of a better but still convenient place.

I have a handy 5 inch deep shelf only above the bench along one wall. I had even installed the braces for another sidewall L section when I first installed that shelf, but meh, never got around to cutting and installing the board.

40338569571_c79e9a6b57_c.jpg
P2090516 by Mike McCrea, on Flickr

The main work bench needs a full mini shelf surround on all three sides to help elevate the little bits and pieces off the bench. Scrap five quarter deck board will do.

40458877322_efbbf2298c_c.jpg
P2210551 by Mike McCrea, on Flickr

Before I start from the top down with the peg board I might as well commence from the bottom up, with a clean and clutter free bench as foundation to build upon and above.

38690790410_242f80c4fc_c.jpg
P2210553 by Mike McCrea, on Flickr

Dayum. I have not seen that much exposed benchtop in a long while. With the main bench surrounded by short shelving I could begin to reorganize the peg board hangers, with several criteria in mind.

The most frequently used tools easiest at hand. Most of them going on magnetic tool hangers.
Less often used tools higher up, but with the magnetic bars even those are still easy, and less aim exacting, to retrieve and put back.
Long linear tools like bar clamps and levels and T squares could be hung highest and still dangle reachable.

Some complicating factors. I have more tools than when I set this peg board up 10 years ago, and over time had resorted to hanging multiple saws on one long peg or nail. The saw I needed was always the third one back. Saws take up a lot of room, and even with space condensing relocation everything barely fit on the woodworking side of the bench.

I had already discovered that muscle memory location is critical. A year ago I built a little shelf under one end of the bench for the shop trashcan. It took me 6 month of wandering around with trash or dustpan in hand to remember where the trashcan was. Which was at knee level within reach of where I started my trashy wanderings.

There was some thought put into in the reorganization 10 years ago, and it was largely efficient. I wanted the tools in the same locations, where I have come to naturally reach for them. It all kinda needed to go back essentially where it was, just better.

One obvious bench top fail, even before starting on the wall hung stuff, was how little work space actually remained open and available for use. The main workbench is 13 feet long, and it was hard to keep 6 feet of that in the middle open and clear.

NOTE. The auxiliary work bench is 19 feet long, but is on the tool less wall side of the shop, so not very walk back and forth tool convenient. As such it usually has a boat resting on it.

That aux bench does have its uses. I clear it off and exile my sloppiest shop partners away from the main bench. They call it Working on the Little Boys Bench. Yeah, keep it up and your new bench space will be called Sawhorses outside in the driveway.

So much stuff bin boxed and sometimes stacked at either end of the bench.

25630425047_cf0bc17037_c.jpg
P2220555 by Mike McCrea, on Flickr

Stuffed stuff. Time to see what can come up off the bench and onto the 5 inch deep shelves, and what needs put away proper on more remote shop shelves.

Some of it will have to stay. The 8 slot soda bottle holders full of my most commonly used screws and bolts weight 30lbs each, and sometimes travel with me for distant work. 18 inches of bench lost to convenience, and muscle memory when I reach for a drywall screw.

40458866212_2f012ca092_c.jpg
P2230558 by Mike McCrea, on Flickr

With a clean bench and mini shelf surround I could finally reorganize the pegboard L on bench left. Look ma, no magnets. Not yet.

40501175011_9e849186d1_c.jpg
P2240567 by Mike McCrea, on Flickr

In center bench, below the glorious natural light window and exhaust fan location for things like stinky contact cement benchtop work, I wanted a couple magnetic tool bars. Built out beyond window sill depth and drilled on top for the burr bits, punches and cutters I use most often, with a long magnetic bar on the front face for my most favored boat working tools.

25630397927_8efc903376_c.jpg
P2240568 by Mike McCrea, on Flickr

The unoccupied magnetic bar is an experiment. I am hoping to condition myself to place the small hand tools currently in use on that empty magnet bar while working, rather than looking around on the mess of shop bench wondering where they wandered. We will see if an old dog can learn new tricks.

On to reorganizing the longer L section of peg board. Gawd that lesser used tool area is a cluttered mess. For starters, why the heck did I ever hang tools in those crappy vinyl tool pouches? Am I that lazy?

40458859502_84b0488687_c.jpg
P2230562 by Mike McCrea, on Flickr

25630404407_a14c7a3368_c.jpg
P2230564 by Mike McCrea, on Flickr

Guess I am, or was, that lazy. Those stupid plastic pouches take up too much peg board area and are a PITA to get tools in and out of. There is a space saving magnet bar use for starters.

40501172391_39413615b2_c.jpg
P2240569 by Mike McCrea, on Flickr

25630395057_837d33793e_c.jpg
P2240570 by Mike McCrea, on Flickr

Its a start. Time to organize those box wrenches by metric and imperial size, and cleanfilegrind some Philllips heads, dunk a magnet in the various stainless steel bins, and finally get back to some boatwork and see how my organizational suppositions work in real life.
 
Last edited:
 

Attachments

Still playing in the shop.

All of the Phillips head screwdrivers have been cleaned and brushed. My first plan, simply using a file card to clean the flutes of crud, was useless at removing the encrusted gunk from the Phillips tips. Picking at the encrustation with a sharp pointy Exacto blade was ineffective at best.

Soaking the Philllips head tips in a half inch of mineral spirits for an hour and then running each flute across the file card worked like a charm. Mostly.

On 10 of 12 came out like shiny new. The big number 3 Phillips head, and a mid sized number 2, were encrusted with what appeared to be epoxies of some sort, blackish PC7 or JB Weld on one, amber epoxy resin on the other.

I have no idea how epoxy got on a screwdriver tip, and I am going to blame sloppy shop visitors. Kinda like No, not me, I think the dog farted.

After a half hour bath in Acetone and some file card action the honey colored epoxy resin on the big Number 3 was clean as a whistle.

The blackish PC7 or JB Weld encrusted number 2 endured repeated acetone soaks, file card scrubs and exacting Exacto picking before I wondered why the heck I was doing this and threw it in the trash. Which may say something about the tenacity of those thick epoxy putties, if not my Scots frugalness.

I learned about the magnet test on a sailing forum. I guess those blue water sailors know a thing or two about corrosion and stainless steel. Sure enough, when I put the magnet to the shiny railing on my 40 year old sailboat, guess what? No sticky.

The stainless steel and magnet experiment with the shop supply of stainless was revealing in unexpected ways. I used both a typical kitchen frig magnet and a very strong ceramic magnet to test every bin of sorted SS hardware in three large trays. It was a worthwhile experiment that took only minutes.

Surprise No 1, a box of what I thought was brass is magnetic as heck and I guess is simply something coated.

Surprise No 2, all of the machine screws, in every size, and all of the wood screws were completly unattractive, even with the powerful ceramic magnet. Nuts and Nylocks as well. Those are all from my local SS purveyor, a welcome surprise which makes me want to stock up a bit.

Curious surprise No 3, one box of stainless steel carriage bolts was magnet impervious. Another box, in a different size, was magnet attractive as heck. I have no idea about the original source of either and will buyer beware in the future.

Not a surprise No 4, none of the flange washers picked up, even with the ceramic magnet.

Semi surprise No 5, the weirdo SS hardware like wing nuts, pins and eye bolts were consistently and almost universally magnet attractive.

Disturbing surprise No 6, all, and I mean every dang one, of the flat washers and split washers picked up easily, even with the weak magnet. I do not think that was just the smaller size and weight.

Not really sure what I learned in that quickie experiment. I am not about to segregate the SS into various magnetic attractions. And I may try that magnet experiment on some D rings from various providers.

I will magnet check what SS I use from shop stock on future installs. heck, I might as well pocket both magnets and take them with me when I go shopping for stainless next time. Soon.
 
Just a point about your screwdrivers on a mag bar Mike, they can be placed both handle down and up, it allows tighter spacing and are still easy to use.

Brian
 
There you go, Phillips up, Flats Tips down.

The chances of my remembering to put them back in the order approaches zero.

One bar for the flats, one for the Phillips, excepting the favorites of each that live on the everyday tool bar.
 
Last edited:

Magnet closures on clothing sounds like a horrible idea. I am annoyed enough when a Velcro cuff sleeve closure gets caught on a Velcro pocket closure.

I had a long ago mishap with the big ceramic magnet. We have two of those powerful ceramic donuts, originally bought so the boys could magnet fish for sunken treasure below a little rapid that often flips the unwary. One trip I stored them in my day bag next to my compass. Ooops, lesson learned.

The magnet testing and other play continues. I stuck the ceramic magnet into the boxes and bins of stainless outfitting parts, and am no longer surprised at the mixed results.

Most of the loose, naked SS D rings, excepting two big ones, were attractive. I had saved the rusty D rings that came with the hard plastic back plate a canoe refurbishment. Those had instant pick up, even with the weak magnet.

The vinyl pad SS D rings from both Northwater and from Top Kayaker were attraction impervious.

The SS caribeeners and clips were all magnet attracted. Likewise all of the SS pad eyes and fair leads. It is the weirdo little stuff.

Betwixt and between refurbishing Phillips heads and Lets try this at home magnet play the shop reorganization continued, moving on to the neglected standing height bench.

There is a short wing wall between those bench heights, a wee wall that adds a lot of shop functionality. That wall existed beside the garage door before the shop expansion and I left it in place intentionally.

It is the same depth as the main bench, separates the seated height bench from the shallower sanding height bench and, best of all, provide an additional three feet of pegboard on one side and 3 feet of shelving space on the other. A two for one deal.

P2240571 by Mike McCrea, on Flickr

P2240572 by Mike McCrea, on Flickr

Had I had not left that wall I would not have appreciated how handy it was, but would now be tempted to build a simple 3 foot wide wood partition somewhere in the shop, just for the extra horizontal tool and shelf space on either side.

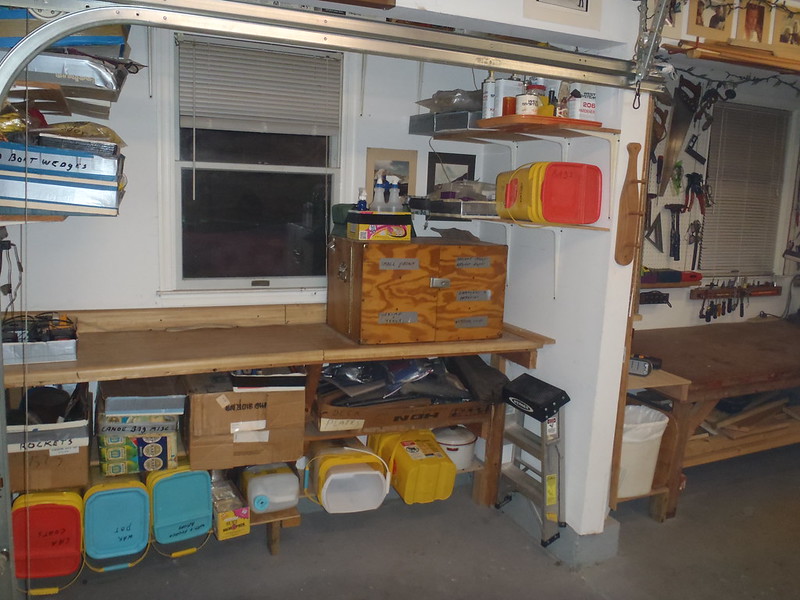
I put another wood cabinet, identical to the one in that photo, on the other side of the high bench. In actuality I rarely use the standing height bench, and never need more than a few feet when I do. As often as not that space is occupied by the spare coffee maker and fixings when working with friends.

Yes Doug, I know, that space between the cabinets is two feet wide, and would fit a shop mini frig nicely. I dare not go there, next I would have a Murphy bed and might never leave the shop.

Cabinet Confession. Those boxes were made 20+ years ago as massive camp kitchens for family car camping trips. To make everything fit in the minivan we needed to have the cooler road trip accessible for lunches and re icing, stacked atop that camp kitchen. It was a big, heavy cooler, so the uber wannigans needed to be dang sturdy.

Uber wannigans plural. Yes, two of them. That is another story. They were built out of five eights plywood, glued and screwed, and have 12 inch deep shelving inside the box itself, and shelving inside the 5 inch deep doors.

A lot of shelving, stupidly made from the same five eights plywood, custom arranged to fit everything from stove to pots and pans to fold out work surface. Even empty they take two people to move, but I expect them to last for generations.
 
"...that space between the cabinets is two feet wide, and would fit a shop mini fridge nicely. I dare not go there, next I would have a Murphy bed and might never leave the shop."

And you make that sound like a bad idea?


I have 5/8ths plywood cabinets in my kitchen. Original to the 60's house. Hard to beat it. Stylish? No. Solid? Go ahead and climb on it.
 
Back
Top