• Happy Birthday, Judge Joseph Wapner (1919-2017)! 📺🤼⚖️

Paddle mod / make it my own

Holding the paddle flat (or perhaps more thorough tipping) yielded a flat finish with no runs, on the top and bottom surfaces!
Congrats!

I'm about to start on a raw paddle today. I'm also going to follow Bruce Smith's method, slightly modified, but for a full varnish finish. He impregnates with a 70/30 BLO thinned mix, then varnishes over that (actually he varnishes, then does a varnish/oil mix).

For your top and bottom varnish coats, did you let one side set before flipping? How did the edges go?
 
I’m pretty happy with the end result.
36956573-A27B-4575-B38C-AD63C016BFE7.jpeg

After tape removal, I have some minor cleanup to do. I’ll sand the small ridge after the varnish sets better. It’s not really tacky, but feels like you have lots of traction if you know what I mean? Sanding now will make a mess.
B89B1594-9DB1-4734-B0B0-6572E94C8611.jpeg

Congrats!

I'm about to start on a raw paddle today. I'm also going to follow Bruce Smith's method, slightly modified, but for a full varnish finish. He impregnates with a 70/30 BLO thinned mix, then varnishes over that (actually he varnishes, then does a varnish/oil mix).

For your top and bottom varnish coats, did you let one side set before flipping? How did the edges go?

I have settled on a method of applying the varnish rather quickly, making strokes perpendicular to the grain to fill any remaining texture, then tipping off with long straight strokes parallel to grain. Flip the paddle and see all the drips around the edge, repeat the quick loading and tipping, and then go around the perimeter last. So either I used the right amount of varnish or the horizontal method is what worked for me. Only repeated varnishing of things in future will tell me if I figured out a method that works or just got lucky this time, but at least in this case I know when to stop!
 
That's helpful, thanks. I like the idea of going across the grain first to fill contours, then with it to smooth.

I'll just have to figure out how to do all that quickly when trying to get the blade, shaft and grip in one coat! Flipping is also harder when the whole thing is coated in wet varnish, but I've managed with thwarts and seats before. Speed is also helpful so that fingerprints can be smoothed out before the varnish starts to set.
 
Varnishing the whole thing at once sounds like a nightmare! When I finished my Home Depole I used a mixture of equal parts varnish, turpentine, and BLO. I applied this with a blue paper shop towel while the pole was resting on sawhorses, and rubbed on them wiped off. The ends where it rested on the horses got kind of ugly, but I wet sanded with the same mixture and some steel wool followed by more paper towels to clean it up. Others have advised against the steel wool, as it leaves steel strands behind. Given the application (pole) and methodology wiping down with paper towels, I risked it and am content with the result.
 
Once that ridge hardens it will be easier to scrape it than sand it. A really sharp scraper will leave a smooth surface that you will hardly notice, especially with an unavoidable coat of oil from the shaft.
Jim
 
Varnishing the whole thing at once sounds like a nightmare!
Hmmmmmaybe! I know some folks manage it!

It's for a paddle I plan to use, and while I want it to look nice (it's quite a nice looking paddle pre-finishing), I would like to get it on the water before ice up.

I have a couple oiled Badgers and a couple varnished paddles (Bruce Smith, Fishell), and even though I've re-oiled the Badgers a few times since getting them last year, they always seem thirsty and a bit dry. I keep hearing recommendations of oiling 3-4 times per year, and that it takes many months of re-coating to really build a nice oil finish.

I have to say I'm more inclined to give this new one a few coats of varnish over a week or two and call it sealed. I've touched up a few varnished paddles, and yes, if you're searching for a mediocre varnish job, you will find it, but I don't think it's very noticeable on the wall rack or on the water if you're just admiring the paddle. I'd rather it look nice and last forever (no water penetration causing rot) than look perfect and never get it on the water. But maybe I'll sing a different tune after my first attempt at a full varnish coat!

I considered doing it in stages, but it seems like blending varnish edges with each other might look worse than doing the whole thing at once and smoothing finger marks immediately after setting it down. Another option would be to rub on thinned varnish, but again I'm not sure the increased number of coats is worth it - I'm thinking I'll go with brushing the 90/10 thinned varnish recommendation in the Warren and Gidmark paddle making book. They recommend working with the paddle horizontally on a couple thin nail tips, which worked well when I recoated thwarts and seats.
 
Just remembered another trick to minimize that ridge in the future is to pull the tape when you just finish with the brush while the varnish is still wet. Yes you will have to tape again for the next coat but for a job like that it’s nothing.
Jim
 
I'm thinking I'll go with brushing the 90/10 thinned varnish recommendation in the Warren and Gidmark paddle making book. They recommend working with the paddle horizontally on a couple thin nail tips, which worked well when I recoated thwarts and seats.

I wish I’d read about working with the paddle horizontal before I started. Solid advice!
 
Woodpuppy, your blade looks very nice after your various efforts.

I've never been fastidious or particularly interested in maintaining a furniture showroom level finish on paddles. After trying various things for maintenance, I settled many years ago for just a couple of cloth passes with a wipe-on varnish for worn areas on paddle blades, shafts and even wooden gunwales. Wipe-on varnishes are just varnishes that are pre-thinned with mineral spirits and may also contain some oils. In fact, I'd even consider Watco a form of wipe-on varnish—as it's a combo of varnish, linseed oil, thinners and dryers—although it probably has less varnish in it than the products that are labeled wipe-on varnish.

The only place I really prefer no finish at all is the paddle grip.

Wipe-on varnishes go on fast and dry very quickly. No brush marks. No runs. No drips. Minwax Wipe-On Poly seems to be the product that is most easily available.

 
I doubt I’ll ever be anal about maintenance layers of this paddle, but I wanted to start out nice. I’m on to wipe-on oil layers now. Dry thirsty wood is soaking up coats today.
 
Woodpuppy, your blade looks very nice after your various efforts.

I've never been fastidious or particularly interested in maintaining a furniture showroom level finish on paddles. After trying various things for maintenance, I settled many years ago for just a couple of cloth passes with a wipe-on varnish for worn areas on paddle blades, shafts and even wooden gunwales. Wipe-on varnishes are just varnishes that are pre-thinned with mineral spirits and may also contain some oils. In fact, I'd even consider Watco a form of wipe-on varnish—as it's a combo of varnish, linseed oil, thinners and dryers—although it probably has less varnish in it than the products that are labeled wipe-on varnish.

The only place I really prefer no finish at all is the paddle grip.

Wipe-on varnishes go on fast and dry very quickly. No brush marks. No runs. No drips. Minwax Wipe-On Poly seems to be the product that is most easily available.

When using this type of finish, just realize that the actual coat is quite a bit thinner than a traditionally applied varnish. So although it goes on fast and dries fast, there is no comparison in the thickness of the finished product and the protection being offered.
 
Here's Badger Paddles' recommended varnishing approach, which is vertical, not horizontal. If a person had a couple pairs of nails at slightly different distances you could alternate where the nail blemishes are among coats (or, even easier for an oiled grip). I think checking back frequently while the varnish sets is probably key to not getting runs with this method. Now can't decide if I'll do this or the horizontal on nail points per Warren and Gidmark....

 
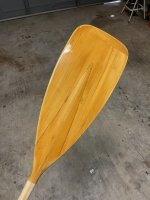
I can’t say “I’m done” quite yet, as I’m still doing coats of 85/15 BLO/thinner and the grip especially is still soaking up the oil. But it’s time for the photo shoot!

To sum up the project, this paddle started as a thick-shafted, club-gripped, pizza paddle. It grabbed way too much water for my taste. Since getting my Bruce Smith, I’ve come to appreciate the slender oval shaft, the compact and easy-to-roll grip, and the wonderful handling (it’s gorgeous too). My other paddles are Grey Owl bent shafts, so I’d been looking at the Grey Owl Fleetwood, in part because I love the blade shape. But the grip- meh, didn’t do much for me. The Bruce Smith grip though- attractive and useful. So I traced the blade shape I liked onto the pizza paddle and tried to replicate the Bruce Smith grip; all work within the limits of the radius of my benchtop belt sander.

Here’s a comparison with the original grip as I have 2 more of these Clement Aviron paddles:
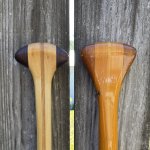
681A88BD-5359-4145-9379-8B9EE1FF5A7B.jpeg

And compared to the Bruce Smith I have grown to really love:
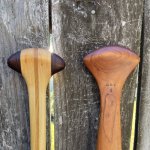
545FAB1E-C159-482E-9692-F9ABBAF7B288.jpeg
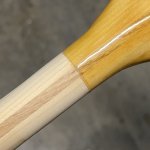
The resultant shape is amenable to a thumb hooked around the end of the grip, while the top is contoured much like its inspiration. Making it for me, I just kept rasping and sanding until I liked it.

The blade shape is a slightly stretched tracing of my favorite Grey Owl bent shaft; this was in order to preserve the reinforcing lamination at the tip and avoid carrying the transition from shaft to blade further down the blade. I didn’t need the shaft any longer than it already is; the paddle was 58” overall, and the shaft was already a touch longer than my other paddles.
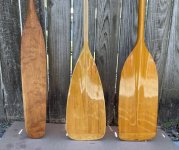
55957254-F4DB-447E-93D3-8362AA9F19E2.jpeg

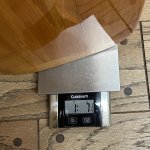
For all the original paddle’s shortcomings, it was never heavy. But much to my surprise it came in a 1/4 oz lighter than my Bruce Smith!
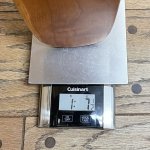
51EBEEAF-BE26-4D9B-8DD7-944651F2BF88.jpeg
9E4074F5-6AEA-4C84-B82A-DC5B06341F46.jpeg

Here’s a family pic or all three together:
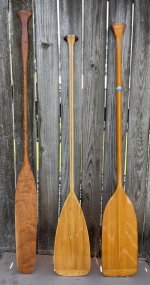
93D29964-8938-4C36-AEB3-A6CED354CD57.jpeg


I think I will really enjoy this paddle. I will actually use it which is more than I was doing with it before. Will I modify the 60”? I don’t know. I can see making my own paddles for fun and as I develop further preferences, but I’m not sure about the durability of this softwood paddle yet. I need to make a short push pole (or just remember to take my boring ol plastic and aluminum boat hook) for dealing with extreme shallows or pushing off at the launch etc. as this paddle won’t tolerate much of that sort of abuse. But I don’t subject any of my paddles to such treatment anyway. I’ll keep loading oil on the paddle this week, but I sure hope to get to use it next weekend on our planned float from the Wacissa head down to Goose Pasture.
 
Last edited:
Wow, a fantastic end result, the grip especially! you wouldn't know they were the same paddles just two short months ago! Will be curious to see how the blade feels compared to the Ottertail. Nicely done either way.

Stripping off the varnish really highlights the beautiful wood in the grip. Now I'm wondering if my varnished paddles will look that yellow years from now. Looks like they were originally pretty thickly coated?
 
Great work, Woodpuppy! You are now the resident paddle re-shaper. The Smith ottertail and Clement-Owl should make a nice duo, with the C-O being more useful in shallow water and when you need more powerful strokes such as in wind.
 
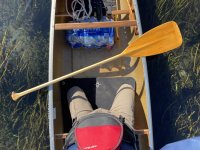
I used the paddle today on a 5-hr, 10.75 mile paddle down the Wacissa. It was a good match, the river was rather low by about a foot, so I was unable to use the ottertail in most sections. The modified Clement performed very well for me. From my attempts at the Canadian stroke to hit and switch, it was light and nimble. I may actually like my grip better than the one on the ottertail. Palm rolls were smooth and easy, and I could hook a thumb like a T-grip. In-water returns were quiet and smooth. I took a stab at side slips too, and got it to work but not as reliably as I’d like. It’s surreal and beautiful when it works right. On the length, this paddle was marked 58 but I took a little off the bottom. It’s shaft length is longer than my ottertail, and I thought it would be too long overall. And it may be, in a low seated paddling station. But kneeling solo in the Polaris it was about perfect. There’s not a thing I would change on the paddle now. I’ll just maintain the finish as needed.

2AF4CAD4-D4EB-4FBD-9B8B-9AACFB2FF53F.jpeg
 
Back
Top