G
Guest
Guest
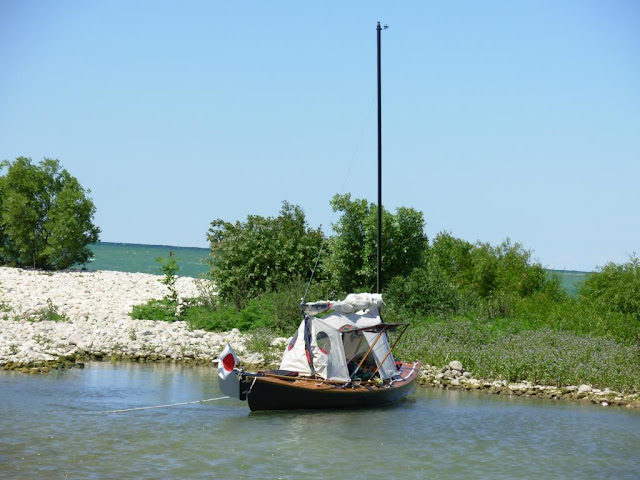
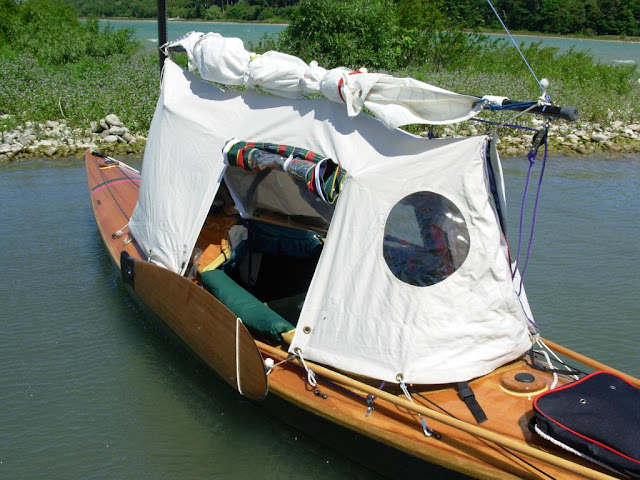
This is a continuation of the motorized canoe with sea kayak ama project started in 2015.
https://www.youtube.com/watch?v=TPErEihIaes
That boat, a 17 foot long by 37 inch wide Mad River Revelation, was too small for realizing the decades old live aboard dream. The better solution would have been a 20 foot Grumman square stern, but those are hens teeth. Still looking for one, aluminum would be better than Royalex for oyster bars and limestone as a motor canoe.
As a motorized double ender, the Miramichi, 20 feet long, 40 inches wide, 16 inches deep with decent rocker bow and stern, oughta work. It is essentially a big seaworthy Prospector.
Before we could stuff that 105 lb monster in the shop we needed to finish repair work on three long sea kayaks. It was a wandering path to get from one side of the shop to the other for a while, like a boat maze.
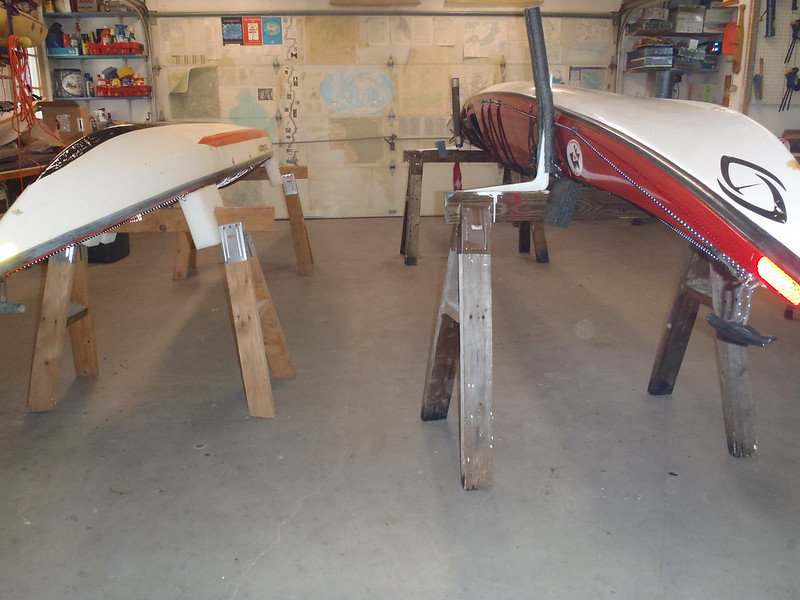 PB280030 by Mike McCrea, on Flickr
The Miramichi is a deep boat, and with the stem rise the usual gunwale level motor mount would not work.
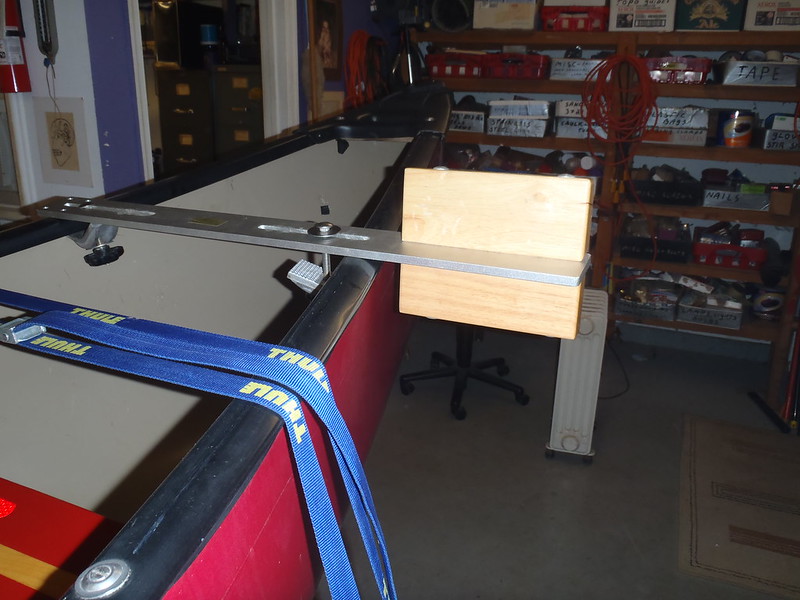 PC060054 by Mike McCrea, on Flickr
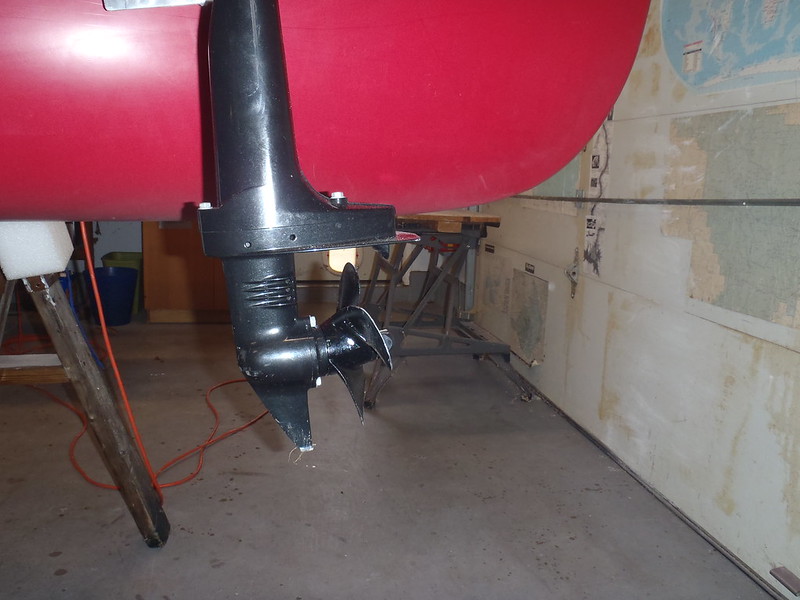
The little fuel sipper 4 stroke Suzuki is a short shaft, and the prop needs to be positionedbelow the bottom of the hull. Suzuki now makes a long shaft version of that motor. 2 years too late, we will make this one work.
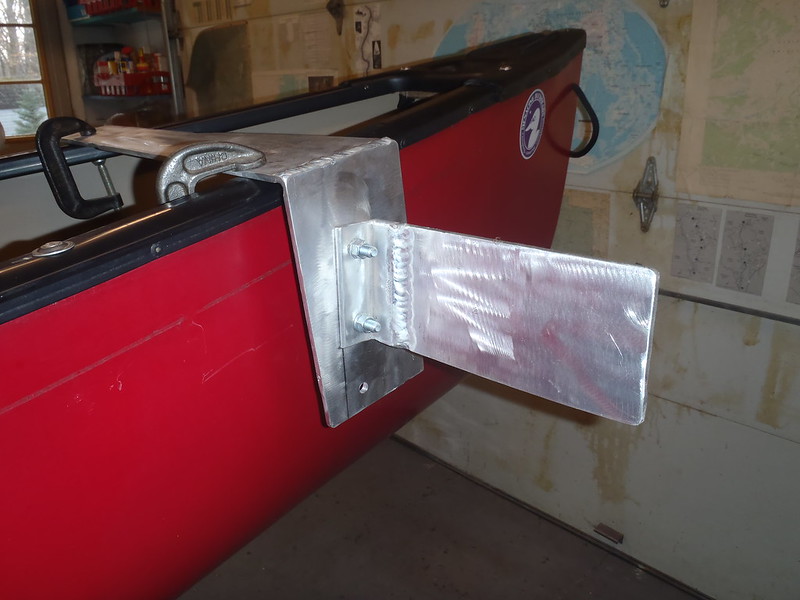
We considered building a Gilpatrick style laminated wood motor mount, with exotic wood inserts. It was not our lack of craftsmanship that stopped us, it was metal craftsman and welder friend Steve, who built this rock solid beauty from quarter inch aluminum plate.
 PC010040 by Mike McCrea, on Flickr
That is one uber sturdy design. With different depth side plate holes, to make it height adjustable up and down. A very cunning piece of custom craftsmanship.
The side plate needed some wood sandwich, so the clamps had something to bite. Half inch oak, G flexed to the plate and eventually fully coated with epoxy and top coated with spar urethane.
 PC050053 by Mike McCrea, on Flickr
Perfect prop height. Thanks Steve, you need to sign your handiwork when you see the finished product later this winter.
 PC060057 by Mike McCrea, on Flickr
Once properly positioned that motor mount was attached through the inwales using stainless hex bolts. Stoutly fastened, the vinyl gunwales on the Miramichi have a full box aluminum insert, not just an L.
Even more stoutly fastened. We drilled hex bolt sized holes and pop rivet holes through the end plates from a couple stainless steel U bolts, and pop riveted those under the inwale. The motor mount attachment bolts are now, from top to bottom, passing through a quarter inch aluminum motor mount plate, aluminum insert top, aluminum insert bottom, and stainless steel plate under the bottom of the inwale. That should hold without undue bolt hole wear or elongation.
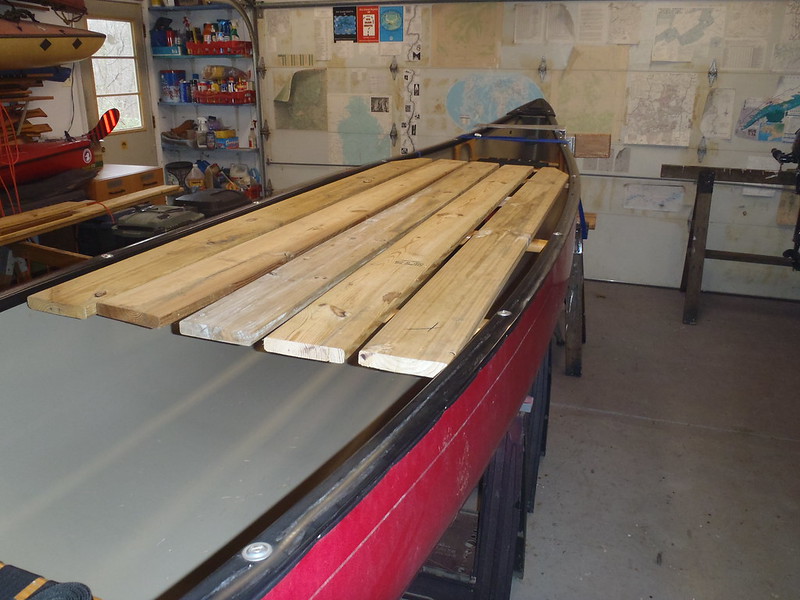
That was all the easy part, although we could not have progressed any further without Steves awesome side motor mount design. Now, with a working side motor mount, the canoe needed a platform atop the gunwales. A big platform, 88 inches long and near hull width wide.
We made a test platform using leftover five quarter deck boards from my scrap lumber rack. Heavy as heck pressure treated, but suitable for the prototype.
 PC070061 by Mike McCrea, on Flickr
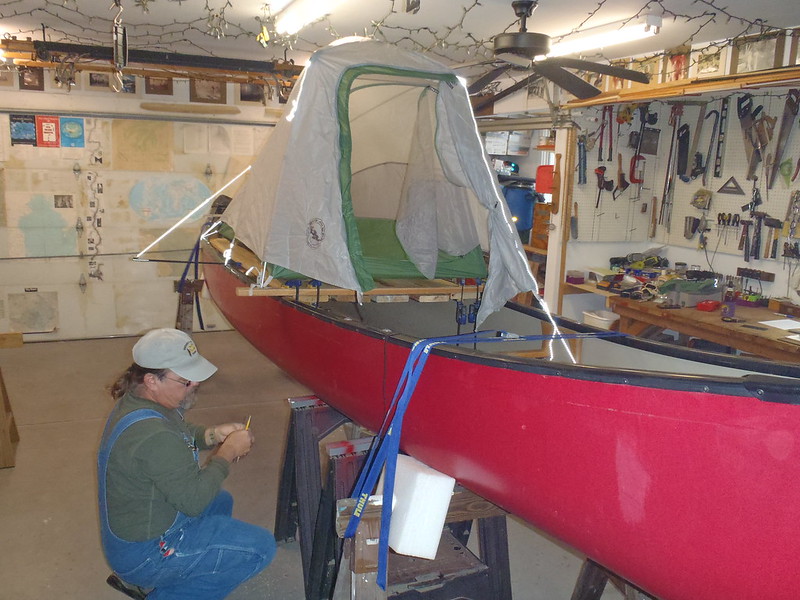
Why does it need such a platform? That is the live aboard part of the motor canoe concept.
 PC090066 by Mike McCrea, on Flickr
Big Agnes Seedhouse SL1. The platform tent had to be a solo, trapezoidal, end entry tent in order to fit atop the confines of the Miramichi sheerline and platform space.
https://www.bigagnes.com/Seedhouse-SL-1
Before anyone freaks out at the thouggt, the tent is securely attached to the platform, and the platform securely attached to the canoe, and the canoe will be securely anchored in protected shallows.
Very securely anchored. There are long, end anchor poles to twist into a sand, mud or marl bottom, spring lined through the bow and stern painter loops, preventing the canoe from moving fore or aft. The anchor poles are 8 feet long so they can be driven several feet into the bottom and still have leftover pole length for rising tides.
And, belt and suspenders, there is a 10 lb mushroom anchor off one side as well. That canoe should not move much except up and down every 6 hours.
OMAGAWD!, what if the canoe rolls sideways? Not to worry, there are adjustable length side floats, custom made adjustable height for the very deep Miramichi stems. Thanks to Chuck at Spring Creek, who has been helpful throughout this very peculiar, years long experiment.
Pay no attention to the photo. Those side float stabilizers actually go up on the bow end near the seat, and are not spread to width.
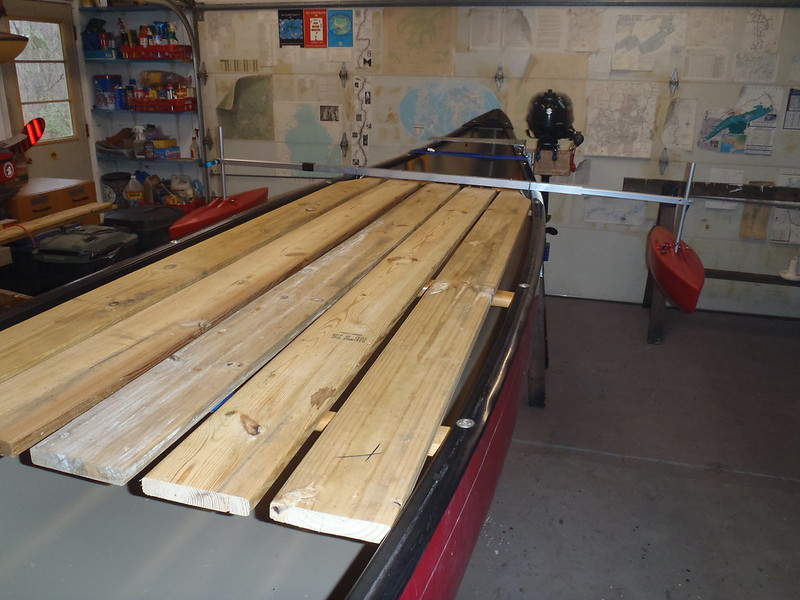 PC080062 by Mike McCrea, on Flickr
With the trapezoidal tent platform oriented in that direction there is ample leg room at the motor station, and open living space outside the door end of the tent for sitting and cooking and scaring people away with banjo plucking deep in the swamp. No one is poking back into that mangrove lagoon when they hear banjo music.
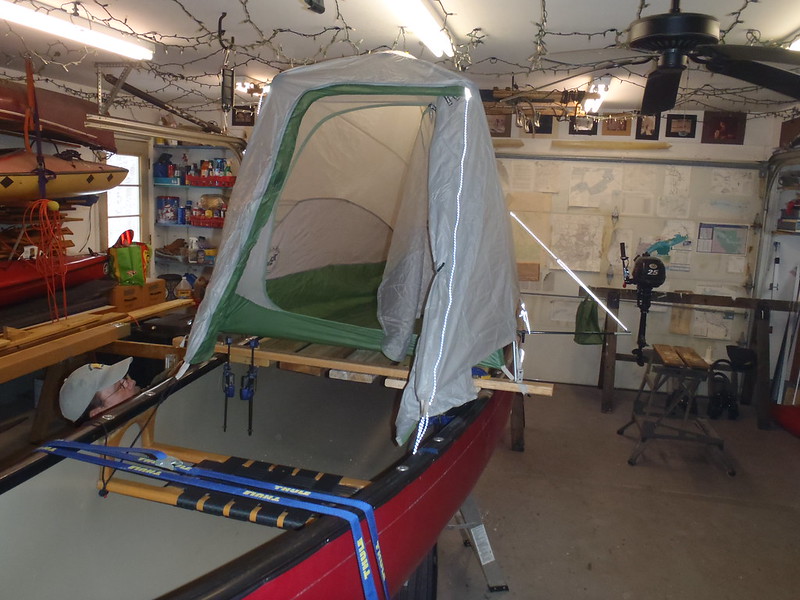 PC090067 by Mike McCrea, on Flickr
Again, maybe to convince my worrisome self this concept is safe, the platform is anchored to the thwarts, and the tent anchored to the platform. The tent pole ends are seated in platform holes. Nothing is blowing off in the wind, so solo Joels last words will not be a Monty Python-esque Tent Overboard, Tent Overboard. There is a story behind that blown into the water expression. Not happening this time.
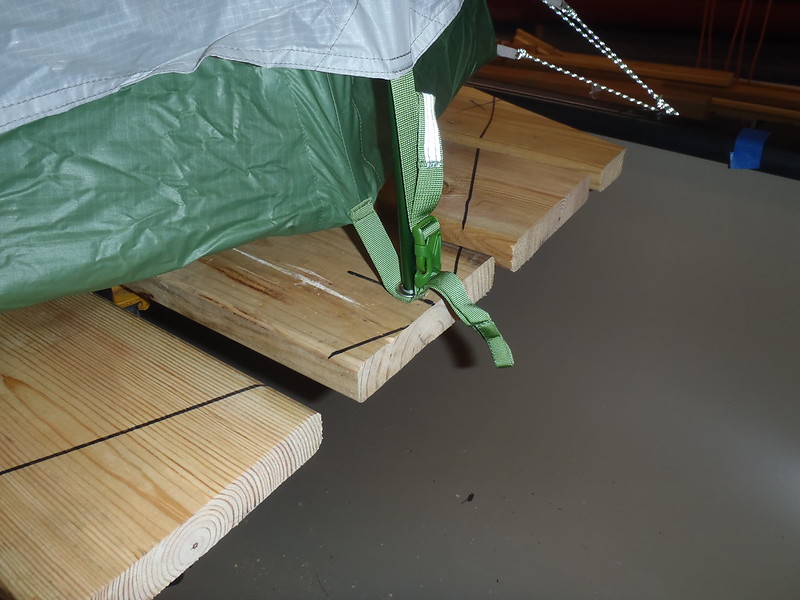 PC090071 by Mike McCrea, on Flickr
That pole foot stuck in platform works easily on the narrow trapezoidal foot end of the tent. The poles and fly at the door end are wider than the gunwales. The prototype solution was one scrap wood traverse board for pole holes and guy line attachment. The finished version is a skinnier laminated piece of oak.
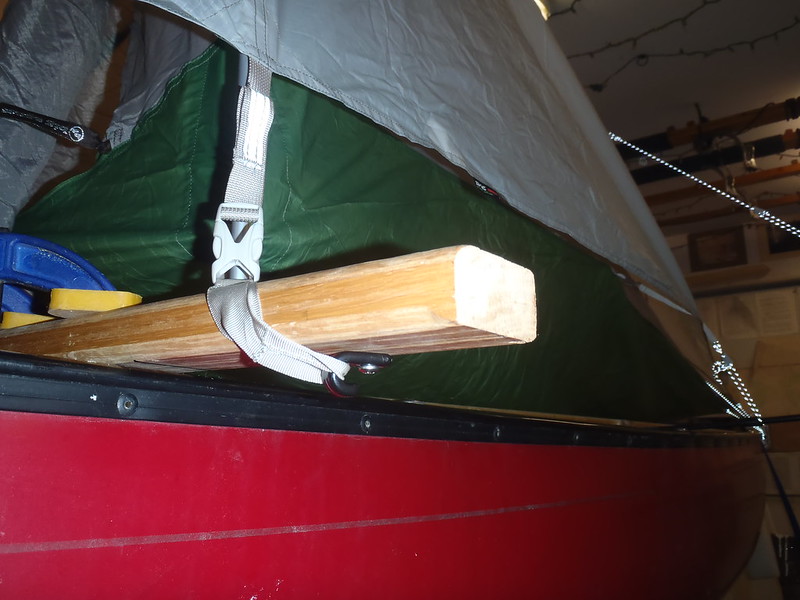 PC090068 by Mike McCrea, on Flickr
Another puzzle. The guy lines for the center of fly need to be tightened to a point 12 inches outside the gunwale. How the heck do we do that? We dithered for a while.
Huzzah! It finally paid to have saved old fiberglass tent poles with ferrule ends, found years ago under a Townie party graffiti festooned bridge abutment on the Yellow Breaches. Those slender glass poles, plugged into holes drilled in the platform edge, were the prefect extension wands with a J hook pop riveted in place on the ferrule.
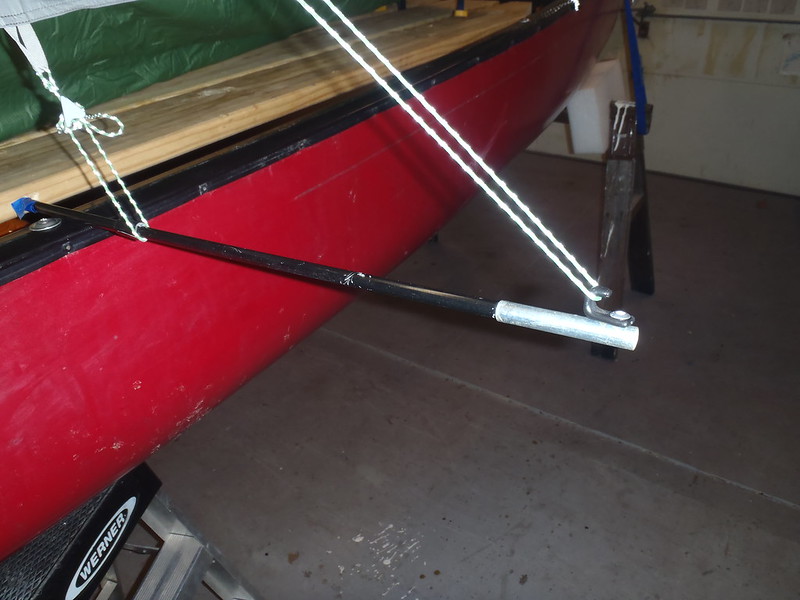 PC090069 by Mike McCrea, on Flickr
For ease of in canoe, on water set up every tent pole seats solidly in a drilled platform hole, and every possible guy line simply loops around a J hook or existing machine screw shank end. Plug the three pole ends into the platform holes and loop the guy lines around the J hooks
No stakes, just put pole in hole, and loop the guylines around J hooks, and presto , a flat tent platform.
As designed it may be as quick to set up while afloat as a tent on shore. Time will tell, one last task on the To Do list is to set the Miramichi on a foam pad on the shop floor and sip a beer while I watch Joel erect the tent from inside the canoe. Just pretend the floor is lava.
Not shown, we were hard freaking at it over multiple 10 hour days and I did not take many photos, the platform board are connected together by three traverse runs of 2 inch webbing and held pulled taut to the inwales, to maintain the drainage gap spacing between boards.
That webbing spacing, allowing the platform planks to fold together flat, was a WTF mind bender. We are still not sure why what we did actually worked.
The boards now fold and stack flat atop each other for canoe trailer or roof rack transport, and can be rolled sideways to access gear stored underneath while lain flat in the canoe. While underway they will probably be left spread open.
Which does lead to the possibility of easypeasy, drain over the outwale spray covers sometime in the future. If the motor canoe is, as expected, run with the platform rolled out flat instead of furled together on one side, a spray cover could be as simple as a tarp or plastic sheet draped over the outwales.
We are a long ways from being done with perfecting this concept. Still, so far, not bad. This is the prototype deck board platform, before additional trapezoidal cuts.
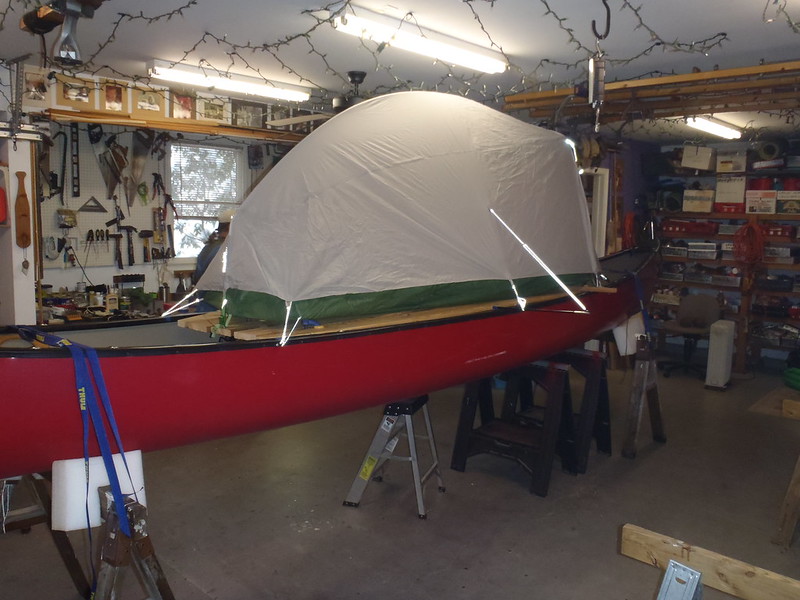 PC090072 by Mike McCrea, on Flickr
There is open space at both ends, either outside the tent or seated on the tent door end of the platform, protected under the vestibule. The 60L barrels fits in front of the bow seat for easy food and stove access, as does another peculiar live aboard requirement.
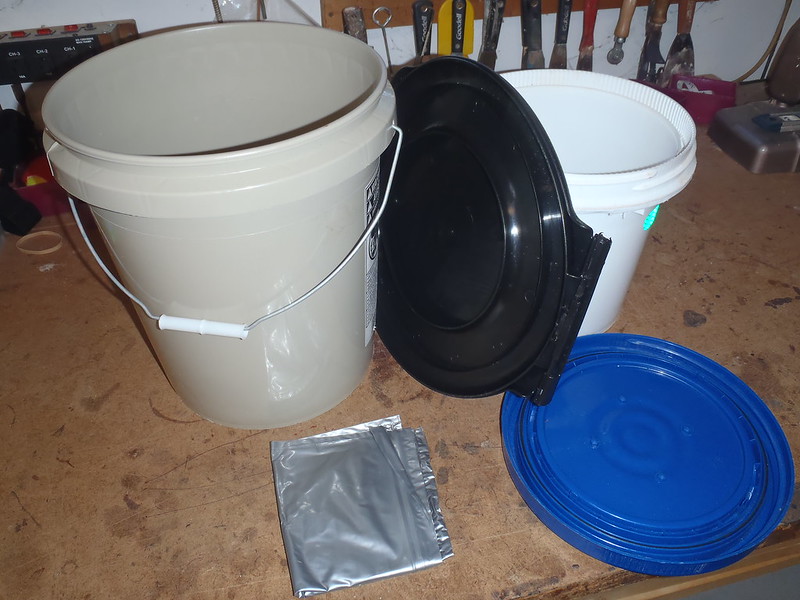 PB300038 by Mike McCrea, on Flickr
 PB300039 by Mike McCrea, on Flickr
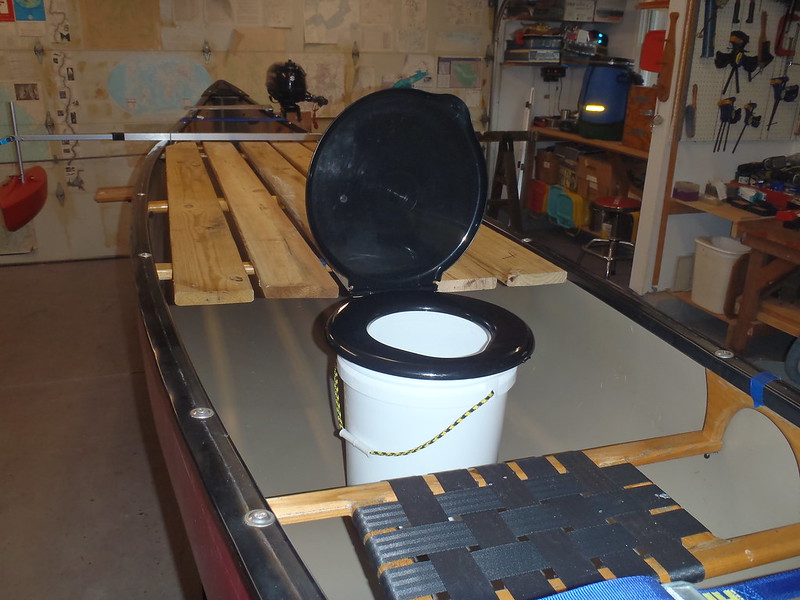 PC080065 by Mike McCrea, on Flickr
This has been the most complex and challenging outfitting puzzle I have ever worked on. Thank god both Joel and I were cogitating solutions, even if we were sometimes making the same measurements from different staring points and then debating our differences.
As usual, with two heads thinking at once, we mostly kept each other from making mistakes. Mostly, hence making a full prototype platform before we screwed up using good boards. Having finalized a working prototype it was a lot easier to move on with surety to the routing, drilling and edge sanding stage of the finished product.
Still lots of outfitting to do, but meanwhile Joel can get busy hand sanding the routed edge of the lighter weight platform boards, prior to rolling out the first coat of Spar Urethane. And I can finally sit in my office and peck at the keyboard.
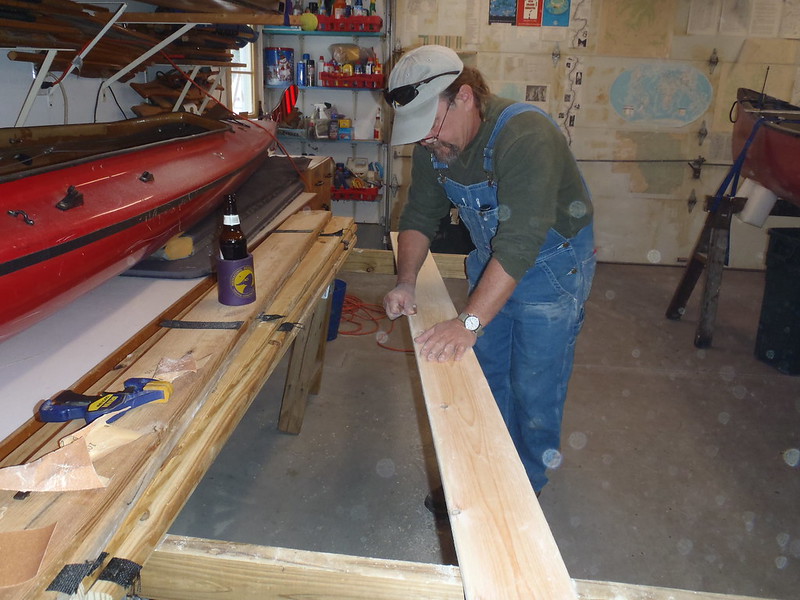 PC100074 by Mike McCrea, on Flickr
This crazy live aboard idea is actually gonna work, and can only get better as we perfect the design after a winters use and trail experimentation. Still needs a marine fire extinguisher to be legal.
Next year, maybe a sail to save gas. And a sun shade umbrella holder positioned at either seat.
https://www.youtube.com/watch?v=TPErEihIaes
That boat, a 17 foot long by 37 inch wide Mad River Revelation, was too small for realizing the decades old live aboard dream. The better solution would have been a 20 foot Grumman square stern, but those are hens teeth. Still looking for one, aluminum would be better than Royalex for oyster bars and limestone as a motor canoe.
As a motorized double ender, the Miramichi, 20 feet long, 40 inches wide, 16 inches deep with decent rocker bow and stern, oughta work. It is essentially a big seaworthy Prospector.
Before we could stuff that 105 lb monster in the shop we needed to finish repair work on three long sea kayaks. It was a wandering path to get from one side of the shop to the other for a while, like a boat maze.

The Miramichi is a deep boat, and with the stem rise the usual gunwale level motor mount would not work.

The little fuel sipper 4 stroke Suzuki is a short shaft, and the prop needs to be positionedbelow the bottom of the hull. Suzuki now makes a long shaft version of that motor. 2 years too late, we will make this one work.
We considered building a Gilpatrick style laminated wood motor mount, with exotic wood inserts. It was not our lack of craftsmanship that stopped us, it was metal craftsman and welder friend Steve, who built this rock solid beauty from quarter inch aluminum plate.

That is one uber sturdy design. With different depth side plate holes, to make it height adjustable up and down. A very cunning piece of custom craftsmanship.
The side plate needed some wood sandwich, so the clamps had something to bite. Half inch oak, G flexed to the plate and eventually fully coated with epoxy and top coated with spar urethane.

Perfect prop height. Thanks Steve, you need to sign your handiwork when you see the finished product later this winter.

Once properly positioned that motor mount was attached through the inwales using stainless hex bolts. Stoutly fastened, the vinyl gunwales on the Miramichi have a full box aluminum insert, not just an L.
Even more stoutly fastened. We drilled hex bolt sized holes and pop rivet holes through the end plates from a couple stainless steel U bolts, and pop riveted those under the inwale. The motor mount attachment bolts are now, from top to bottom, passing through a quarter inch aluminum motor mount plate, aluminum insert top, aluminum insert bottom, and stainless steel plate under the bottom of the inwale. That should hold without undue bolt hole wear or elongation.
That was all the easy part, although we could not have progressed any further without Steves awesome side motor mount design. Now, with a working side motor mount, the canoe needed a platform atop the gunwales. A big platform, 88 inches long and near hull width wide.
We made a test platform using leftover five quarter deck boards from my scrap lumber rack. Heavy as heck pressure treated, but suitable for the prototype.

Why does it need such a platform? That is the live aboard part of the motor canoe concept.

Big Agnes Seedhouse SL1. The platform tent had to be a solo, trapezoidal, end entry tent in order to fit atop the confines of the Miramichi sheerline and platform space.
https://www.bigagnes.com/Seedhouse-SL-1
Before anyone freaks out at the thouggt, the tent is securely attached to the platform, and the platform securely attached to the canoe, and the canoe will be securely anchored in protected shallows.
Very securely anchored. There are long, end anchor poles to twist into a sand, mud or marl bottom, spring lined through the bow and stern painter loops, preventing the canoe from moving fore or aft. The anchor poles are 8 feet long so they can be driven several feet into the bottom and still have leftover pole length for rising tides.
And, belt and suspenders, there is a 10 lb mushroom anchor off one side as well. That canoe should not move much except up and down every 6 hours.
OMAGAWD!, what if the canoe rolls sideways? Not to worry, there are adjustable length side floats, custom made adjustable height for the very deep Miramichi stems. Thanks to Chuck at Spring Creek, who has been helpful throughout this very peculiar, years long experiment.
Pay no attention to the photo. Those side float stabilizers actually go up on the bow end near the seat, and are not spread to width.

With the trapezoidal tent platform oriented in that direction there is ample leg room at the motor station, and open living space outside the door end of the tent for sitting and cooking and scaring people away with banjo plucking deep in the swamp. No one is poking back into that mangrove lagoon when they hear banjo music.

Again, maybe to convince my worrisome self this concept is safe, the platform is anchored to the thwarts, and the tent anchored to the platform. The tent pole ends are seated in platform holes. Nothing is blowing off in the wind, so solo Joels last words will not be a Monty Python-esque Tent Overboard, Tent Overboard. There is a story behind that blown into the water expression. Not happening this time.
 PC090071 by Mike McCrea, on Flickr
That pole foot stuck in platform works easily on the narrow trapezoidal foot end of the tent. The poles and fly at the door end are wider than the gunwales. The prototype solution was one scrap wood traverse board for pole holes and guy line attachment. The finished version is a skinnier laminated piece of oak.
 PC090068 by Mike McCrea, on Flickr
Another puzzle. The guy lines for the center of fly need to be tightened to a point 12 inches outside the gunwale. How the heck do we do that? We dithered for a while.
Huzzah! It finally paid to have saved old fiberglass tent poles with ferrule ends, found years ago under a Townie party graffiti festooned bridge abutment on the Yellow Breaches. Those slender glass poles, plugged into holes drilled in the platform edge, were the prefect extension wands with a J hook pop riveted in place on the ferrule.
 PC090069 by Mike McCrea, on Flickr
For ease of in canoe, on water set up every tent pole seats solidly in a drilled platform hole, and every possible guy line simply loops around a J hook or existing machine screw shank end. Plug the three pole ends into the platform holes and loop the guy lines around the J hooks
No stakes, just put pole in hole, and loop the guylines around J hooks, and presto , a flat tent platform.
As designed it may be as quick to set up while afloat as a tent on shore. Time will tell, one last task on the To Do list is to set the Miramichi on a foam pad on the shop floor and sip a beer while I watch Joel erect the tent from inside the canoe. Just pretend the floor is lava.
Not shown, we were hard freaking at it over multiple 10 hour days and I did not take many photos, the platform board are connected together by three traverse runs of 2 inch webbing and held pulled taut to the inwales, to maintain the drainage gap spacing between boards.
That webbing spacing, allowing the platform planks to fold together flat, was a WTF mind bender. We are still not sure why what we did actually worked.
The boards now fold and stack flat atop each other for canoe trailer or roof rack transport, and can be rolled sideways to access gear stored underneath while lain flat in the canoe. While underway they will probably be left spread open.
Which does lead to the possibility of easypeasy, drain over the outwale spray covers sometime in the future. If the motor canoe is, as expected, run with the platform rolled out flat instead of furled together on one side, a spray cover could be as simple as a tarp or plastic sheet draped over the outwales.
We are a long ways from being done with perfecting this concept. Still, so far, not bad. This is the prototype deck board platform, before additional trapezoidal cuts.
 PC090072 by Mike McCrea, on Flickr
There is open space at both ends, either outside the tent or seated on the tent door end of the platform, protected under the vestibule. The 60L barrels fits in front of the bow seat for easy food and stove access, as does another peculiar live aboard requirement.
 PB300038 by Mike McCrea, on Flickr
 PB300039 by Mike McCrea, on Flickr
 PC080065 by Mike McCrea, on Flickr
This has been the most complex and challenging outfitting puzzle I have ever worked on. Thank god both Joel and I were cogitating solutions, even if we were sometimes making the same measurements from different staring points and then debating our differences.
As usual, with two heads thinking at once, we mostly kept each other from making mistakes. Mostly, hence making a full prototype platform before we screwed up using good boards. Having finalized a working prototype it was a lot easier to move on with surety to the routing, drilling and edge sanding stage of the finished product.
Still lots of outfitting to do, but meanwhile Joel can get busy hand sanding the routed edge of the lighter weight platform boards, prior to rolling out the first coat of Spar Urethane. And I can finally sit in my office and peck at the keyboard.
 PC100074 by Mike McCrea, on Flickr
This crazy live aboard idea is actually gonna work, and can only get better as we perfect the design after a winters use and trail experimentation. Still needs a marine fire extinguisher to be legal.
Next year, maybe a sail to save gas. And a sun shade umbrella holder positioned at either seat.
Last edited:

