• Happy National Eggnog Day! 🎄🥛😵

Considering my 1st build.

....Another option is to put all the scarfs together, all at the same place? It could be a neat look ? I believe the canoe would be just as strong, as it's really dependent on the glass....
Jim

Years ago I saw a fellow's strip built kayak where he had done just that. He had a vertical row of butt joints towards each end of the boat carefully aligned. He also took care to align all his staples, too, and the combination gave it a very neat stick-built appearance.

I wasn't able to talk with him which I now regret. My interest then wasn't great as we were all caught up in the "going staple-less" thing at the time.

I'm guessing it was done in NWC as it was a very light white boat but it may have been something else of similar appearance. I'd imagine he kept the butt joints centrally aligned on a station. The staple holes were quite dark and stood out prominently. I don't know if he filled them or if that was just the resin fill from the glass work. Regardless, the boat was really quite an eye-catcher.
 
Cruiser: I love the way you closed up the football! I sincerely doubt I'll be THAT creative/meticulous on the first but maybe someday...

Incidentally, I was building more wine storage in the basement tonight and had to set aside 2 straight-grained, clear pine 1x8s... just couldn't see cutting them up. Now I need more lumber to finish that project and I can see this is going to be a problem. :D
 
Another thing about NWC is that you know you are going to have a lot of skarfs, you have 2 choices, try and hide them or make them pop and make them a design feature. When I did mine I used epoxy on the skarfs and used wood flour to really darken the epoxy up to make the shark joint show ..... not for everyone, but I like it. The joints really staggered easily

n9-Do3bwrtX0Z4NH8QP8kYrEjgnUzD-hPDIbWtMyL8R2vgRF7FIm3wpYQaJijE3UDsCmMAbStb_qrCb9o1GcL-1eC1IC_KYq6w42xkef0UrTE044ZlAs2xGH3GZ7at40eKqYz827H28B7VnqY2QFa-yiPDldifcJ7P_L5kGe1C71AraGWnaFAGcyeFBYKeV9uRyOeWuQQA_dBvFmmELHnNP7J0d6f12M6V6gt8yC_Ps3tiPtGyP6UcKo0srotwQpl90NWHANi25bRQNL6fECNU8A3X1v-ZKRsxdUNKD7OlDI65Tu_zloComalUDRyL-ryNeQ_1Mj-ueZmBVRk8zQI0OXFOQ6U5pHTD7vDoz9CCukzOIT5nAyZa5RBdcTLF3y1rH1lMTxrzgj4c4vO768X2IhoROf9VFqgcL7hTye2QMR3T46hFJp-ZYwxWCZdq_-a4c2DDGkKiEszXqFIo49sirmwf_ocABuodhij7e_MVaKbXwSYz5YvXQ_5xI2CsTqJY5h2xz8jpDMaxpYRjlnWUsduG_pqJixvFr1FQu_MPllsygafncfYUoMXWyJrmYq1LjH2obgxUn8K2hGlcwKtZg12Vd8x-khAyLYpdEpGQqKbuIaUL1S1bbLDRvyOp2Xi9_5yghKhd8qMmtYP3chhfhQNAvC6YiSEEbTaVrr14m-pSZkxi5-Aww6-JgsuIYilLlFMFOUyuAlyrE71g=w1434-h1075-no

Technically ? Where was your Whiskey Strip ? :rolleyes:

Nice !

Jim
 
Last edited:
Years ago I saw a fellow's strip built kayak where he had done just that. He had a vertical row of butt joints towards each end of the boat carefully aligned. He also took care to align all his staples, too, and the combination gave it a very neat stick-built appearance.

I wasn't able to talk with him which I now regret. My interest then wasn't great as we were all caught up in the "going staple-less" thing at the time.

I'm guessing it was done in NWC as it was a very light white boat but it may have been something else of similar appearance. I'd imagine he kept the butt joints centrally aligned on a station. The staple holes were quite dark and stood out prominently. I don't know if he filled them or if that was just the resin fill from the glass work. Regardless, the boat was really quite an eye-catcher.

Filling staple holes with epoxy, doesn't hide them as well as a solid filler.

I've stated before, Elmer's MAX, seemed to blend in slightly better than Titebond III, my sceond choice, for staplehole filling.
 
He wasn't trying to hide them, he was using them to artistic effect by virtue of keeping them perfectly aligned and highlighted. It was really quite impressive. Wish I'd have taken a picture of it now.
 
Jim .... as you have pointed out so often, a whiskey strip isn't the only way to fill that middle. Actually your last build did the same thing if I remember correctly.

Brian
 
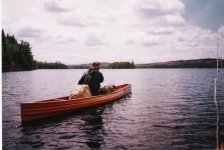
I ran across this pic, of my Youngest son in the BWCA, many many moons ago ! It was rare, as he was always ready to go to the next campsite, and would leave us in his wake. Made it hard to get a good pic !

Canoeing_zps34456778.jpg

Anyway, that is a Bruce Kunz designed 38 Spl.

Jim
 
Thanks Jim. I've been checking the NW Canoe site for the plans but they haven't put them up yet. I'm itching to get started but I'm still cleaning up previously started projects. (never a shortage of those it seems)
 
I did send them an email. I hope Dan can get on it soon.

There always seems like something needs doing !

Jim
 
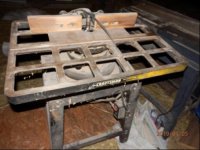
Progress (if one could call it that) has been slow. I did manage to pick up a shaper on CL ($100... I think I did ok but still have no clue how to use it). The heated garage bay still has my Expedition in it as I rebuild the engine. On the bright side, I should be able to wheel the strongback outside for sanding as it will surely be warm enough by the time I get that far.

heck, at the rate I'm going, I may be able to paddle some solos at the Western PA Rendezvous in Butler (early June, I think) before I start cutting forms. :rolleyes:

shaper.jpeg
 
That's progress...
I bought some shaper cutters from Corob Cutters, they had reasonable prices.

Now what about that Expedition engine? Rebuilding? How much of a rebuild?
 
Progress (if one could call it that) has been slow. I did manage to pick up a shaper on CL ($100... I think I did ok but still have no clue how to use it). The heated garage bay still has my Expedition in it as I rebuild the engine. On the bright side, I should be able to wheel the strongback outside for sanding as it will surely be warm enough by the time I get that far.

heck, at the rate I'm going, I may be able to paddle some solos at the Western PA Rendezvous in Butler (early June, I think) before I start cutting forms. :rolleyes:


I don't want to break your heart, but the cutters for bead and cove, for the shaper, will likely cost more than a good router, and B&C bit's.

It looks like a great Project ! You'll have Fun !


Jim
 
Jim, hardest part of the bits might be finding them in 3/16 instead of 1/4 inch. Neither Corob or MLCS list them but I'm still looking (and [somewhat] willing to use 1/4 inch if I must but that would bring weight up again as I'm not using cedar). I sincerely doubt I'll wear them out with 50-60 board feet per boat so I'll spend what I must to get a quality set of bits.

Mike: Expedition engine is a repair not a total overhaul. It spit a spark plug out of a hole that had already had a (poor quality) insert installed. I pulled both heads, installed over-sized stainless inserts in all 8 holes, reinstalled heads and promptly screwed up by turning the crank to TDC (1/4 turn or so) with the chains off.

I realized the mistake as soon as I made it but (never one to trust my luck) I pulled both heads back off. Turned out to be a good call as I found a bent intake valve. At 200,000 miles, it can stand a set of valve springs any way... Carelessness and education are both expensive but parts are ordered and "my" garage bay will be empty again soon. (probably about the same time everyone will want to start putting shoes back on their horses but what can ya do?).

(Mike: PS: the CJ5 project has been pushed so far to the back burner that I think it fell off the stove)
 
1/4” radius cutters on 3/16” or 5/32” strips works pretty well
you don’t want a full radius anyway you’ll end up with fragile feather edges that easily break and create more sanding work

A side note about rebuilding and learning lessons.
When I rebuilt the 258 straight six in my CJ5 (1996, I think) I bought a matched set of performance cam and lifters from Comp Cams.
I had the block machined and crank ground, all new main, rod, camshaft bearings, head fully rebuilt, even replaced all the freeze out plugs.
Come time to start the engine for the first time, I pulled the distributor to use a drill to spin the oil pump and lube things up. Well, no amount of spinning could produce any oil pressure!!
WTF?? I had all new bearings, how could I not have pressure...I ended up dropping the pan, rechecking the bearing clearances, pulled the oil pump and verified its ability to pump, and then scratched my head.
What else could prevent the oil pressure from building.
Eventually, I pulled the head and found that the lifters were too small in diameter. On that engine, the lifters are down far below the deck and I never noticed that they weren't right. After contacting Comp Cams, they admitted that they had sent the wrong lifters!
Phew, but all that cost me a few weeks and a handful of gaskets.
 
Last edited:
Yes, as stripperguy states, the 1/4" radius bits will be just fine ! Sounds like a lot of motor work ! a Fix Or Repair Daily kinda thing ? :rolleyes:

Jim
 
Last edited:
Fix Or Repair Daily kinda thing
Yes, unfortunately, spark plugs came out of those engines pretty regularly after initial replacement. In fact, this was the 3rd time; 2nd time for that hole. ("temporary" repair held for 6 years though)... now it will never happen again. (fingers crossed as it cannot be repaired again)

Interestingly enough, I got the same reply from MLCS and was just about to ask you guys if it was accurate. (I'm impressed that their response was extremely fast.)
You can still use the 1/4" diameter flute and bead cutters with 3/16" stock. In fact some of our customers who build cedar strip canoes actually prefer the larger cutter size. The reason is that the feather edge at the top of the flute isn't as sharp and therefore there is less peeling of the fine feather edge when you are gluing the pieces together. It leaves a cleaner glue edge after sanding is done.

-- Thank you for doing business with MLCS Woodworking. Please let us know if we can be of further assistance.
Question I have is: will the cutter need to be recessed (deck raised?) an additional 1/32 inch so that the b&c is centered in the strip or just maintain orientation so that the thin edge stays toward the inside (or outside)?
 
Center both the bead and the cove cuts
i run my strips through a planet to guaranty uniform thicknesses
and get that expedition out of the garage!!
 
Question I have is: will the cutter need to be recessed (deck raised?) an additional 1/32 inch so that the b&c is centered in the strip or just maintain orientation so that the thin edge stays toward the inside (or outside)?


Yes. Center the bit on the strips ! That is why strip thickness is important. A Skilsaw will simply amaze you with how accurately it cuts uniform thickness strips !

If you plan to use a shaper, to B&C your strips, you will also need to plane your Planks before cutting strips !

If you use a router, and run your strips BETWEEN a fence and the B&C bits, there is no need to plane planks ! The router will do that the first time through !

Jim
 
Last edited:
and get that expedition out of the garage!
I need to do that. With no wife to hide herd, my oldest daughter has taken over reigning in her Dad and tells me that I'm "not allowed" to start another project until I finish one of those already in progress. As the Expy is currently residing in "my" build area, it seemed reasonable to allow her the win (this time) :D

If you use a router, and run your strips BETWEEN a fence and the B&C bits, there is no need to plane planks ! The router will do that the first time through !
Can't I do the same thing with the shaper by moving the fence 3/4 of an inch from the bit & running the strips through between the fence and the bit? (forgive my ignorance. As stated previously, I'm NOT a wood worker)

Meanwhile, I picked up some Poplar and Butternut samples to make a (test strip) cutting board. I figure that should tell me how they hold together when glued and how easily they can be sanded together (my guy at the mill says they'll work well together) as well as how the colors contrast.

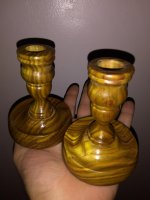
Side note: He also had some candle holders made from Sumac... Might be a really pretty future boat. Said it's one of the few woods that maintains a greenish color but the hard part is finding trees large enough to cut boards. IMG_20190314_202543810.jpg
 
The Shaper's I've seen won't allow you to move the fence behind the bit, like a regular router table will. Shapers were designed to work Hard woods, into trim. Running Hardwood between the bit and the fence, would be a dangerous thing ! You can easily get by with it with 1/4" soft woods, how ever !

Butternut should be a good wood for strips ! It carves easily !

Nice Sumac turnings !

Jim
 
Back
Top