• Happy Mathematics Day! ❌📐♾️

Building a Tripping Cooler

Hahahahah mistakes lol.... Don't know what you are all talking about... THEY SUCK dang mistakes! But you learn from them or at least you should... One once said that "A mistake is juste something you go on from"
 
Project problem solving can be fun or a pain in the arse, it all depends on how much time and how many beers have been invested in the conundrum. This one looks like it's turning out both fun and successful. Very smooth and agile engineering there, adapting your cooler on account some muffin made your freezer the wrong size. Not your fault. But I like how you overcame that. No idea what to do about latches, straps and such. Part function, part fashion. Might be a personal choice alsg. I'm looking forward to following the next steps. That seal groove reminds me of some old metal coolers that had a similar arrangement. Those were about 40-50 years ago. So that dates me. Can that banding be incorporated into the handles somehow?
 
Is the banding strong enough to act as handles? That would be similar to traditional wannigans. Questions questions. I have no answers. it is a good thing this is your project and not mine. I would have looked hard at the freezer-cooler fit and pondered how to alter the freezer interior to fit my cooler.
And how to do that without my wife noticing.
 
The banding is strong enough to lift the cooler from. I've just epoxied 4 blocks just below the banding that are the same thickness as the banding but about 3" tall x 1.5" wide. The blocks have slots through them to take webbing for the handles. I'll post some pictures when things are dry.
 
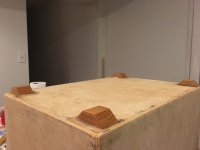
The feet, which were previously attached with thickened epoxy, received a sealer coat of clear epoxy this morning. The feet are cut offs from the same oak used for the banding that have been beveled at a 45 degree angle.

file.php?id=42687.jpg - Click image for larger version  Name:	file.php?id=42687.jpg Views:	1 Size:	193.7 KB ID:	83131
 
Odyssey, I had an old Coleman metal cooler that my parents bought the year I was born. When they passed I ended up with it and it was years before the rust and age got to it. Yeah, we're of the old school! ;-)
 
alsg, when you are done, almost done the last thing you need is a logo, previously discussed, branded on the outside of it. I like Odyssey's Drooler moniker!

dougd
 
That's looking very nice! I vote for strapping the cooler closed. You could incorporate the lid straps into the strap handles... make the both of them run out of the blocks that you added. That method worked out well on one of my wannigan builds anyways...


I don't have a suggestion for the logo, but I agree on the drooler idea!

Jason
 
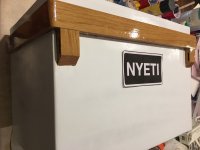
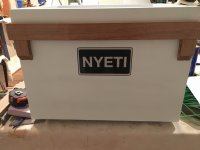
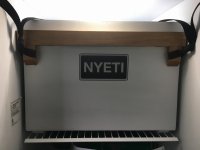
The cooler is painted in and out. I taped off the oak and can't decide whether it looks good or out of place in natural. You can see the blocks that will be used both for carrying webbing and to strap down the lid.

The "NYETI" name tag isn't attached yet; just printed it out to see how it might look.

file.php?id=42712.jpg - Click image for larger version  Name:	file.php?id=42712.jpg Views:	1 Size:	206.7 KB ID:	83314
 
Last edited:
All the mistakes are hard to see in this photo.

The NYETI logo is perfect.

I think I can speak for all of us who build things; the mistakes are hard to see unless you are the one who made them, and knows the location of each tiny blem or miscue. Most folks would never notice, none at the 20 foot test.

Also to be decided: whether to use self-adhesive weather stipping in the groove to make the seal with the top or whether to put some kind of paint/pour in rubbery substance (Flex Seal?).

Not sure if you have done anything to help tightly seal the lid, but that is absolutely worthwhile. Even with a well insulated cooler a tightly seated and sealed lit is a huge boon for ice and cold retention.

We have an Igloo Marine that is thick walled well insulated, but the lid closure is (was) simply plastic to plastic. Even with a molded groove on the cooler body and a matching lip on the lid it was far from air tight.

I put a piece of thin self adhesive weather stripping inside that groove and the lid is now well sealed. It was easy to find the needed width and depth of weather stripping to fit that groove.

Even the thinnest stuff I could find was a little thicker than needed at first, but the clamped lid pressure soon compressed it perfectly, something that might be harder to achieve with a poured or painted flexible surface.

The foam weather stripping has held up well, and would be easy to replace if ever needed.
 
I'm not really set up for a scientific test. For starters, you'd need two coolers with the same capacity and the same amount of ice. This "test" is really just for fun since the cooler wasn't designed to be filled with ice and beverages in use. It's meant for frozen/cold food. Also, I expect my son will be opening the cooler frequently during the "test" to retrieve ginger ale.
 
Well, I love the idea that the whole cooler fits inside the freezer, which should make packing food and other kept cold stuff the night before easier. With our typical pre-dawn getaways the packed and iced cooler usually went into the van the night before, wasting 8 hours of ice retention.

Just grabbing the already packed cooler from the freezer at 4am would be easy enough. Will the beverages within freeze solid overnight? I wonder how frozen Ginger Ale tastes once thawed.

That may merit a taste test, or the use of higher alcohol by volume adult beverages.

Although, if that is anything like our freezer, we would need to eat a lot of frozen foods to make shelf space. Maybe that shelf is all the stuff that goes inside the cooler.

Never fear, there will be a few adult bevs in the cooler for the test.

Putting the whole cooler into the freezer seems like a brilliant idea to me, too. But I can't take credit. The idea came from Mr. Gilpatrick's book, "Building Outdoor Gear" https://www.amazon.com/Building-Outd.../dp/1565234847. Given your DIY bent, I think you'd like the book. I think Mr. Gilpatrick must also have came up with the idea to use plywood lined with rigid insulation/ and covered in fiberglass/epoxy. If others had the same idea, I didn't see any examples when I was doing my research.

My only innovation is the exterior hardwood banding/seal. Also, his plans called for a vertical, backpack configuration with backpack straps. I think I could still outfit mine with backpack straps through the same blocks currently holding the webbing handles and carry it with the flat lid against my back. With a lot of icy-water sloshing around, it might not be practical; but with frozen foods, it might be viable for short portages. I wouldn't want to go on multi-mile hikes with it, that's for sure!

The thing sure is sturdy and as configured it is a perfect seat/coffee table height!
 
Last edited:
Back
Top