• Happy Go for a Ride Day! 🚗🚴🛹

Ashes Solo Trip build

Joined
May 4, 2023
Messages
23
Reaction score
17
Location
Winnipeg-ish, Manitoba Canada
After a summer of building raised beds, desks and floating shelves, I'm finally getting back to my canoe.

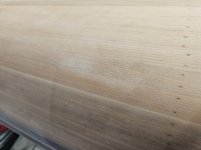
I just finished sandng the outer hull and I can see the cloth in a number of places. Most are at the edge of a double layer (football/stem) which I'm less concerned about, but there are a few places on the side as well. Would it be worthwhile rolling on another layer of epoxy to cover?
 

Attachments

  • 20241014_132419.jpg
    20241014_132419.jpg
    97.6 KB · Views: 31
It happens. If it was on the bottom of the hull in a high wear area I might add more epoxy but most of the time I just ignore them and they disappear with the application of whatever top coat you choose to use.

Alan
 
It wasn't mentioned, but I don't think you have hit the actual cloth yet. That pattern shows up just as you are approaching the 1st epoxy coat, it has to do with how the epoxy fills the weave on the 2cd and 3rd fill coats.
As stated, it will disappear (mostly) with the varnish.

Brian
 
I had a close look at it and I agree that I don't think I'm into the cloth. I still have a do a final light sanding before varnish but I'll be carefull around these spots. If it's still visible after varnish it certainly won't be the only visible mistake I've made.

This was my practice boat so I'm not too broken up about it.
 
Does anyone ever use multiple perperndicular lengths of cloth on the inside - with some overlap at the seams, rather than one long piece from bow to stern? My 4oz. cloth is 50" wide and the canoe is about 53" gunnel to gunnel.

So either I use one long piece and patch the top several inches where the boat is widest, or run cloth perpendicular and overlap at the seams. I'm not totally opposed to the latter, especially since the bottom of my boat got sanded pretty thin and I could do a large overlap in the middle, but I know it's going to a huge hassle trying to keep things flat and clean looking.

Any suggestions?
 
On my first build, I ran 30 inch strips (of 6 oz e-glass) across the hull w/ about a 2 inch overlap instead of trying to do it in one piece. It worked awesome and I'll build all future boats in this manner.

Because you feel that you're sanded thin, I'd probably run large overlaps. the double layer will add a few ounces but the factory edges will not produce the stray strands that cutting the cloth will. The extra layer should substantially increase your impact strength and I doubt you'll have any issues. Just take a little more care at the overlaps to ensure that both layers of cloth are fully wetted out, don't drag it off the bottom while working up the sides (I think those wrinkles may be easier to get out when there's a single layer) and remember: Pictures or it didn't happen.

Good luck but you've got this.
 
So either I use one long piece and patch the top several inches where the boat is widest, or run cloth perpendicular and overlap at the seams. I'm not totally opposed to the latter, especially since the bottom of my boat got sanded pretty thin and I could do a large overlap in the middle, but I know it's going to a huge hassle trying to keep things flat and clean looking.

Any suggestions?
I've done both in the past. It's theoretically "higher strength to weight ratio" to use the one piece lengthwise with the narrow patches up just under the gunnels. It's also less noticeable, which may be a bigger factor for "pretty boat" category, and you'll use less glass. It won't be very noticeable with 4-oz. fabric anyway. Your overlapping seams across the boat won't be a big deal weight-wise with 4-oz. material, but I agree harder to deal with keeping seams (and everywhere else) flat. I've done it and it works if you're careful. Gamma sure seems to like it.

If you do go lengthwise, those narrow strips to patch short fall in the fabric width can be overlapped strips cut off the end of the roll of fabric, 50 inches long (width of cloth) and I don't think they need to be more than 3 inches wide in the center of the hull, though cut 'em 4 inches so you have glass sticking out above the gunnel line. I don't think you need more than an inch of overlap of the wide piece there. Put the messy narrow strips under the selvedge edge of wider lengthwise fabric for a cleaner, likely less noticieable edge? That also makes it easier to keep air bubbles from collecting because of selvedge. Good luck with it whichever way you decide to go.
 
I run my cloth across the interior hull, I usually have 60 inch rolls, so a solo is usually 3 pieces. I'm not out to win any beauty awards with my canoes. I find this method to be quite a bit easier than a full sheet, if you develop bubbles or wrinkles, it is much easier to work them out.
 
I think others here do it like this. I do both stems first; a bias cut strip and a small panel in the tight stem area to get the hard part out of the way. I let the epoxy set or even leave it overnight. I then lay out the overlapping pieces, with the overlaps going in one direction. Once they are laid out and smoothed with a dry brush and set exactly where I want them, I gently peel back just the ends of each overlap so I can wet out one section at a time, starting with the non overlapping panel. I like doing it this way because wetting out the inside is more difficult than the outside due to pooling in the bottom and the difficulty of pulling the resin up the sides without moving the cloth. Breaking it up this way mostly eliminates the anxiety of getting the entire inside of the hull right before the epoxy kicks, and you can take a break between the panels. To get the cloth to lay down along the sheer, trim the excess cloth within an inch once you get it wet out

Mark.
 
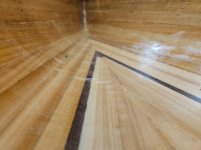
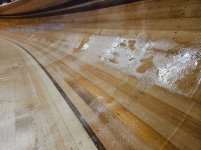
So, not entirely successful. I ended up with some wrinkles in the bottom of both stems. I found the next piece really stuck in place and was difficult to move and smooth out.

The other issue was getting it squeeged out completely. I was hoping for an even weave showing but I've got some smooth areas where the epoxy was thicker. It seemed that even when it looked good, it still slumped down and left thicker spots. That tumblehome crease didn't make it any easier.

I haven't decided if I'm gong to leave it as is or fill and sand.
 

Attachments

  • 20241112_082121.jpg
    20241112_082121.jpg
    107 KB · Views: 10
  • 20241113_080847.jpg
    20241113_080847.jpg
    175.6 KB · Views: 10
It doesn't look bad at all. My boats look the same at that stage. Most of the shiny vs dull will be gone after a couple coats of varnish, especially if you use a semi gloss or satin. One more coat of epoxy will even things out better but is just extra weight. Once you use it and get in there with sandy boots and packs the imperfections will be hidden by the scratches. My suggestion is to scrape off any high spots or runs while it's still a little green, then wait a week or so and give it a light sanding with 220 and do the coats of varnish.

Mark
 
Once again, I'll remind you that an artist is consumed by the perceived flaws in his creations... I should show you pics of my first build, your hull looks like a museum piece by comparison.
A little scraping (as Mark said upthread), a little sanding, a little varnish is all you need.
Believe me, all this fretting will be so far behind you the first time you get this hull wet, you'll be amazed.

And, if you're like many of us here, you'll also be planning your next build.
Seriously, get that thing wet, and dirty, and just enjoy the sh!t out of it!!

You're on to the fun stuff now...decks, bulkheads, trim, seats, thwarts. All the possibilities, all that color and grain and graceful parting of water, yeah, you're gonna like it.
Thanks for keeping us up to date.
 
I'll echo the above but, of course, you're the final judge. I had some puddling in the bottom of mine also but I never seem to notice when it's taking me from campsite to campsite.

Keep it up & enjoy the rest of the build (and paddling it).
 
I'm just taking notes cause I've already got enough epoxy, fiberglass and cedar for the next one.

I'm trying to keep this one light, so I'll likely do a little sanding and call it good enough. Plus, we've been having unnaturally warm weather here and if I can get some gunnels on soon, maybe I give it a test ride before things freeze up.

It is nice to see an end in sight.
 
Back
Top