I thought it might be worthwhile to start a separate post on my composite build rather than burying it in the thread with the stripper build. While I have built a couple composite canoes in the past there is a lot of new ground for me to tread here and I thought others might find it entertaining to watch me stumble along.
Also,
@Nick Pending has shared some particulars with me through PM and I'm hoping he, and anyone else that has advice to offer, will chip in.
I'm building a short 13' narrow tandem canoe meant for young kids. The canoe is being strip built but I decided to use the stripper as a mold for a composite copy as well.
Is the stripper for the out-of-state kids and you're keeping composite for yourself? You mentioned in the thread this was excerpted from that you're in Iowa and the kids are in Minnesota. That doesn't mean that adults won't be in either boat at times, so I'd build somewhat for that, maybe just not super-robust, gonzo whitewater tough.
These are all personal opinions and methods and reflect what worked (sometimes what didn't work) for me. Others will have different results, sometimes as good or better, sometimes worse. Live, experiment, and learn and pass results good and bad on through these forums please!
My only trial of this method of what Alan is doing here was done in excess of 45 years ago, and I don't remember all details now. I know I popped the composite layers off the plug, pulled peel ply, and bagged the Airex core into place. I'm pretty sure I also bagged the following layer(s) in too. I'm pretty sure that with the core bagged in the hull would be stiff enough that there would be little problem moving it around and having fold issues, but before that it might have been more dicey?? I no longer remember.
Again, if at all possible, bag the core into place even if you hand lay up the full piece that covers it. Bagging is the only way to ensure getting the core down against the hull layers without lots of air potentially causing bubbles. The sand trick can work, but has limits, though it is easier to do. I have done several other hulls with cores, but all of them were done entirely within female molds.
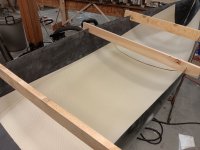
After getting the exterior of the stripper fiberglassed I sprayed it with a few coats of PVA release agent and laid a layer of 6oz fiberglass followed by a layer of 5oz carbon the following day. There were extra layers of fiberglass at the stems for extra abrasion resistance since carbon is very weak in that category. Normally I would have put down a full layer of fiberglass over the carbon but I expect this canoe to see light usage. For a little extra protection I added extra fill coats to give a thicker layer of epoxy.
I would agree with some narrow glass stem bands over the carbon, though the the ones for extra wear beyond just holding the two sides of the ends together wouldn't have to come up vertically very high unless you anticipate excessive collision practice. Above the loaded waterline a couple or three inches? I don't know what would be enough. I don't think you need the glass outside of the carbon unless I was paddling it. I'm hard on boats.
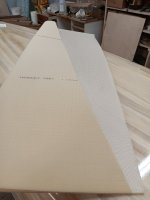
I left the stems of the composite hull open while laying the cloth. This helps separate the composite canoe from the mold. For anyone doing this in the future I would highly recommend doing the same. I imagine removing the boat with closed stems would be much more difficult.
Many commercial hulls are purposely slightly longer the higher up the stems one gets as well as progressively flared slightly wider up the boat so as to enable manufacturers to pop hulls out of molds without having to later close the end as you suggest. Those guys have lots of practice at this, so do so at your own peril. I'd suggest splitting the ends, especially if there is any recurve at the ends where it would be mandatory. I have a couple of one-piece female molds with this lengthening and flare that don't need to be split.
I would also recommend laying tape along the sheer line of the mold as this is where you begin separating the composite hull from the mold and it can be tough so any little extra help would be welcome. I did not put tape along the sheer with this build and very much wished I had.
Maybe putting the mentioned tape so that an edge sticks down below the trimmed edge of the stripper being used as a plug and acts as a drip edge for the resin? For instance use two-inch-wide tape and stick one inch of the width to the strip boat plug. Another inch would be hanging down free, and resin won't travel up the inside to cause the problem that Alan experienced. You likely don't need an inch hanging free, just an example for explanation. More is better principle? I've not done this so how much is up to you. Maybe stick strips of cardboard or something stiff to the inside of that sticky free edge of the tape to keep it from getting bent up and sticking to the plug and possibly allowing resin transfer like that? Just newspaper would likely even suffice. Not that this last observation really matters much but, if you aren't doing a full inside layer addition and your inwale isn't going to be very deep (narrow vertically, the side contacting the hull), don't let that tape line show on the inside of the boat by using an excessively wide portion of tape sticking on the plug. Opportunities abound throughout for experimentation here!
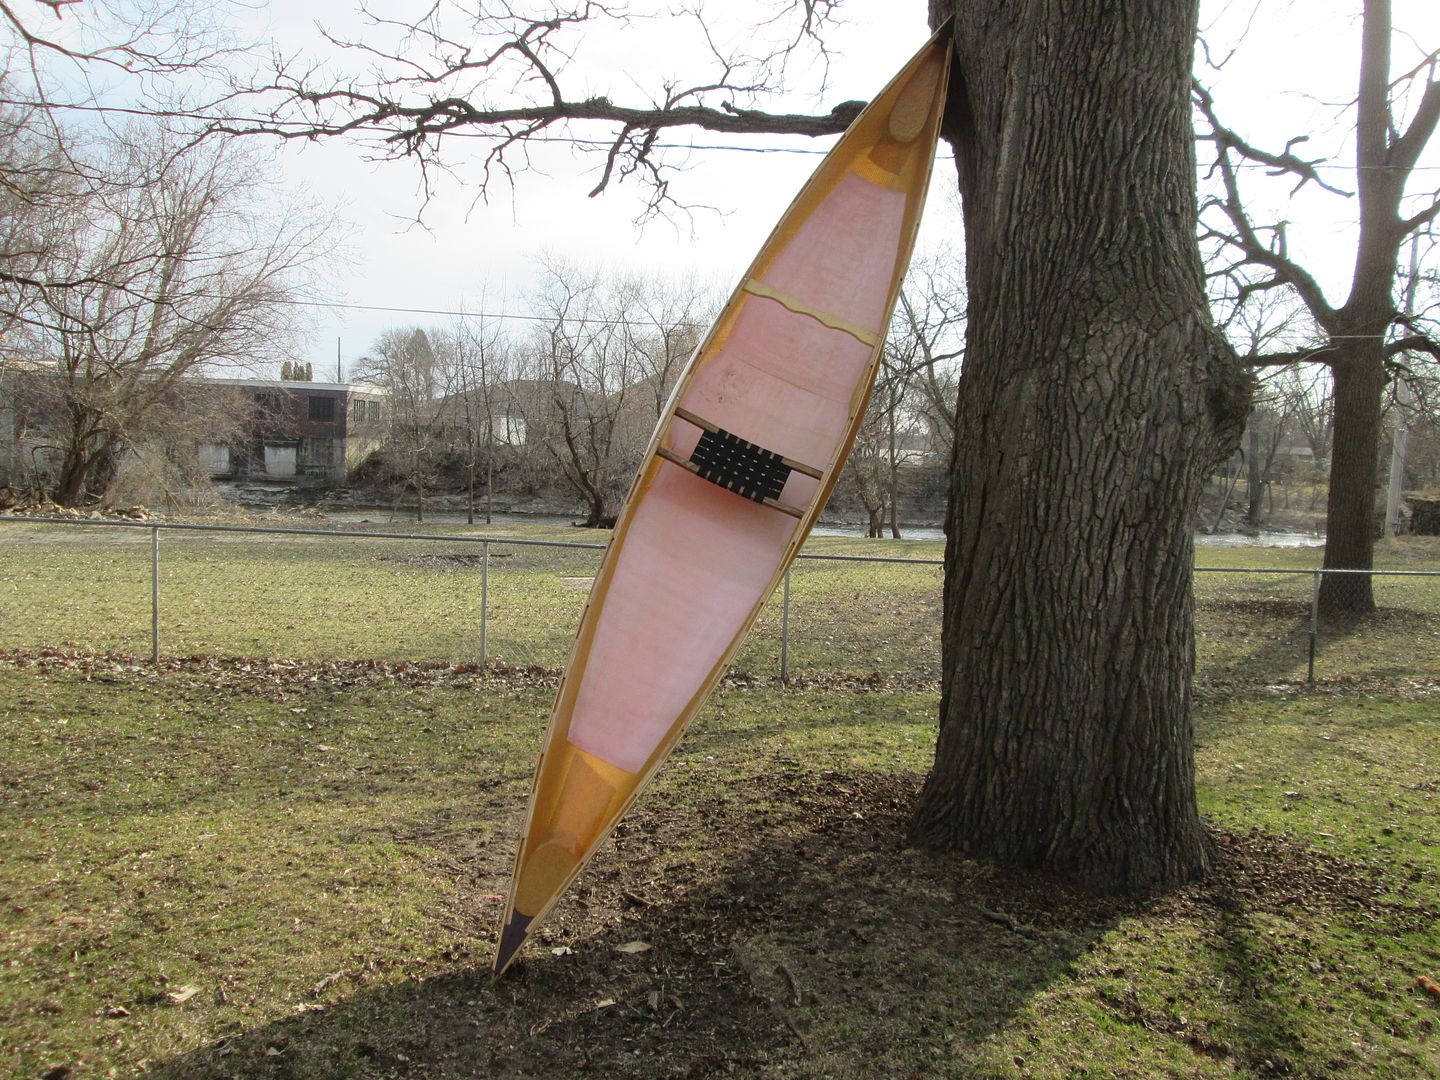
Once the composite hull was separated I made a couple spreaders to keep the boat in roughly the correct shape. It's floppy as a noodle right now.
If instead of vacuum bagging you're using weight inside the hull like Jim Dodd describes (and illustrates in the original post that this topic was scraped from), a bed of some "formable" substance to lay the hull in for near-all-points support might work, though the lengthwise 1x4s Jim describes would certainly be easier. Any method could allow the hull to distort or change the molded rocker. You want to do this the least possible. Vermiculite compresses (maybe not enough?) and perlite may work better as I don't think it compresses as easily. I've not used perlite so don't know for sure that it would work well. Perlite with less compressibility might have sharp little points that could mar the smoothness of the hull? Use a mix of both? I'm just mentioning possible solutions. Not sure what either vermiculite or perlite costs these days, so may not be economically feasible for one or two boat hulls, just offering it as a possibility. This would likely have to be done on the floor which means uncomfortable bending over to work on it or building a table of some sort to raise to working height. Jim Dodd's slings with boards seemed to work for him at holding the 300+ pound load and sounds cheaper and easier to me. Don't know if it distorted the hull to any great degree or not. No guarantees a vermiculite bed or one of another material won't do the same. What's easiest and cheapest?
I then sanded the interior in preparation for the foam core and final layer of Kevlar.
I used peel ply instead. A definite dearth of elbow grease available here. It just means I'm basically lazy.
The foam I'm using is scored so it will easily conform to the shape of the hull with no heating. But the biggest reason I went with scored foam is because it can be rolled up and shipped in small packages, saving me a 6 hour round trip to buy large sheets.
In my private note to you, I mentioned using something like an ice pick to punch a mess of holes into the foam so that all the air could be pulled from under it. Probably left you scratcthing your head. I used unscored foam in large pieces, whereas you mention you have the scored version, so you wouldn't need to do that. I missed your mention of that in my initial quick read. I also used quarter inch foam, which is thicker than yours. Many commercial builders use 3/8ths thickness, maybe even more(?), but I don't think that's necessary. I had to heat form mine.
I laid the foam in the hull and eyeballed where I thought it should be cut. I cut one side, folded the foam in half, and then marked and cut the other side so it would be uniform.
And that's where it sits right now. I'm going to think about the shape of the foam core for a couple days before I epoxy it in place. Right now I have it running up the turn of the bilge. As I remember the factory foam core canoes I owned only had a core on the floor and not up the bilge. But at least one did have ribs up the bilge.
Is there a good reason to not run the foam up that high or did the factory boats keep it low simply because it used less material and less labor to shape the foam?
As you mention, I think the pros only do it for ease and some weight savings, but they almost all also run ribs up the sides. Your foam is much thinner than what the pros use so maybe it's a good idea to go higher. Personally, I wouldn't. Whether you do go up past the bilge or not, if you're not going to do the foam ribs, I would also recommend putting some extra narrow layers of stiffening fabric once in a while to act as ribs, or the boat might seem a bit floppy with very little thickness of fabric from the stiff gunnels down to the stiff foam. Your three layers essentially hand layed up might be stiff enough, but I'm not sure. What I'd recommend is some heavy unidirectional Kevlar strips maybe two inches wide or so running from beneath or on top of the foam up to just short of the gunnel so it doesn't impact inwale installation as Stripperguy mentions. Glass or graphite (carbon) would work also and be better for compression loads, but heavy Kevlar uni will suffice and is lighter. The carbon on top of that inner Kevlar layer might look cool (oooooohhh, carbon fiber!) to those impressed by it, but if you use it, cover it with a light glass layer to keep from scoring it with gear or footwear scuffs, etc. I think you definitely want those ribs in the seat area to transfer loads from the gunnels to the foam below it. Ther emight be enough layers elsewhere that you don't need it on this little boat, but I don't know. I'd also recommend at least one in the center, maybe more than that spaced between them, but it's a short boat, maybe you can get away with two, or in any case not as many needed as I think (and as I said I tend to overengineer structures).
I'm planning to vacuum bag the foam into place, which will probably be a circus. I think I have enough materials left over from when I was building about 6 years ago but I need to round them all up to be sure.
It's a matter of making sure you have everything you need, and having done it before helps considerably. It's been so long for me now that I'm sure I'd forget a few things. Make sure you put a resin trap in the line before the pump so you don't fill it and epoxy the whole thing together. If you're just gluing the core down, that isn't as hard but doing full layers of fabric entails lots more. What I used to do is dry runs. I'd get all the fabric into the mold get the sealant tape down and the bag on and sealed down, then draw a vacuum as tight as I could and leave it for a few hours, checking for leaks. Then I'd pull the bag back on one side and do a quickie wet layup on all layers at once, leaving air in all over the place, which would get squeegeed out before the resin set. Later after more practice, I'd just pull the bag back at one end and pour all the resin in and rock the boat back and forth side to side and end to end some, then reseal the bag and draw the vacuum. Then start squeeging. I wasn't using fast hardeners, was using industrial resins and hardeners that would give me like 6-8 hours of working time. In fact, I was adding an accelerator to speed set some. This was ages ago and I don't have a clue as to what's available now.
To respond to Jim Dodd just below, the floppiness of the core in this state doesn't matter at all. Gluing it down and then adding the reinforcement on top is what stiffens the cored boat. The foam stiffness doesn't matter as long as it's strong enough not to shear apart. All the stiffness is in the layer(s) sandwiching it. I don't think Alan will have any problems with floppiness that Jim envisions. Further down Stripperguy mentions how stiff is eighth-inch fully cored boat is, but Alan isn't fully coring this one. I'm sure bringing the core up the bilge will stiffen more, but not as much as Stripperguy experienced. I'd still go with at least ribs of some sort under the seats. Maybe not needed elsewhere, but you might get some wiggle without at least one, maybe two or three, between the seats, especially with two-layer boats. I could be totally wrong. I no longer have that boat I built long ago to check out.
There were other things noted in the private message(s) to Alan, but I'll save some of that stuff for later topics. The info will be easier to find later if it's not buried in this foam core thread. I may append some other hints in a later note in this thread. May. I'll try to go over this a bit later and maybe clarify just a bit or edit and check for typos.
Good luck with the project.