• Happy National Eggnog Day! 🎄🥛😵

Refurbishing Old Cane Seats?

  • Thread starter Thread starter Guest
  • Start date Start date
G

Guest

Guest
First off, I am a webbed seat kinda guy, especially if I am rehabbing a wood seat frame for reinstall. That said, I have a 2005 tandem canoe with cane seats that are still in excellent condition; sturdy enough to hold my bulk, which is a testament to even old, uncared for cane strength.

I have at some point taken out, sanded and revarnished all of the other brightwork, but not the seats, and I have never “treated” the cane in any way. The wood bench frames are in desperate need of sanding and varnishing, and beyond removing the seats I am indecisive on how to proceed

I could rip off the still sound cane and spline, sand, fill the spline gap, varnish, turn them upside down and web them. I have hundreds of yards of webbing and stainless steel staples aplenty*, and that would make the sanding and varnishing job more thorough.

Or I could “treat” the still sound cane with some (?) preservative and just sand/vanish the exposed areas of the seat frame.

What says you?

If left caned, what should I use to revitalize the 13 year old cane?

*About stainless steel staples. I bought another box today, having discovered only a few left. I have not used anything close to 1000 stainless steel staples, but gawd dang if the wife didn’t put up some Christmas decorations last week that will never rust.

I guess I need to hide the SS staples alongside the high quality duct tape and good rope.
 
There are many schools of thought on this. Lately, I haven't been putting anything on the cane. I have used tung oil, and very, very thin traditional spar varnish on the top of the cane only. A pro-caner told me to do that on canoe seats, but I am still a bit on the fence about it. I wouldn't put "poly" anything on a boat. In my opinion, it is not flexible enough, but to each their own.
 
If you paddle naked the natural oils in your skin should be all it takes.;)

Yeah, butt I’d like to avoid the brown streak up the center of pale cane.


Here's a discussion from over on WCHA. It's new cane he's asking about


Sweeper, thanks. As expected that discussion of treating cane made things clear as mud, with zero consensus opinion.

The cane seems fine, but it is already 13 years old. Now that I am planning on giving the boat to an in-law I want to outfit it, and refurbish it as durably as best I can, and 13 year old cane is suspect in my mind, treated or not.

With future cane failure in mind I don’t want to adhere old cane to the edges seat frame using a coat of varnish or spar urethane and necessitate someone less anal than I having to chisel it off and refinish.

The seat drops are MRC’s no-maintenance plastic drops, so there are already seat synthetics involved. I think I’m back to ripping out the cane, filling the spline gap, sanding and varnishing the naked frame and then using webbing.

I have 100 yards each of black, red and green 2” webbing, maybe another colorful plaid pattern, or something taken from a National flag that incorporate those color stripes.

I could get some yellow webbing for the center and go full Bob Marley

https://www.youtube.com/watch?v=4QSQNqQQT-g
 
I know people like the durability of webbing, but I can't get over the "lawn chair" look. ;)

Hot water or steam assists greatly with spline removal, assuming wood glue was used to install.

Cheers,

Fitz
 
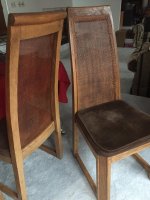
About treating cane, I sort of think it makes no difference. As noted by previous posters, there is really no consensus on whether to treat the cane or allow it to "breathe." We have a set of dining room chairs that have now, one at a time, all been recaned over the 40 years we've owned them. Because I was trying to match the other chairs in the set, I tried to stain the wicker canes and learned wicker really doesn't take stain, they just don't absorb it. I ended up using Minwax Polyshades, colored polyurethane, on both sides. The oldest recaning is about 25 years old and still holding fine. And, I've recaned canoe seats, and left them untreated. I think if it mattered much, there'd be more consensus on how to treat cane.
DRchairs.JPG

Like Mike, in a canoe, I've always preferred webbed seats. It hopefully won't be you or me, but at some point in a canoe's life, somebody is going to step on the seat, and I just don't trust cane to stand up to that. And, in the one canoe I had with cane seating, there was one trip where the cane ripped, and I used all the duct tape I had for a seat pan to finish the trip. So, they do look nice, but I just don't trust cane.

Like Mike, I have a canoe that needs refinishing of the bright work. Last go round, I varnished the seats to the edge of the webbing and left it at that. If you are compulsive enough to treat the inside of the seat's bolt holes, it isn't satisfying to leave the seat unfinished under the webbing.

Not knowing a better term, I'm going to call the piece of wood that forms the left and right side of the seat "stiles." I'll call the long pieces that get bolted to the drops "rails." I'll gladly except tutoring on seat terms.

The stiles on my seats are twisted. I sort of expect the seat was built with rectangular mortise and tenons. If so, the tenons must be about shot.
DRchairs.JPG

So, I'm thinking I just need to replace the seat, which solves the under-webbing varnish question. Does that sound right?
 
Not knowing a better term, I'm going to call the piece of wood that forms the left and right side of the seat "stiles." I'll call the long pieces that get bolted to the drops "rails." I'll gladly except tutoring on seat terms.

I have often wondered about the proper nomenclature of canoe seat components. Unable to glean any insight from my library of canoe building books I gave them names of my own. I too settled on "rail" for the long members that span the width of the canoe, but in my world, they are bolted to "seat hangers" instead of drops. I toyed with calling the short bits "stiles" but in the business of cabinet making stiles are usually longer then rails and I thought that would cause confusion. In the end, I chose to name the little prices "struts". They are structural and resist pressure in the direction of their length.
 
The stiles on my seats are twisted. I sort of expect the seat was built with rectangular mortise and tenons. If so, the tenons must be about shot.

The broken seat joints I have seen were all biscuit joints or dowel joints, two short dowel pieces in holes holding the seat frame together. It looks like one of the two dowels on yours has broken, and the other probably isn’t far behind.

No doubt someone can supply the correct terminology for those biscuit/dowel joints.

I thought a stile was a set of steps allowing people to walk over fences.
 
FWIW I polyurethane the top surface and do nothing on the bottom of the cane

error..Its Epiphanes varnish I used.. I have one canoe with cane seats for 26 years and the cane is still sound . One other did have a cane failure but I could see it coming.. It starts out as a small rip in one area. The manufactured cane seems to fare worse than hand woven cane.. as they do come in different diameters.

I dislike beachchair web type seats and had a catastrophic failure in the worst place,; the French River Delta..Also ripped on the North Fork of the White but we had rope to make lacing.

No doubt our own personal preferences are based on our personal experiences..
 
No doubt someone can supply the correct terminology for those biscuit/dowel joints.
Dowels and biscuits would both be called loose or floating tenons. Instead of a mortise on one part and a tenon on the other, two identical mortises are created in the parts to be fitted and a tenon is slipped into the joint. The strength of this kind of joint comes largely from the sizing, makeup and fit of the tenon. I make my rail/strut joints using a ¼" thick plate of baltic birch plywood for the tenon.
 
Most of the production wooden canoe seat frames that I have come across have utilized simple double dowel joints between the frame elements. These are easy to manufacture since all that is required is to drill a pair of holes in each of the two elements and tap in the appropriate sized short dowel segments. I have found that once the webbing or cane is removed from the seat frame, it is not uncommon for the glue to have dried out and the joint to be loose even if the dowels are still all intact.

It is not at all uncommon for one of the two dowels to break. This can occur when someone of considerable mass sits on the seat (names withheld to protect the guilty) but can also occur if the seats are redone using webbing. When I use webbing to replace the seating surface of a caned seat, I moisten the webbing first so that I can easily achieve a nice taut surface. But nylon webbing especially lengthens considerably when wet and shortens as it dries. I have overdone this a time or two stretching the damp webbing too taut so that as it dried it put enough tension on the outside edges of the short frame elements to twist them sufficiently to break one of the dowels.

If you have a broken dowel in a double dowel joint it is pretty easy to just drill out the stumps of the broken dowels and put in a new one. Of course, a real mortise and tenon joint is stronger but more time consuming to make.

As for refinishing Mike's seats, I would simply rip out the existing cane. That makes it so much easier to refinish the seat frame and repair it as necessary. A narrow wood chisel actually works quite well for cleaning out the spline rout. As for redoing the seating surface, if you prefer cane, Mike, why not just get some cane and spline and re-cane the seat? Once you have the rout cleaned out and the wood refinished, it is probably easier to do that than fill in the rout and apply webbing.

I have bought cane webbing and spline from this vendor and I have been happy with their products.

http://www.caneandbasket.com/SearchResults.asp?Cat=43

If you go that route, order some of the hardwood wedges to help drive the spline into the rout and hold it in place as you work your way around the webbing.
 
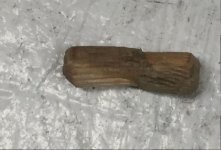
The seat was held together by the twin dowel method, and by the nylon straps. There is evidence glue was used, but it wasn't holding much. Once the straps were loosed, I pulled the joint apart by hand. That seat always made squeaking noises. Perhaps it was the joint straining and wearing the dowel. The dowel wasn't broken, but it was quite worn.
Trp-Seat-dowell.jpg

I had another seat on hand to put in, or I wouldn't have torn up the seat I removed. I was surprised the replacement seat was about a half inch narrower, front to back, than the one I removed. I forced the fit anyway. Now the bow seat is wicker! It's what I had.

Is there any reason not to rebuild the seat. There's nothing wrong with the struts. The rails are bowed a little, but otherwise seem fine. Guess I'd just need some glue, replacement dowels, webbing and staples. Mike mentioned ss staples. The staples I removed are corroded. Does that mean they are not ss, or, given enough time, does stainless corrode? Stapling into hardwood should be fun--any tips?
 
Is there any reason not to rebuild the seat. There's nothing wrong with the struts. The rails are bowed a little, but otherwise seem fine. Guess I'd just need some glue, replacement dowels, webbing and staples. Mike mentioned ss staples. The staples I removed are corroded. Does that mean they are not ss, or, given enough time, does stainless corrode? Stapling into hardwood should be fun--any tips?

While I have tremendous faith in good ole Aliphatic Resin or "yellow glue", I would not use it to reglue a joint. Assuming an AR or PVA glue was used originally, both of these products rely on the porosity of the material being bonded to create a strong joint. They also have no gap filling ability, which is likely the case with your seat at this stage. While you would no doubt be using new tenons (dowels), the mortise holes will have old residual glue in them compromising the bond. You could oversize the mortise holes and dowels but there comes a point when you might as well build from scratch.
If I were attempting to rebuild this seat, I would recommend new dowels and a glue with gap filling properties. The Polyurethanes are billed as such but my preference would be an epoxy with a high-density adhesive filler.
New webbing, SS staples both good ideas. My tip for driving staples would be a pneumatic staple gun.
A new, non-contoured flat canoe seat with webbing cost $30.
 
West Systems G Flex epoxy works very well as a waterproof, durable wood adhesive. That is what I now use for rebonding wood joints on canoe seats, repairing broken thwarts and gunwales or for scarf joints on gunwales.
 
It is not at all uncommon for one of the two dowels to break. This can occur when someone of considerable mass sits on the seat (names withheld to protect the guilty) but can also occur if the seats are redone using webbing. When I use webbing to replace the seating surface of a caned seat, I moisten the webbing first so that I can easily achieve a nice taut surface. But nylon webbing especially lengthens considerably when wet and shortens as it dries. I have overdone this a time or two stretching the damp webbing too taut so that as it dried it put enough tension on the outside edges of the short frame elements to twist them sufficiently to break one of the dowels.

I broke one dowel in a seat frame while installing the webbing. 20 years ago, doing one of my first rebuilds, I was webbing the still sound seats on an old Explorer I had regunwaled. The seats had taken a slight contour bend from the previous owner’s bulk.

For some reason I decided to clamp the seats to the workbench, maybe while sanding or pulling webbing taut. As I clamped it flat I heard a distinct CRACK, but the seat frame showed no visible damage, so I proceeded to web the seat and install it in the canoe.

First daytrip with that boat, paddling it bow backwards solo, there were some shenanigans amongst the group. For my part I had surreptitiously removed the drain plug from a friends kayak and was incrementally pouring water into his boat. When his soggy butt finally caught me I attempted to sprint away from his paybacks, digging in with power strokes.

That was when the other dowel broke, dumping me arse over tea kettle onto my back with my legs waggling in the air. My soggy arsed friend caught me, grabbed my bailer and thoroughly saturated me while I flailed helplessly about on my back. Paybacks are heck.

Worse I paddled the last couple miles to the take out solo from the stern seat /.

I would be suspicious of the rest of the dowels on any seat that had taken a Chip-like twist, even if only on one corner of the frame. The remaining dowels must have been exposed to additional stress, and if one was old enough to let go. . . . .

The seat was held together by the twin dowel method, and by the nylon straps. Guess I'd just need some glue, replacement dowels, webbing and staples. Mike mentioned ss staples. The staples I removed are corroded. Does that mean they are not ss, or, given enough time, does stainless corrode? Stapling into hardwood should be fun--any tips?

Stainless steel staples will eventually corrode or at least discolor a bit, especially if you do much salt water paddling, but nothing like regular steel staples. A friend has a canoe with seats I webbed 20 years ago using stainless steel staples. He does paddle some tidal waters and those seats are still going strong

The webbing straps will help hold together a failing seat frame to some degree. Until it fails catastrophically at some inopportune moment.

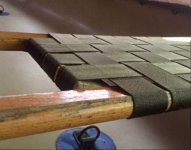
My webbing technique may be imperfect, but it works for me. I once used a combination of brads and staples, but now use only stainless staples for ease of installation (tapping in the little brads was a PITA with my fat fingers).

I take a cloth tape measure the length of webbing necessary to wrap around the seat frame, including across the bottom and against the vertical seat frame edge underneath, with the webbing on vertical edge ends doubled over to hide the (hot putty knife) cut end inside the fold.

Cut one length of webbing to that cloth tape length and do a test wrap, first doubling over the webbing on that goes against the vertical edge of the seat frame. Staple the doubled over end on the inner seat frame (one SS staple) and staple the horizontal webbing (two SS staples) under the seat frame on that side. One side is now well anchored.

Then pull the (unwetted) webbing taut and double staple the horizontal bottom on the other side while pulled tight. The extra inch of webbing that gets folded over and stapled on the other vertical edge provides some webbing to grasp and pull tight for the two staples the bottom. Once the webbing has been stretched taut and stapled on the bottom it is easy to fold over the webbing tab and staple the vertical side.

I usually have to re-size/re-cut the first piece of webbing since in situ, unlike the cloth tape measure, the webbing will stretch a little when pulled taut, but once that 1[SUP]st[/SUP] piece has been trimmed to length I can cut all of the others running in that orientation at exactly the right length and staple them in place.

One full run of webbing in either orientation, then do the over/under weave in the other orientation and cut to length.

For funsies I just pulled out a couple of manufactured webbed seat, likely from Ed’s Canoe or Essex. The webbing is attached with four peculiar ¼” wide staples at each end of the webbing, two staples (offset) on the horizontal bottom, two staples in-line on the vertical inner edge.

I presume there is a reason for the offset and will do the same when I web these seats, at least on the wider bottom side where there is room for two staples.

The ends of the webbing on those seats are not folded over, the cuts are uneven sloppy and the webbing ends on some old used seats are beginning to fray. The fold-over only takes another 1 ½” of webbing length per strap, seems worthwhile to me.

FWIW the stainless steel staples I use are T50 3/8” (10mm). Once everything is stapled I give each one a couple hammer taps to make sure they are fully seated and embedded in the webbing and not leg scrape-able when kneeling.

Not to belabor the obvious, but if you hammer tap the staples on the inner vertical edge of the short part of the seat frame (Conk’s “struts”), where the frame can’t be laid flat on the bench, it helps to build a raised platform of scrap 2x4 pieces so you aren’t hammering that edge of the seat frame into an unsupported area below.

Which should have been obvious to me the first time I webbed a seat. Oops.

I toyed with calling the short bits "stiles" but in the business of cabinet making stiles are usually longer then rails and I thought that would cause confusion.

I love learning things here, and have to ask. Conk, in cabinetry what are stiles?
 
Back
Top