• Happy National Hot Sauce Day! 🌶️🥵

New project... 17.5' Atkinson Traveler

It's too cold in my 'shop', the unheated barn, to accomplish any big jobs so I spent a few minutes experimenting with a sled on which to shape the underside of the future decks for this canoe. The idea is to relieve the underside of the decks so they appear "lighter"; not in the sense of weight but rather give a more delicate appearance to the underside of the decks. I did not want to remove material from the entire underside of the deck, just the back end of each. The upper surfaces of the decks will be crowned using plane and spokeshave once the triangular shape is cut out.

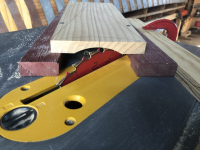
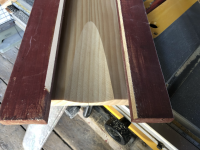
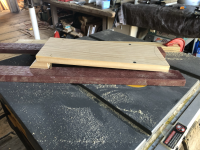
I used a couple of scrap 1x's to serve as runners under the deck blank, and clamped a fence to my table saw at 45 degrees to the blade. I affixed the deck blank to the runners with the stem end of the blank elevated by another scrap 1x so the undercut would not extend to the end of the blank. That would weaken the sides of the triangular deck once cut out of the blank. It's necessary to screw through the inwales into the sides of the finished deck, so the deck can't be weak near the tip.

My experiment was done on a piece of 4/4 pine, but the actual decks will be cut from 5/4 tiger maple so the undercut can probably be a bit deeper on the actual deck material.

45 degree fence; runners in red:
tempImagep80cB3.png
Deck blank in cutting position:
tempImageu4owT5.png
Side view showing elevated front position:
tempImageAyjKj7.png
Underside stock removal result:

tempImageOHgz8D.png

I think I can make a gentler arc if I move the fence closer to 90 degrees to the fence. Unfortunately this may increase the danger inherent in the cutting process. For that I should mount handles to the runners to keep a better grip on the work and keep my hands away from the blade. I do know that each pass should not remove much material, thereby reducing the chance of the blade throwing the workpiece. It ain't worth losing a finger to make a dainty deck!
 
Jim, that makes perfect sense! I hadn't thought about that. Just now I did a quick search and found that a fence on both sides of the work are recommended by many people. Next time...
 
Clever and creative! I'm really enjoying following your progress. Thanks for taking the time to post your build. The photos and description are great.
 
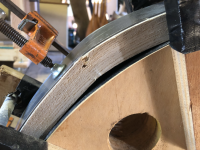
First attempt at steam bending a stem was a bust! At this point I don't know what went wrong, but I can see from the failure that the outer wood stretched and separated at mid-curve. Did I not steam long enough (55 minutes)? Was the Ash blank flawed? Did I pre-soak the blank too long (4 days)? Was it too cold outside for the walk to the barn (38F)? Was the blank too wide ( 7/8"x1 7/8")? I did notice that the steel compression strap had come unhooked on the upper end so perhaps it wasn't pressing hard enough against the outside of the bend. Oh well, I hoped - but didn't really expect- the first bend to go perfectly!!

At around 1:25 minutes you'll see that the upper retainer block on the compression strap comes loose, and at 1:35 the outer layer of wood breaks at the third clamp hole on the form. I heard it go... after that I knew the piece was no good, but continued to clamp just for practice.


tempImagedcAI6k.png
 
Bummer. How green was the ash? Kiln dried? There is a such thing as over steaming, but what you did looks about right for that thickness. Does that piece have a lot of grain runout where it split? I try and steam the piece next to where I bend it, but it didn’t seem like an excessive long time between.

With all those variables aside, I’ve had some pieces split for no good reason. Improper moon phase possibly?

I hope your next attempt is successful.

Bob
 
Way too much time out of the steam box. Between walking across the yard and clamping on the compression strap and slight fiddle with the first clamp the stem piece has cooled too much.
I strive for ten to fifteen seconds (or less) from out of the box to mostly clamped. I’ve never used a compression strap but I hear they do help. If you had a helper that could speed things up. My wife always helped me with the quick clamp ups but she doesn’t like it because the need for speed makes her nervous. Also, I know the long tail is a convenient handle but next time also try to put pressure with one hand right at the apex of the bend. Once you start the bend, don’t stop but continue ‘handsomely ‘ (that’s a new word for the day). I also put a thermometer in the box (I think you did) and I don’t start the time till the box is over 200° the hotter the better 212° if you can get it. The rule of thumb is 1 hour per inch of thickness so you got that right and presoaking was good too. Short of being there that’s all I got at the moment.
Jim

I just watched the video again and it was a minute twenty seconds till you really started to bend, to me that is the biggest reason for failure.
 
Last edited:
Bob, I don't think there was significant grain runout at the failure. The grain lines appear pretty parallel to the curve. The Ash was air dried about 1 year; cut out of a 2" thick slab. It was too windy to run the burner outside, and I didn't want to have that flame in the barn! I saw today a video of Headwaters Canoe where 3 people bent a stem; one to bend, one to clamp, and one to pour boiling water over the wood as it was bent.

Jim, I think you have it right; too slow! I was worried about having the burner in the barn, but next time I’ll put the box just inside the barn with the burner just outside. And, have a helper to clamp. I had the setup in the shed to shelter from a windy day. Deep down I knew that was a disadvantage.
 
I just realized if you just look up Handsomely you will not find the meaning I was referring to. You will if you look in a nautical dictionary. But I’ll save some time.
Handsomely - Carefully, or slowly; in a proper manner, as in the easing (letting out) of a line. Not too fast nor yet too slow, but with great care; cleverly.
Jim

Fire in the barn is why I use the wall paper steamer, plus cheaper at least if you steam more than one boats worth.
 
Looking forward to the build!
Haha, if it gets past the stem stage…..

Great job not swearing on screen. Pretty sure I'd have at least mumbled a few ill-chosen words.
I only do that when I hit my thumb with a hammer. There will be plenty of tacks on this project, I’m sure there will be a couple of mis-hits!
 
Every build is a learning process ! It doesn't matter if it is the first, or the fiftieth !

The key is to keep at it, until you get it figured out !

Jim
 
47 years since I built my first boat and if you learn from your mistakes I sure have learned a lot.
Back to the steaming, I always do a cold walk through with whoever is helping me. Starting with pulling it out of the box to the first initial clamp. All clamps, wedges and everything is laid out ready to go right down to the clamps adjusted to size. Also some extra clamps ready to go just in case.
And of course the piece of wood is placed in the box so I know exactly which end and side goes where.
Jim
 
2nd attempt at stem building:

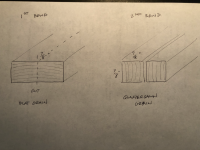
This time, I did several things differently; I steamed longer, pre-soaked longer, placed the bending material higher in the steam box, and most significantly, I ripped the 7/8"x1 7/8" blank into two 7/8" square pieces and bent in quarter sawn orientation rather than flat sawn which is how the first attempt was done resulting in flat grain 'blowout'.

Although the end of the bend at the flattest part of the form went poorly when the compression steel bending block contacted the form, all the bending at the curvature of the form went well.

Here's the grain orientation diagram:
tempImagec3uVrg.png

And, here's the video of the bend:


I don't know why, but you have to restart the video to get the beginning sequence.
 
I don't know why, but you have to restart the video to get the beginning sequence.

I re-inserted your video so it starts at the beginning. You likely chose "Copy video URL at current time" when you were already 40 seconds in rather than choosing "Copy video URL."

Second time's the charm. You got a lot of good advice here and at WCHA.
 
Back
Top