G
Guest
Guest
I found two more small SS pots with lids at Goodwill (I remembered to bring a magnet), and with the gift of some Presbyterian Church candles had accumulated enough wax for a couple small FIAC’s and more custom feeder bricks.
 P1210074 by Mike McCrea, on Flickr
OK, mostly I felt like tackling some simple shop DIY that required little effort or forethought. Clearing off a shelf and putting some stored pots and wax to good use fit the bill.
Banged the handles off the pots and replaced the lid knobs with something smaller. The lid doesn’t get hot, it is only used to snuff out the flames.
 P1210068 by Mike McCrea, on Flickr
Those Presbyterian candles are not in keeping with the Church’s Scots roots. Those were some high quality candles, with a noticeably higher melt point than the 145F wax I have been using. Thanks Paul.
With the old candle stubs melted in a pot on the Coleman stove I filtered out the old wicks by pouring the hot wax through a kitchen strainer. Old wicks, and debris from one giant gaudy candle that was covered in decorative glitter. Thanks again Paul.
 P1240083 by Mike McCrea, on Flickr
I did not appreciate that better quality Presbyterian wax and effed up, melting those church candles for the first of three (once a day) needed pours/settles & cardboard wick soak ups into the pots. That better quality wax is at the bottom of the pot, where the flames, with some feeder brick action, will never reach.
Cardboard wicks cut to height (with a bit of pot hot wax and windscreen lip left on high) and pre-coiled for a spiral.
 P1210071 by Mike McCrea, on Flickr
That cardboard spiral wick does not need to be, really shouldn’t be, a tightly compressed spiral in the pot. The original Maine sea kayak guide versions use a tightly wrapped wick that filled the entire pot with no gaps, and the How-to videos show the same. A loose spiral, a half inch to an inch apart works much better. Think about a regular candle; it isn’t all wick.
Getting that spiral wick to hold in spaced position is the tricky part. The pre-coil (wrapped around a piece of pipe) helps. Stapling the center coil together in a circle, and adding some taller starter wicks spaced between coils helps even more. Not even close to a perfect spiral, but good enough.
 P1210078 by Mike McCrea, on Flickr
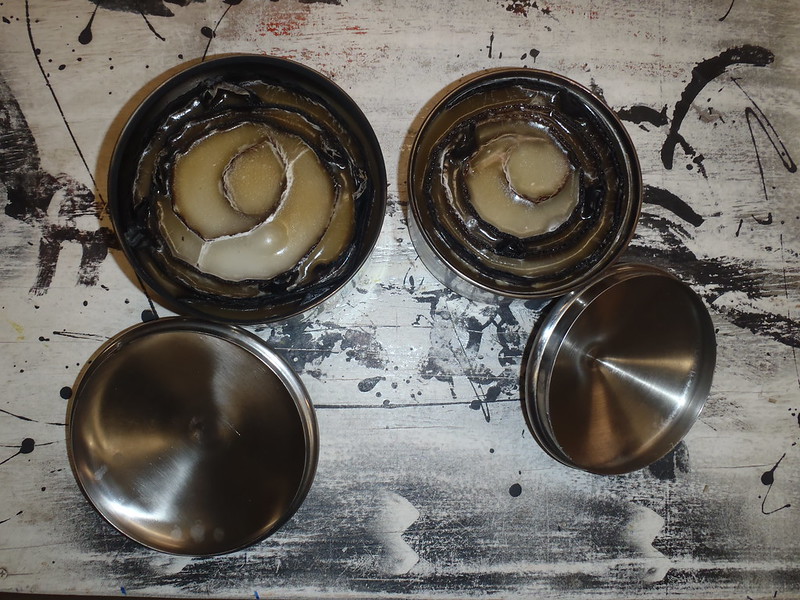
First pour results the next day, pot half full of wax – note the wax soaking upwards on the cardboard wick, and the resulting cratered depressions. Two or three pours, a day apart, resolves that.
 P1230080 by Mike McCrea, on Flickr
While the wax was melting I laid out the containers for another batch of feeder bricks, along with Citronella oil for one batch. And, what the heck, the last of the colorful “Magic Flames” for another. The muffin tins make perfectly sized feeder bricks for those pots, but I made some ice cube tray bricks for lesser feedings.
 P1230081 by Mike McCrea, on Flickr
 P1240085 by Mike McCrea, on Flickr
When adding a feeder brick atop the cardboard wick it helps if the center of the spiral is further apart, and a little more wax buried, the rings of wick around the pot edge provide most of the flames, and the melting feeder brick snuffs out any exposed wick in the center.
 P1240087 by Mike McCrea, on Flickr
One last FIAC trick; if you want to blaze one up in seconds it helps to light them at home first. The initial burn, drawing wax up and charring the cardboard wick, is slow to fully flame, like a candle when first lit. But once lit, burned for a bit and extinguished with the lid the charred wick catches easily and the flame spreads quickly around the cardboard spiral.
Pre-charred for 30 seconds, not burned far into the wax.
 P1250092 by Mike McCrea, on Flickr
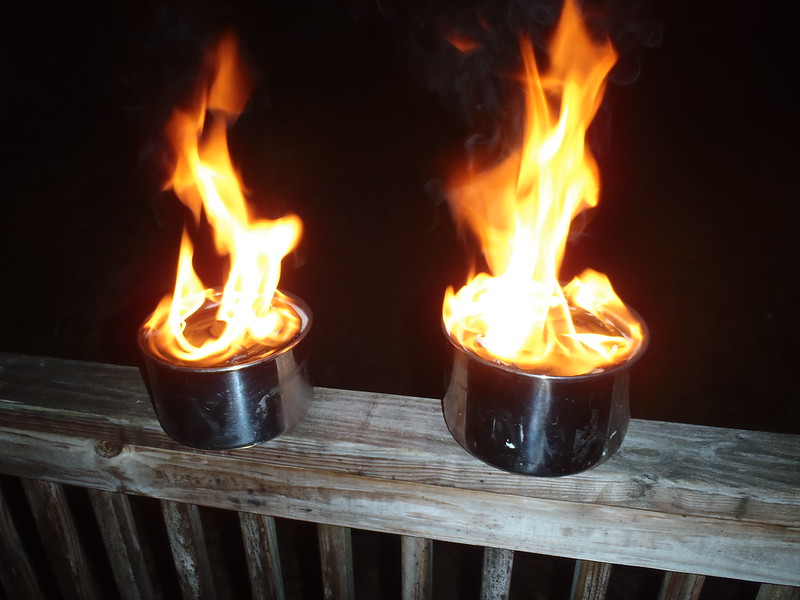
Less than a minute after lighting the charred wick the next day.
 P1250101 by Mike McCrea, on Flickr
The last FIAC made, small pot #8, is doing kayak hatch duty on Everglades beachfronts and chickees (as was small pot 4 or 5 before it was burned out on an all-nighter for lack of feeder wax), so these are FIAC’s 9 and 10. All of the kayak-hatch or personal sized ones went to friends; I’m saving one of these for myself.
No doubt some shop visitor will be happy to leave with the other, and a supply of feeder bricks.
 P1210074 by Mike McCrea, on Flickr
OK, mostly I felt like tackling some simple shop DIY that required little effort or forethought. Clearing off a shelf and putting some stored pots and wax to good use fit the bill.
Banged the handles off the pots and replaced the lid knobs with something smaller. The lid doesn’t get hot, it is only used to snuff out the flames.
 P1210068 by Mike McCrea, on Flickr
Those Presbyterian candles are not in keeping with the Church’s Scots roots. Those were some high quality candles, with a noticeably higher melt point than the 145F wax I have been using. Thanks Paul.
With the old candle stubs melted in a pot on the Coleman stove I filtered out the old wicks by pouring the hot wax through a kitchen strainer. Old wicks, and debris from one giant gaudy candle that was covered in decorative glitter. Thanks again Paul.
 P1240083 by Mike McCrea, on Flickr
I did not appreciate that better quality Presbyterian wax and effed up, melting those church candles for the first of three (once a day) needed pours/settles & cardboard wick soak ups into the pots. That better quality wax is at the bottom of the pot, where the flames, with some feeder brick action, will never reach.
Cardboard wicks cut to height (with a bit of pot hot wax and windscreen lip left on high) and pre-coiled for a spiral.
 P1210071 by Mike McCrea, on Flickr
That cardboard spiral wick does not need to be, really shouldn’t be, a tightly compressed spiral in the pot. The original Maine sea kayak guide versions use a tightly wrapped wick that filled the entire pot with no gaps, and the How-to videos show the same. A loose spiral, a half inch to an inch apart works much better. Think about a regular candle; it isn’t all wick.
Getting that spiral wick to hold in spaced position is the tricky part. The pre-coil (wrapped around a piece of pipe) helps. Stapling the center coil together in a circle, and adding some taller starter wicks spaced between coils helps even more. Not even close to a perfect spiral, but good enough.
 P1210078 by Mike McCrea, on Flickr
First pour results the next day, pot half full of wax – note the wax soaking upwards on the cardboard wick, and the resulting cratered depressions. Two or three pours, a day apart, resolves that.
 P1230080 by Mike McCrea, on Flickr
While the wax was melting I laid out the containers for another batch of feeder bricks, along with Citronella oil for one batch. And, what the heck, the last of the colorful “Magic Flames” for another. The muffin tins make perfectly sized feeder bricks for those pots, but I made some ice cube tray bricks for lesser feedings.
 P1230081 by Mike McCrea, on Flickr
 P1240085 by Mike McCrea, on Flickr
When adding a feeder brick atop the cardboard wick it helps if the center of the spiral is further apart, and a little more wax buried, the rings of wick around the pot edge provide most of the flames, and the melting feeder brick snuffs out any exposed wick in the center.
 P1240087 by Mike McCrea, on Flickr
One last FIAC trick; if you want to blaze one up in seconds it helps to light them at home first. The initial burn, drawing wax up and charring the cardboard wick, is slow to fully flame, like a candle when first lit. But once lit, burned for a bit and extinguished with the lid the charred wick catches easily and the flame spreads quickly around the cardboard spiral.
Pre-charred for 30 seconds, not burned far into the wax.
 P1250092 by Mike McCrea, on Flickr
Less than a minute after lighting the charred wick the next day.
 P1250101 by Mike McCrea, on Flickr
The last FIAC made, small pot #8, is doing kayak hatch duty on Everglades beachfronts and chickees (as was small pot 4 or 5 before it was burned out on an all-nighter for lack of feeder wax), so these are FIAC’s 9 and 10. All of the kayak-hatch or personal sized ones went to friends; I’m saving one of these for myself.
No doubt some shop visitor will be happy to leave with the other, and a supply of feeder bricks.
