• Happy Winter Solstice! 🌇🌃

3M Dual Lock—Q's & A's and Tests for Canoe Uses

Happy Birthday Glenn. I have marked October 31 on my anal retentive calendar as “Glenn M B-day”. Unbeknownst to me I mailed you a birthday present yesterday, an envelope with a couple pieces of low profile 4575 for your inspection.

That is a very generous offer and I’d like to test the 250-to-250, especially in terms of how difficult it is to seat the mushroom heads for spray cover use. No strain gauge; I never foresaw that I would be doing this many tests with various canoe outfitting attachment points.

One good thing about forgetting to set the clocks back; I woke up at my usual “4:30am”, made coffee and started playing in the shop, only to discover that it was actually 3:30am when I looked at the computer. Oh well, I have plenty of dirt, mud, sand, shop spider webs and insect carcasses.

I stirred up a witch’s brew slurry of that goo and smeared it on all of the test pieces of low profile Dual Lock. I’ll give it a day or two to thoroughly dry/cake on and see how easily it cleans out. I’ll be interested in how it compares to similarly goo’ed up Velcro and will do the same with test pieces of hook & loop. Might as well do the goo clean up test with the 250 test pieces, thinking that larger, more widely spaced “mushrooms” might be easier to clean.

My last “test” with the 4575 will be to see how difficult it is to detach the acrylic adhesive backing, even if that means digging under it with a screwdriver or razor blade.

Or maybe not “last”; one thing with these silly shop experiments, I often think of some additional procedure or abuse to try.
 
Mike, I just ordered to be sent to you a 10' x 1" roll of 250 density in black color from Amazon, which you should get Tuesday, Nov. 3.

This product is even more complicated than the mushroom density. Note from the embedded chart below that, even within each density, there are up to three different adhesive backings. The type I ordered is SJ3550 -- "conformable acrylic".

QyJnKoN.jpg


vvvvvvvvvvv
 
Mike, I just ordered to be sent to you a 10' x 1" roll of 250 density in black color
This product is even more complicated than the mushroom density. Note from the embedded chart below that, even within each density, there are up to three different adhesive backings. The type I ordered is SJ3550 -- "conformable acrylic".

vvvvvvvvvvv

Thanks Glenn, I’m very curious about the differences, especially the push-pressure required to seat the Dual Lock on a spray cover attachment. I’ll cut off some lengths of 250 and mail them to you for comparative inspection alongside the low profile stuff. Whichever you choose for a sliding seat I’ll have plenty left.

Dual Lock does seem a complicated product to choose between variations. I have no idea what the functional differences between “Comfortable”, “Firm” and “Comfortable Modified” acrylic adhesive might be. But, when it comes to boat outfitting, as you know, I like comfortable.

The “Mix and Match Densities for Strength” chart is easier to understand, at least in terms of what is not recommended:
We advise against mating 400:400 because the density makes it difficult to engage and disengage effectively. For 170:170 the head pattern may not match up well to engage the heads properly.

As requested I dirty up the mushroomed surface of the low profile Dual Lock, a test I intended to do but sorta forgot.

I had some (white) adhesive backed Velcro, doubtfully industrial strength, probably big-box or fabric store stuff. I am decidedly not a fan of Velcro for a variety of reasons, but for comparison sake I stuck a 6” piece of Velcro on that same Royalex & gunwale piece, and a 6” length on another scrap of heat sealable Packclolth.

PA310022 by Mike McCrea, on Flickr

Before the grunge removal test I tried the spray cover pull off experiment with Velcro, and will admit that, when new and previously unused, the Velcro has sufficient tenacity to hold a spray cover.

PA310023 by Mike McCrea, on Flickr

That test done I smeared all of the Dual Lock and Velcro attachments with a witches brew goo; a sludgy concoction of water, dirt, sand, crumbled dry leaves, shop spider webs and bug carcasses. Eh, a sprinkle of kitty litter mixed in for a bit of clay clog action.

PA310026 by Mike McCrea, on Flickr

Not just dropped on goo; pressed down with a tongue depressor and thoroughly smeared in. To finish baking my mud cakes I used a spray bottle of water to mist the compressed sludge.

PA310027 by Mike McCrea, on Flickr

Double double toil and trouble. Really double, I underestimated the amount of test goo I needed and had to make a second batch. Too late, after mixing and smearing the goo, I realized that I should have included some loose threads; errant threads and beard hairs are the bane of hook and loop.

PA310029 by Mike McCrea, on Flickr

I’ll let that goo brew stew for a couple days, until it is caked on dry, and see how the debriding goes.

XXXXXXXXXXX (?)
 
Re the cleaning test, unlike at home when cleaning would be easier and less immediately crucial, in the wilds you won't have a water hose, air compressor or fancy brushes. You will be able to submerge things in the water, and likely have some sort of cloth or sponge, fingers, sticks, knives and a maybe a toothbrush.
 
Mike, just gotta say that I really like your real world testing of canoeing and outfitting nuts and bolts, and especially the fact that you take the time to share your results in this level of detail. It’s all gold to people like me trying to sort through the many options for outfitting and maintenance. Many thanks from me (and the forum in general I would bet).

Tony
 
Re the cleaning test, unlike at home when cleaning would be easier and less immediately crucial, in the wilds you won't have a water hose, air compressor or fancy brushes. You will be able to submerge things in the water, and likely have some sort of cloth or sponge, fingers, sticks, knives and a maybe a toothbrush.

Thanks Glenn, you stopped some planned stupidity on my part. My plan was to hose blast off the encrusted crud. You are right, that’s not a likely option in the field.

I know that crud test is extreme, an absolute worst case encrustation, but with the covers off and the canoe flipped upside down in camp any rain splashed dirt is going to end up on the Dual Lock or Velco (or snap rivets or etc). Think about how far up dirt splashes on a tent after a hard rain.

Beyond leaving all of the paddling gear dry and protected in the (rightside up) canoe that is another reason I like using a storage cover in camp in conjunction with my partial spray decks; the spray cover attachments are further away from the spatter, and fastened together unexposed in any case.

I always have a sponge in the canoe, I’ll start with that. I guess I could add an old toothbrush to my kit. Or get a spork.

Mike, just gotta say that I really like your real world testing of canoeing and outfitting nuts and bolts, and especially the fact that you take the time to share your results in this level of detail. It’s all gold to people like me trying to sort through the many options for outfitting and maintenance. Many thanks from me (and the forum in general I would bet).

Tony, thanks for those kind words. I appreciate the willingness of folks on Canoe Tripping to share their experience and expertise, and have learned a lot here. I’m working on a canoe rebuild now, using a couple CT learned tricks.

I am curious by nature, and skeptical of “I heard that. . .” or “I’ve never done this myself, but. . . .” solutions; I need to see/try/feel/test for myself. I spent 35 years in University research and that may have imbued me with some continuing experimental penchant.

Sometimes investigations and experiments continue longer and deeper than I had first imagined. The varnish, oil and epoxy exposure test went on for nearly 5 years, the canoe attachment weight bearing experiments took a week (and some thousands of pound lifted and failed) to complete.

I’m still developing my best-practices for installing Dynel skid plates. But I learned a lot of firsthand lessons, and expect I will again when finished experimenting with the Dual Lock.

I received an e-mail reply from 3M with answers to my low profile questions. Once I’ve had a chance to (try to) decipher it I’ll share that 3M response.
 
3M’s answers my e-mailed questions:

“I ordered some 3M 4575 Dual Lock for possible use in attaching vinyl coated spray covers to canoes, and am confused/concerned about some discrepancies between the on-line 4575 description versus the package card that came with the product.

On-line the 4575 is listed as “Indoor/Outdoor”, but on the product card only as “Indoor”. I’m sure you can see my concern there.

On the product card the 4575 is described as “Closure Life 100”. Eh, a spray cover may come on and off a dozen times on a week long trip.

Is the 4575 intended for indoor use? Does it really have a “Closure life” of 100?

And, if no to either question, which Dual Lock would you recommend for spray cover attachments? The 2x as thick high profile would work in that application just as unobtrusively.”

The reply:

“Thank you for contacting 3M. I work with our Industrial Adhesives and Tapes and would like to follow up with you regarding your recent online inquiry regarding SJ34.

It can be used outdoors. The closure life is 150 for the low profile dual lock before it will lose 50% of its strength.

The data sheet has further info:


https://multimedia.3m.com/mws/media/1591587O/3m-dual-lock-reclosable-fastener-sj4575.pdf

The standard SJ3550 or SJ3560 would be thicker but get you up to1000 closures before losing 50% of its strength.

If you needed more closures, getting you up to 5000, SJ3571/SJ3572 are good options to consider.”


Kudos to 3M, I e-mailed them on Friday afternoon and received a reply on Monday.

But ARRGGHHH, so many numbers and codes to interpret. I’m surprised that e-mail didn’t end with “This message will self-destruct in 5 seconds”.

My still kinda clueless take away; I’m not sure the low profile “150 closure life before losing 50% of strength” is adequate long term for a spray cover, but at least the adhesive is waterproof.

Nothing left to do except rip that low profile Dual Locked fabric off the Royalex panel hundreds and hundreds of times. Maybe I’ll go sit on a park bench while I do that. While wearing a bike helmet, a blank expression and thinking of JSaults.

I am now really curious about how difficult it would be to press-attach the mushrooms on the standard profile Dual Lock for below gunwale spray cover attachments. 1000 closures before losing 50% of strength would be preferable.

5000 closures with SJ3571/SJ3572 would assure my great grandchildren could still use the covers, but I have a feeling (?) that stuff would be a PITA to snap closed on spray covers.

I may request sample pieces of SJ3550/SJ3560 or even the 5000 closure SJ3571/SJ3572. I have started down this dang rabbit hole, might as well keep digging.

Now thoroughly confused I think I’ll go do some sanding and epoxy work. At least I have a clue about what I’m doing there.
 
Crud cleaning (and on to testing Dual Lock SJ3550 and a different Dual Lock)

Before I can test the 10’ x 1” roll of SJ3550 Glenn kindly sent to me (and a secondary surprise) I need to get on with the crud cleaning, and repeat the tenacity tests with the low profile and Velcro.

I used a sponge. Visually the Dual Lock cleaned up very well, no need for a toothbrush or spork. The Velcro not so much; the hook side retained some crud (loose threads and hairs would have been worse) and ate part of the sponge, the bits of which stayed stuck to the Velcro hooks.

The low profile Dual Locked seat frame, once sponged clean, snapped in place and stuck as well as ever, even wet (no surprise). If anything it actually seemed a little more tenacious, or maybe I’m just getting weaker.

PB030027 by Mike McCrea, on Flickr

Same as it ever was for the Dual Locked spray cover material as well.

The Velcro did not sponge off very well. At all; I finally resorted to blasting it with a hose trying to dislodge the little bits of sponge stuck to the hook side. With only minor success.

PB030029 by Mike McCrea, on Flickr

The Velcro still had plenty of Royalex/fabric grip when pulled in up and across the gunwale section in tension, but when I peeled the fabric free sideways, well shucks, the loop side adhered to the fabric detached immediately. Seems I omitted testing the waterproofieness of cheap Velcro.

PB030031 by Mike McCrea, on Flickr

Before I move on to testing the new Dual Lock(s), one more experiment with those pieces. How hard is it to deliberately remove the Dual Lock and remaining RX stuck Velcro.

On the Royalex side the Velcro was still fairly well stuck, but I could a corner started my fingernail and pull it free from there. Removing the Dual Lock from the RX was another story; I had to get some lift started with a razor blade, and then pull it with pliers.

PB030034 by Mike McCrea, on Flickr

Removing the Dual Lock from the heat sealable Packcloth. I managed to lift an edge with my fingernail and the strip of Dual Lock pulled free with a hard two-fingered tug.

PB030036 by Mike McCrea, on Flickr

If I do make an experimental spray cover I’ll paint a little bead of G/flex around the perimeter of the Dual Lock pieces on the cover material. If I cut the pieces of Dual Lock for the cover fabric slightly longer than the ones on the hull, so the detachment points on the cover side are away from the ends of the Dual Lock, that might help as well.

Removing the little 1” squares from the seat frame was much like the Royalex; I had to get a corner lifted with a razor blade and pull with pliers.

PB030037 by Mike McCrea, on Flickr

I never much liked Velcro and I like it even less now. With the caveat that this was probably cheap adhesive-backed Velcro.
 
Last edited:
The closure life is 150 for the low profile dual lock before it will lose 50% of its strength.

For my movable seat concept, 150 removals for the low profile Dual Lock would be more than enough. I probably would only remove the seat when cartopping. I doubt I have 150 cartop trips left in my life. Worst case, you peel off the weakened dual lock, which Mike has already demonstrated to be easy, and apply new strips.
 
All this experimental activity warms my heart. You, Mr. McCrea, have gone far beyond my years ago recommendations for the use of Dual-Lock.

And Glenn, this activity has caused me to look back in my photo archives for better views of my seat mounting arrangements.
I was previously fixated on pics of my initial Dual-Lock usage in my Red Kite, forgetting completely that I also used the same arrangement in my Carbon Copy Kite.

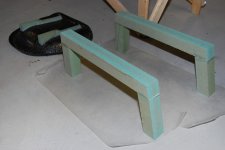
So below is a pic of the in process seat (courtesy of Alan Gage) with partial Dual-Lock and the not yet completed seat pedestals. If you look at the seat bottom, you'll see that I needed to add more length to the seat support. Initial testing of the seat with a shorter support (where I already had some Dual-Lock) was, uhmm, surprising. I had an inadequate lever arm to react the moment applied by my butt...which resulted in a quick rearward flop!!
I don't have any pics of the completed seat support rails, but I added short (2 inch lengths?) pieces of Dual-Lock at each end of the two seat rail corners. The unfinished pedestals were later wrapped in carbon fiber and mounted to the canoe bottom with Cabosil thickened epoxy and some more carbon fiber. Yes, that is 2" thick H80 Divinycell.

The advantage, IMHO, of these pedestals over other types of adjustable rail mounts is that I can fit one foot or both feet under the seat, or, while kneeling, fit a leg between the pedestals and the other leg anywhere along the bilge. The variety of seated positions helps reduce fatigue.
The lack of any gunnel to gunnel seat supports makes it very easy to swing a leg, or both legs, past the seat when loading, launching, or scrambling over beaver dams (I do a lot of that).
Oh, and lastly, the use of Dual-Lock to hold the seat in place completely eliminates the possibility of a trapped or injured leg in the event of an upset.

Enough of my babble, here's that photo and another showing the completed seat and pedestal arrangement.

ACtC-3fGLFlPAIiZuAGKejvw4SFBMSdzK5glYDgPiM_HRAVADt_nNE-yLsaMHXHv0lybTdINlfMTiV4IelUtc6APH8bgCiw2a3VnQ0jBYVjrQychQWZhKx4ZZ0QeDyhGj-pJudwrZ8HYg1gIkI0nXlX_ldmrfw=w1318-h882-no?authuser=0.jpg

ACtC-3eg2Qg4WzNaBRaUlLcOIrfxv08fnZtyNRX0SZSeLrMqrYdTyVasu7jKr_zdo8by4z52Eb9MT0s4CdJctHen-4jPiWoz_RTOCY2lQ4Nq8DGB7qkne37nM6JIF5pbEKGf07T4aq-UnmxI4paVzmH3FpYcRw=w1323-h882-no?authuser=0.jpg
 
First, a realization about Velcro use in boat outfitting. Since the hook side of the Velcro is the most tenacious at holding crud if using Velcro it would probably be best to affix the hook side to the covers and the less crud attractive side to the hull.

For my movable seat concept, 150 removals for the low profile Dual Lock would be more than enough. I probably would only remove the seat when cartopping. I doubt I have 150 cartop trips left in my life. Worst case, you peel off the weakened dual lock, which Mike has already demonstrated to be easy, and apply new strips.

Glenn, when you are sliding seat ready I will be happy to mail you however much you need of whichever Dual Lock seems best suited. If you like I will mail you test pieces of what I’m using in the current experiments.

All this experimental activity warms my heart. You, Mr. McCrea, have gone far beyond my years ago recommendations for the use of Dual-Lock.

I’m not done yet, I’m like a dog with a bone when I sink my teeth into some shop experiment. On to the next Dual Lock tests using standard profile(s). Yes, plural.

Glenn’s sample roll of SJ3550, the Dual Lock product suggested in 3M’s e-mail response.

PB030022 by Mike McCrea, on Flickr

And, tada, something I found while sorting through the Velcro and specialty tape (Tenacious tape, Melco tape, etc) and bungee cord box – an unopened box of a different (?) More Dual Lock!

PB030025 by Mike McCrea, on Flickr

I realized I was running out of Velcro a couple months ago and grabbed a box of at Walmart. I thought it was Velcro and stuck it away unobserved. It is not Velcro, it is some variety of standard profile Dual Lock. Two 10’ x 1” rolls. For $15

I have no idea which 3M secret code the Walmart Scotch “Extremely Strong” material might be. It is marked 3M, indoor/outdoor, 1000 closure, etc and in appearance identical to the SJ3550.

Off to the experimental races with both.

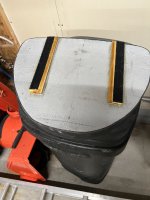
I’ll need to use both varnished wood panel trash can lids this time. Guess I shouldn’t have taken the handle off the first one and then reinstalled it. Think man, think.

PB030039 by Mike McCrea, on Flickr

I’ll need a second old bench seat for head-to-head dueling Dual Lock tests, luckily I have dozens. And another piece of Royalex and scrap gunwale stock.

Well, there’s an unexpected but valuable lesson; I couldn’t use the first (very old) bench seat I pull out. It was slightly warped, and all four corners didn’t make contact with my flat/level trash can lid “rails”. Again, luckily I have dozens of old (and not so old) flat bench seats.

I didn’t waste full slider rail strips of Dual Lock this time, but instead used smaller pieces on both lids and seat frames; with the four mated corners lined up it should make no difference.

Before I got too involved and forgetful I marked which Dual Locks were which, the SJ3550 and WallyWorld Scotch branded version appear to be identical.

PB030040 by Mike McCrea, on Flickr

Another piece of scrap Royalex (thanks Doug, I am actually starting to run low. Who knew pieces of old RX would be this handy?) and another piece of ash gunwale for the spray cover test. Three inch strips of Dual Lock this time.

PB030044 by Mike McCrea, on Flickr

As before I hard rollered the mated Dual Lock so the mushrooms were all fully connected and the adhesive backings well compressed.

PB040047 by Mike McCrea, on Flickr

On the plus side for spray cover use the standard profile is easier to connect than the low profile version. Lots easier, even by thumb pressure alone. Screw that harder-to-connect low profile stuff; I would not use it for outfitting purposes, can’t think of a household application, and I have a lot leftover.

I had a butt-sit on both seats to fully compress/bond the acrylic adhesive. I have read that the acrylic adhesive needs 24 (48?) hours to fully bond, so in a couple days I can do all of the same tests as done with the low profile Dual Lock.

PB030042 by Mike McCrea, on Flickr

I now return to my regularly scheduled boat refurbishment & outfitting channel.
 
Mike. When you refer to Velcro are you referring to the brand of hook and loop closure or to a unknown brand of hook and loop closure. To further mess with your head there are different ratings on hook and loop closures as far as how hard they grip and the 1/2 life of strength. sorry to get your head spinning. :)
 
Mike. When you refer to Velcro are you referring to the brand of hook and loop closure or to a unknown brand of hook and loop closure. To further mess with your head there are different ratings on hook and loop closures as far as how hard they grip and the 1/2 life of strength.

Dan, I was using “Velcro” in the generic sense, although the white stuff in those photos was marked Velcro on the (not waterproof) adhesive backing strip. To be more comparative I could repeat all of the tests using some outdoor self-adhesive industrial strength Velcro. Probably not gonna happen, I’m happy so far with the both the SJ3550 and Scotch branded stuff.

BTW, I ordered a 30-pack of these small stainless D-rings we talked about. Thanks for your help with those.

https://www.amazon.com/gp/product/B0...?ie=UTF8&psc=1

They are much larger than the ¼” D’s I used in the past, and the screw/pop rivet holes are 11/64 (nothing an SS washer won’t cure).

I’ll give them a shot in the current canoe project. I have no idea about the SS quality. At 30 for $16 I suspect not the best. These are probably better quality, but $9 for a 5-pack is a bit ca-ching.

https://www.amazon.com/gp/product/B0...?ie=UTF8&psc=1

I have one of the cheaper version screwed onto my outside rack next to the various paint test panels and will see how corroded it is in a year or two. I may get a friend who lives oceanside to do the same for faster results.

sorry to get your head spinning. :)

I can get that going easy enough all on my own, but thanks for the help.
 
Testing the SJ3550 and Wallyworld Scotch-branded Dual Lock

It was significantly more difficult to pry the Dual Locked SJ3550 and Scotch-branded seat frames off the varnished trash can lids. Both easily held the 37lb WorkMate platform, even with a stout bounce. I could not fingers pry them off pulling straight up against all four tabs. Pulling the ends of both rails at one side took some force, pulling a single rail end was easier, but still more stuck than the low profile Dual Lock

In the guise of an anti-sliding seat grip. or partial spray cover attachment points, that’ll do just fine. The standard profile seems much easier to mushroom hook together than the push-like-the-dickens low profile for use as below-outwale bent over/crouch down spray cover attachments.

The standard profile Dual Lock is twice as thick as the low profile, caliper measured at 1/8” thick, and the adhesive tenacity is stronger. Starting some corner lift with a razor blade and pulling the Dual Lock off the seat frames with pliers took some strength, and even at twice the thickness of low profile I tore some shreds off the SJ3550/Scotch Dual Lock before either released

PB060032 by Mike McCrea, on Flickr

That may in part because I allowed the acrylic adhesive two full days to set up.

There was no discernable difference in mating SJ3550 with the Scotch-branded stuff. I’m all but certain those products are identical.

I will submerge the Royalex and Dual Locked test panel once again, and for apples-to-apples comparison again leave them soaking for four hours. Before that submersion I have another self-adhesive immersion experiment to include, a piece of multipurpose automotive weather stripping.

PB060034 by Mike McCrea, on Flickr

I have some of that leftover from waterproofing and dirt road dust excluding the tailgate and cap door on the tripping truck. AmeriSeal Multipurpose Weatherstrip 13480.

https://shop.advanceautoparts.com/p/...480/10017524-P

The aperture in that bulb weather stripping is perfectly sized to accommodate a piece of thin walled stainless steel tubing.

PB060037 by Mike McCrea, on Flickr

I have a plan in mind to preserve our precious bodily fluids while keeping raindrops from falling off the partial DIY spray covers.

The crud test this time will include some loose threads and beard hairs. Working with the standard profile Dual Lock I found that it would snag and hold the ends of my frayed shirt cuffs.

PB060035 by Mike McCrea, on Flickr

Not as snatch-readily as damnable Velcro though. The low profile Dual Lock barely snags and holds. Yes, I tested that too.

Those may not be the final tests; I requested sample pieces of the 5000 closure SJ3571 or SJ3572 from 3M. Inquiring minds and all that.
 
Mike, great stuff, and so much to digest. Thanks for your efforts. I plan to use dual lock in a project and will report on it when it comes to fruition.
 
Mike, great stuff, and so much to digest. Thanks for your efforts. I plan to use dual lock in a project and will report on it when it comes to fruition.

Dave, I’m having a ball playing around with Dual Lock. Beats hand sanding brightwork any day.

Both the SJ3550 and Scotch-branded stuff had better stickem than the low profile on the heat sealable fabric side after a four hours soaking. I tried peeling up a corner and it seems well stuck. So too is the auto weather stripping bulb, which is awesome for my plans.

I am all but certain those are the same product; even the peel off backing over the adhesive is identical, while the low profile stuff is completely different in that regard.

Tomorrow I’ll mix a pot of crud and slather it on the SJ3550/Scotch for the clean out test, but this stuff looks like a winner.

First Glenn introduces me to peel ply in rolls, now Dual Lock. Thank you Glenn.

I mailed sample pieces of SJ3550 and Scotch to Glenn today, and to Joel. Joel is hauling a camper trailer between Maine and Florida twice a year, and I think he’ll appreciate being able to better anchor some things down on twisty roads.
 
Dual Lock Crud Test #2

SJ3550 and Scotch, and for comparison sake, both Velcro sides stuck to the same Royalex piece.

PB090042 by Mike McCrea, on Flickr

Some loose threads and beard hairs included in this batch of sludge for good measure. I do enjoy snuggling with my spray covers. (Seriously, Velcro hoodie closures with a full beard are best avoided)

PB090041 by Mike McCrea, on Flickr

As before, wetted down and press smeared on, this time left out in the sun for two days to dry

PB090045 by Mike McCrea, on Flickr

Results: Crud mostly dried in the days sunshine, using a sponge clean up/out the caked on Dual Lock and Velcro debris produced this:

PB090050 by Mike McCrea, on Flickr

The Dual Lock stick togetherness was still good, even with the remaining crud, the Velcro maybe not as much. As a last test I scrubbed them with an old toothbrush. That did almost nothing for the Velcro, the hook side is still disgusting looking (black Velcro would be better in that regard) and still full of debris.

The Dual Lock cleaned up decently with a few toothbrush swipes.

BWAHAHAHA! Not actually the last test. Remember the DIY trash can lids* that I used as faux-slider rails for the seat experiments? Those are trash can lids. They live outside, exposed to UV, rain, snow, and pollen. And will soon befuddle the trash men when there are empty beer cans mysteriously stuck to the top of the lid.

OK, in an effort to not be a jerk, maybe full cans of something else they might enjoy while bumper riding house to house; trash pickup is at dawn, and I don’t think those guys are quite ready for a beer yet. Maybe a Yoohoo, or a Monster Energy drink

I will report long-term UV and weather results in a few months. Or years.

And I may lurk at the top of the driveway to witness them doing rock-papers-scissors for choices between a Yoohoo or an energy drink.

*OK, an explanation of the DIY trash can lids. Our trash pickup spot is atop the windy ridge. Cylindrical trash cans will end up the next county over. Those are Rubbermaid “Roughneck” cans, rectangular, so they don’t blow away, 30” tall, so they fit in the back of the truck or SUV. Two of those cans are 20 years old. The can part is still good, but the ancient lids finally crapped out from UV exposure.

Can’t buy just lids, so I DIY’ed a couple, and bought two new “identical” Rubbermaid Roughnecks. The cans are the same thick plastic, but the lids are now made from plastic as thick and UV resistant as a soda bottle. In a year’s time those crapty plastic lids were UV brittle, busted pieces missing, kaput.

That may be the worst “planned obsolescence” I have ever encountered. Eff you Rubbermaid, I’ll make my own dang lids. And use them as repositories for leftover varnish and paint. And long term Dual Lock testing

PB080022 by Mike McCrea, on Flickr
 
I thought the following exchange from Mike's DIY No-Sewing Spray Covers thread would be a useful capstone summary for this thread:


Originally posted by Glenn MacGrady

Are you using the [standard] or low profile dual lock, and why?


Originally posted by Mike McCrea

Standard Profile. The height difference is negligible; low profile = 1/16”, standard profile = 1/8"

Why?


Per 3M the low profile loses 50% of strength after 100-150 removals. The standard profile SJ3550 or Scotch-branded Dual Lock (same thing) loses 50% of strength after 1000 removals.


Per the Dual Lock experiments the standard profile SJ3550 has stronger adhesive, is easier to press connect, is easier to clean when crud encrusted, and has significantly stronger grip when snapped together.


Originally posted by Glenn MacGrady

That's a helpful summary of [standard] vs. low profile Dual Lock. From the short pieces of each you sent me, I find the low profile easier to pull apart, however, which may be good or bad depending on the application.


Dual-lock on Foam(s) Experiment and Results

The question of using industrial strength Velcro or Dual-Lock to adhere a removable dog pad in a canoe arose, and I thought it worthy of continuing the Dual-lock experiments. The same question was also posed as a way to install removable kneeling pads.

With kneeling pads the Velcro or Dual-lock would be in the oft wet and dirty bilge, and while the self-adhesive on the Dual-lock has proven durable when repeatedly wet, the issue of collecting dirt and debris would bilge water would remain. For a removable dog pad, with the Dual-lock possibly adhered further up the chines, that issue would be lessened but not completely eliminated.

The test pieces; ensolite sleeping pad, minicel, exercise flooring and a DIY vinyl covered pad.

P4050003 by Mike McCrea, on Flickr

The self-adhesive on Dual-lock needs a day to fully set up, and clamped or weighted firmly in place helps.

P4050004 by Mike McCrea, on Flickr

Unclamping the Dual-locked test pieces 24 hours later, I used one of the trash can lids I stuck Dual-lock on two years ago in the previous experiments. Still firmly attached, which is a testimonial to Dual-lock’s “low surface energy acrylic adhesive”.

I started with the foam I suspected to most easily fail, the ensolite sleeping pad. The good news is that it (and all of the foam pieces) audibly clicked mushroom capped into place.

The test plan was to first carefully peel the foam off, then yank it off. There was no ensolite yanking, even with a slow careful peel the Dual-Lock released from the ensolite with all the tenacity of a Post-it note. That’s a fail.

P4060005 by Mike McCrea, on Flickr

Next the minicel. It was better adhered, but still no yank needed; the careful peel required more pull, the Dual Lock pieces again came off stuck together, but the adhesive backing pulled some minicel off with it. Another fail.

P4060006 by Mike McCrea, on Flickr

Next the un-embossed side of the exercise flooring. The Dual-lock stayed stuck with a gentle pull, best of the foam test pieces in that regard, but failed on the first yank.

P4060007 by Mike McCrea, on Flickr

Then the embossed side of the exercise flooring. A bit of a surprise there; I thought the harder surface embossed side would provide a better adhesive surface. Not, the Dual-lock adhesive let go even with a Post-it Note tug.

P4060009 by Mike McCrea, on Flickr

Lastly, the vinyl covered DIY seat pad. Carefully pulled, yanked, then repeatedly and vigorously yanked, no problem; the piece on the vinyl pad stayed stuck. With that proof-of-concept I peeled the Dual-lock off the pad cover by hand; it was well stuck and took some doing.

P4060010 by Mike McCrea, on Flickr

Not that I ever had such inclinations, but that settles it; no naked foam attached with Dual-lock (or Velcro) on my hull. YMMV.

A time and weathering note about the Dual-lock test strips attached to the garbage can. The short piece is High-Profile Dual-lock; still clean, functional and well attached after 2 years of weathering and exposure.

The long piece is Low-Profile Dual-Lock, also still clean and well attached. The Low-Profile has, and always had, less tenacity than the High-Profile, but it too still works.
 
An option to use Dual-lock with minicell foam is to first attach a very thin strip of wood (like 1/8/ or so thick) to the minicell using contact cement, and then apply the Dual-lock over the wood strip. I’ve used this to successfully mount a carved minicell seat to the floor of a pack canoe - holds firmly through multiple on and offs. I also ran a tiny bead of epoxy along the edges of the Dual-lock for extra holding insurance, although not sure that is necessary.
 

Attachments

  • D4A5C85E-9D4B-4413-B71A-2346D9BBF8EA.jpeg
    D4A5C85E-9D4B-4413-B71A-2346D9BBF8EA.jpeg
    138.6 KB · Views: 4
Last edited:
Back
Top