• Happy Winter Solstice! 🌇🌃

New project... 17.5' Atkinson Traveler

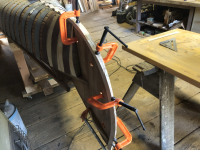
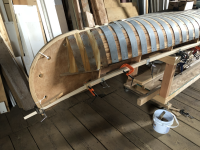
Stem blanks are off the stem form, and on the canoe form! No bending defects. I was a little surprised by the amount of spring back once off the stem form, but clamps brought them tight to the canoe form. The stem blanks are not yet notched for ribs, or shaped for the planking bevel. This will reduce the stiffness, and presumably result in less resistance to bending into the canoe form. tempImage9TLbJy.pngtempImager6SigD.png
 
Here's the grain orientation diagram:
tempImagec3uVrg.png

Patrick, another non-builder question from me so I can understand this process better.

I understand your diagram to show two different grain orientations for the stems. But is it meant also to suggest that you bent only one piece of wood on the first try, but two pieces of wood on the second try? Stated differently, do you bend one piece of wood on the form to create both stems and then saw that bent piece in half to create two stems; or do you use the form twice, once for each stem?
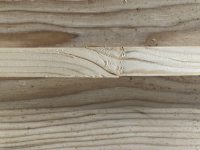
Glenn, I think the standard practice is to bend one blank which is subsequently sawn lengthwise to create two bent stems. After my initial failure I decided to rip the next double-wide blank into two 7/8" square blanks, and rotating them 90 degrees into vertical grain orientation. I then bent them together. There were absolutely no defects on the resulting bends.

The failures I saw in the first bend were all associated with the flat grain orientation so I decided to try vertical. It worked.

I watched a number of steam bending videos here, which were very helpful.

 
I'm going for the marathon length build record on this one...

Actually, I got focused on really diving into the restoration of the early Chestnut Bobs Special. I did finish all the repairs and got her into canvas in mid-October 2023 and will prime, paint, and complete that canoe when weather conditions allow in Spring. Similarly, I will get to the rib steaming on the Atkinson Traveler in warmer weather as well. In the meantime I milled the Spruce inwale stock, tapering the ends for a "slim" appearance at the decks. Unfortunately, one of the pieces broke at a spot of bad grain near the upsweep of the sheer. Back to square one on that one! Here's the side that went well. The sweep is pretty gentle, and these inwale pieces were neither soaked or steamed for installation on the form. Because of the tapering they bend pretty easily at the tips. tempImageHnNvSw.png
Bad grain at the failure spot:
tempImageOHTvYF.png
Tapering the last 18" of the inwales where they meet the deck sides:
tempImagexOD25g.png

The inwales are tapered so they will look like this when the deck goes in:
E19E51EC-62C0-4729-992F-EBF258035C18.jpeg

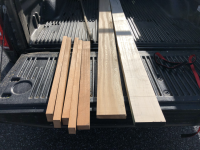
And finally, I just picked up some hardwoods today. Mahogany for carry handles, maybe seat frames; quarter sawn tempImageES483j.pngSycamore for thwarts & perhaps seat frames (the decks will be Sycamore) instead of mahogany; and some curly Maple for two paddles.

I am considering caning the seats like these found in a Gerrish canoe recently restored by Zachary Smith, https://www.facebook.com/photo?fbid=763110889185782&set=pcb.763111435852394:

C4F1C903-30D7-4C24-8F17-5403313A383D.jpeg32811B28-C8E9-4D4E-A057-334E7E62A39A.jpeg
 
Last edited:
Bummer about the split. It’s going g to be a dandy though. I like the wood choices- it will stand out in a crowd!

Bob
 
With apologies for the long delay, I will begin adding pictures and commentary about this build. There has been some discussion over on wcha.org about the canoe and I will copy and paste much of that directly into this thread. I have progressed quite a way since my last posting and as of today the canvas is stretched and I'll begin that phase tomorrow.

After waiting a long time to acquire 18' stock for inwales (Sitka spruce), I'm finally getting this project going. I ended up buying some materials from a fellow in mid-Hudson, NY and along with the material came an old 18' St. Lawrence Boatworks Co.- called a WhistleWing'- canoe to be restored in the future!

From my reading I gather it's common to simply dry-bend the inwales onto the form. I did this successfully but I had this nagging fear that there was so much tension in the wood that once ribbed, and planked, that there would be deformation once the canoe was off the mold. So, I removed the clamps, allowing the stock to straighten back out. They retained virtually no shape from having been dry-bent! I steamed each end with the plastic bag method quite successfully and clamped to the form.
tempImagelmOvyT.png


Working alone I steamed (in a standard steam box) enough ribs to do the middle third of the canoe. After shimming the rib tightly under the strong back, I first bent one side and spring-clamped to the inwale, then quickly went to the other side and repeated the process. I think it's conceivable that the second bend had a bit more resistance than the first side due to cooling, but I had no problems other than one rib which catastrophically failed due to poor grain structure. I later went back and pre-drilled, then nailed the ribs to the inwale. The second day my brother assisted and we easily bent the ribs together, again first clamping then going back and nailed. Our third session ended abruptly when my steam vessel ran out of water prematurely (guess I had the flame up too high), and we both smelled smoke. In spite of that, we pulled the ribs out one by one, and had no issue bending on 11 ribs that only had residual steam in the box. All that are left are about 5 ribs at each end, albeit the ones with the most radical bend at the stems!

tempImage7pqdvV.png

tempImageYRi9ie.png

tempImagefrMWtA.png

tempImageSIgF7O.png
 
After a week away working in Vermont, I returned to the barn/shop and at Mr. Thurlow's ( the Atkinson Traveler designer; Northwood Canoe Co.) suggestion I steamed and installed the last, sharpest rib bends at the ends of the canoe. Logic suggested that a strongback directly over the stem recess would allow me to insert shims to tightly hold the rib to the stem and inhibit splintering. So I bandsawed a 2x4 scrap and fastened it in place at each end.
tempImage1040bH.png

tempImageoj2yM0.png


Next I set up the steam rig with a plastic bag this time to accommodate two previously bent ribs from another project which didn't work out for that canoe. These had been bent over a Chestnut Bobs Special for replacement and were in good shape other than that they didn't take the final shape I wanted to fit inside the old canoe. I assumed there would be breakage so I would make my first attempt at this sharp bend with ribs that were already 'discards'.

tempImageRDImCy.png


Once steamed for about 40 minutes, I knew the ribs were ready because the shape of the ribs had relaxed in the steam to nearly straight again! I removed the first rib from the bag, placed and shimmed under the strongback, lo and behold.... the first one bent like a limp noodle with absolutely no problem or splintering! Stunned but emboldened, I grabbed the other 'discard' rib and repeated the process with the exact same result. I had been dreading the possibility of damaging several rib blanks and here I felt like some sort of pro!

tempImagegnk4Ts.png

tempImageI8jUeI.png


Now... it's on to planking. Ribs were faired with a 60 grit long board sander I made from two slabs of 3" wide Masonite and rib-stock paper holders under two newel post knobs screwed through the masonite:
tempImaged4eVRp.png

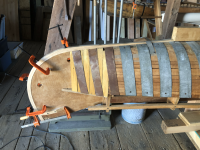
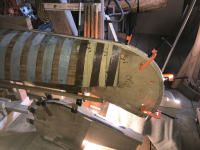
I struck a centerline on the canoe, selected and laid out the garboard strakes, and will commence planking tomorrow. In Thurlow & Stelmok's book, Building the Wood Canvas Canoe, Jerry Stelmok describes using 18ga. steel nails to fasten the planking to the stem in between ribs. I was surprised at this, though in each of the restorations I've done the planking was nailed into the stems with steel. Planking which crosses a rib at the stem gets bronze ring shank nails. I'm wondering if 5/8" nails, pre-drilled, are sufficient for this?
tempImageHn5kRX.png

tempImage0MgyGV.png
 
"You are right in that the planking to stem fastenings should be the 5/8" bronze ring nails. It also helps to predill with a 1/16" bit.
When Jerry and I wrote the book the shortest and smallest bronze ring nails that were available were 7/8" #14 which were way too long and way too big for the stem work and that is why the small steel nails were recommended but followed up with a #14 bronze ring nails that would need to be predilled with a larger dill bit and the nail cut shorter so not to come all the through the stem. It wasn't long after the book came out that I bit a risky bullet and custom ordered 100 lbs of the 5/8" #15 ring nails. The demand for the nails increased over the years so that Standard Fastenings started to put them in their catalog so now they are fairly easy to get but not possible in 1986."

"Rollin Thurlow"


Some progress. Planking on the form is now complete, the half built canoe lifted off the form, cant ribs installed, inwale/stem joints complete. It is interesting to see the inside of the canoe for the first time... and recognize some minor mistakes made! There are a couple of phillips head impressions left on some ribs from the metal band fasteners which will need sanding out. My bronze 7/8" nail points penetrated through the stems where ribs were nailed to them. They are now filed off and are now part of the character of the canoe.
tempImagec439P2.png

Off the form:
tempImageyHWc72.png

Excess rib tips cut off:
tempImageKXwQQS.png

Ready to finish planking:
tempImageT9qQlX.png

tempImage9O3k9t.png
 
Nearing the end of the planking process it suddenly dawned on me... I haven't made decks, thwarts, seat frames yet! So while I'm plugging away at planking ( the hard part is using the planking material I have on hand wisely and arriving at a pleasing planking pattern!) I have started work on the decks.

Decks, thwarts, and seat frames will be made from quarter sawn American Sycamore (Platanus Occidentalis) https://en.wikipedia.org/wiki/Platanus_occidentalis. It has a really interesting figure when quarter sawn, especially where the decks and thwarts will be crowned. It is a species of tree quite common here in my part of Pennsylvania, and last year I made a paddle from it which I like... so, why not?

tempImageRJwitx.png


Decks:
The underside is coved with this jig on my table saw. The 5/4" block screwed to the underside of the deck blank creates the limited cove shape seen on the finished underside. Care must be taken to only take tiny incremental cuts otherwise the blade would throw the work piece!! I guess the smart thing would be to put a fence/guide on both sides of the blank.
tempImage3VmJXJ.png

tempImagekol94y.png

812597E2-F842-427B-835B-A503A6CE534B.jpeg

And, sawn to shape:
tempImagels2Dsd.png

Starting to crown the upper surface:
tempImageDTbqQc.png
 
October 6, 2024

I'm trying to decide on seat frames today while watching varnish dry; 3rd coat, 1st was 50/50, 2nd 70/30, 3rd full strength gloss.
tempImagepbIcpD.png

tempImageveIctx.png


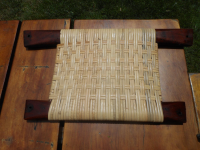
I'm attempting to work out the hole spacing for a balanced look to the cane pattern, and while doing so, in the back of my mind I've been thinking about caning in an entirely different manner which would require building the seat frames differently as well. My thought is to use a Brodbeck or Nutting style seat. Not so much the shaped rails (but perhaps to some degree) but rather the non-hole, wrapped and woven cane style such as these:

Photos I've shamelessly lifted from several discussions here on the forum: Attribution to 1905Gerrish, Al Bratton, and Michael Grace respectively.
BEF28342-4253-4D6B-B0A6-38BDE4705886.jpeg

ED97FC93-CE79-4BEE-B76F-02D9F1F3DF71.jpeg

D6BA3925-6257-4D2E-A889-C3C0D46EB9EC.jpeg

7355E28B-4F3A-41BA-B92D-96F0C7CE2B2C.jpeg

B1112B57-9373-45F9-8D05-DBA256D34C9E.jpeg

I note that in each case, the seat 'stretcher' is a dowel rather than a shaped piece like the rails. Some patterns have a 2x2 strand pattern, some 3x3. I think this is determined by the size of the cane used- perhaps 2x2 uses larger binding style cane. Knowledgeable folks are encouraged to chime in.

The next consideration is whether these seats are ridiculous in the Atkinson Traveler I'm building, or a welcome diversion from the typical cane patterns. Your thoughts?
 
If I go with the alternative seat weaving, I'll probably make thwarts and seat rails like this. Just a quick & dirty experiment so far on a piece of Spruce. Tapered ends, gently radiuses edges, tapered upper surface on an arc as well.

tempImagey8yAdI.png

tempImageEHfC53.png


On a different topic, I have a number of small knot holes to fill in my planking. I managed to put most of them on ribs so with the exception of two minor spots. I thought of filling with a two-part wood filler but I'm concerned that the resulting hard filler could detach and migrate under the canvas after some time. Any alternatives? Maybe just linseed oil based window glazing? That's apparently what I've found on several restorations.
 
October 14, 2024

Some progress. Thwarts are rough shaped:
IMG_1229.jpeg


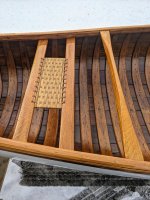
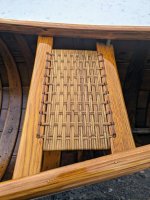
Seat frame components rough shaped as well to mimic the thwarts. The cross rails will be 3/8" Oak dowels rather than 3/4"x1 1/2" stretchers one normally sees, and the holes for these have been drilled. I am going to go with the woven cane seat shown here:

1730070847298.png


IMG_1332.jpeg

IMG_1331.jpeg


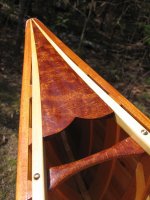
Decks are installed:
IMG_1316.jpeg

IMG_1315.jpeg


I have gone over the hull and done quite a bit more tack clinching, and now have 4 coats of gloss varnish in the interior. Once all varnishing is up to the same level, I'll make final coats with semi or satin to knock down the gloss a bit.
 
Back
Top