• Happy National Zipper Day (pat. 1913)! 🤐

Mad River Explorer Royalex 16

Joined
Feb 2, 2019
Messages
11
Reaction score
1
Picked this up dirt cheap, for a winter project. Needs a lot of work 2 large cracks 1 completely through to inner hull, wrinkles and 1 large dent.

Planning to paint, repair cracks, seats and wrinkles/dents if possible.

This is is my first attempt at canoe repairs so any info on materials and techniques are appreciated. Willing to spend a bit on materials/tools to return this canoe to its former glory.
 

Attachments

  • photo11013.jpg
    photo11013.jpg
    399.5 KB · Views: 0
  • photo11014.jpg
    photo11014.jpg
    132.6 KB · Views: 1
  • photo11015.jpg
    photo11015.jpg
    228.2 KB · Views: 0
  • photo11016.jpg
    photo11016.jpg
    366 KB · Views: 0
  • photo11017.jpg
    photo11017.jpg
    252.9 KB · Views: 0
Paint....Meh! Why bother
Cracks....Gflex + multiple layers of S-Glass
Dents....hair dryer, use extreme caution
Seats....if the hangers and frame are still ok just diy with nylon webbing

I'll leave the techniques to someone else with more finesse but that huge crack on the outside will need a fair bit of the foam scraped out and filled with Gflex (after getting rid of the bulge).

No doubt there will be some other ideas
 
Nice find, had to look that boat up! Seats as recped said just get the cane out and then put webbing in, an easy job. The bubble in the hull, never seen that before but may a heat gun or hair dryer to try to push it back down? The cracks, especially the one on the outer hull I would smooth out the edges of the crack, fill with G-Flex even with the hull and then lay down a layer of Dynel cloth with a mix of resin and G-Flex much like a skid plate. Dynel with that resin mix I mentioned with make a rock solid fix, believe me, done it to my Courier and that's seen a lot of rivers with lots of rocks.

From the pics the seats look pretty good. Take a good look at the ends and look for rot around the bolt holes. I use G-Flex to plug them and treat the ends and then re-drill for the bolts.

dougd
 
Gflex comes in 2 types, get the thickened variety. Somewhere on the west systems website is a white paper on this exact canoe repair. Just follow those instructions. I added fiberglass reinforcements to both sides as advised above. Spray with rustoleum when it cures.
 
The big bump will be the tricky part, if you mess up you could literally destroy the boat or leave yourself with an area susceptible to failure. I wonder about "preheating" using a space heater and then doing the final warming with a heat gun. You definitely don't want to melt the foam core, you might want to find an extra pair of hands since you need to heat from both sides and apply pressure at the same time to push it back into something more closely resembling the original shape (at least enough to tighten up that big crack).
 
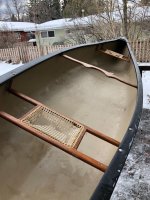
What Recped and Doug said about dents, cracks, seats and paint.

For a heat source to help push out the dent a halogen floodlight has worked very well. Like one of these

https://www.walmart.com/ip/HT-500-WA...4a&athena=true

Position that lamp 12 – 18 inches away from the dent and check to make sure the vinyl skin isn’t getting too hot, move the lamp back or forth so that the hull is no hotter than you can stand to touch briefly with your hand. The lamp will easily heat a largish area, slowly, through and through, and you don’t need to stand there for waving a hair dryer or heat gun around. BTW, you can easily melt the vinyl if you rush with a heat gun.

Have a board (piece of 2x4) pre-cut that you can use to force out the dent, maybe propped off the bottom of the seat. You’ll want a thick piece of stiff foam or something hull curve shaped to pad the end of the prop board, so you don’t force out a 2x4 shaped rectangle. Test fit all of that before heating the dent so you know how it fits in place once the dent has been heated to softer flexibility.

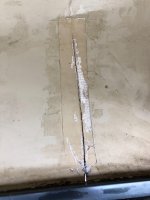
Leave the prop board in place until the hull has cooled. Or longer; I have never worked on a dent in that close proximity to a crack and would leave the prop board in place until the crack on the exterior has been filled and patched. It appears that the crack might squeeze more closed with the dent pushed back into position.

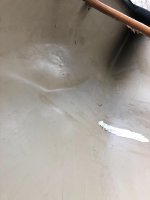
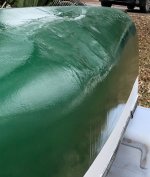
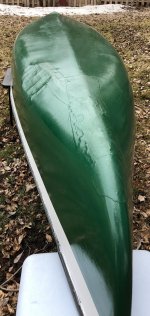
The photo of the dent on the inside looks like it matches the dent on the outside but, if after pushing the dent back into place the inner vinyl skin appears to be delaminating you can slice an opening, push some G/flex under the vinyl and weigh the skin down; put a piece of wax paper over the slit delamination and pile some large Zip-lock bags full of sand atop the wax paper.

If you do decide to paint the hull use a paint color as close as possible to the hull color, so that the inevitable scratches through the paint won’t show as contrasting fugly. Brush on oil based enamel paint works well enough.

EDIT: Do not use acetone to clean the areas where the foam core is exposed. Acetone will dissolve the foam, and keep dissolving it until you have a soft gooey mess.
 
Last edited:
Thanks for all the help, I’ll try to update with progress pictures later in the week.
 
Here is the finished product, Gflex and a dynel/resin mix made the smaller repairs and skid plates easy. The large dent was really tricky to work out evenly. After doing all I could with a halogen lamp and firm pressure I ended up filling the deeper sections with Dynel patches to try and get the hull back to original shape. not real proud of it but confident it will work. My girlfriend really wanted to give it a good paint job so I let her take the reins on the cosmetics/design.

All in in all good first project excited to find another soon! Thanks for all the help gents!
 

Attachments

  • 8A67D032-6C74-4FC8-B7D6-9F0E87EA9875.jpeg
    8A67D032-6C74-4FC8-B7D6-9F0E87EA9875.jpeg
    354 KB · Views: 0
  • 018FCC4F-0DA2-454C-87E6-F9DAD59FFE89.jpeg
    018FCC4F-0DA2-454C-87E6-F9DAD59FFE89.jpeg
    661.4 KB · Views: 0
  • E0030C29-9E6B-4279-BDC1-F3F9EFFE8570.jpeg
    E0030C29-9E6B-4279-BDC1-F3F9EFFE8570.jpeg
    764.8 KB · Views: 0
Last edited:
.
 

Attachments

  • 2A4D3A40-DFC4-4882-A85F-98AF53215D07.jpeg
    2A4D3A40-DFC4-4882-A85F-98AF53215D07.jpeg
    383 KB · Views: 1
  • 4347AC7A-55D6-4C38-9B0E-1832AA9616AC.jpeg
    4347AC7A-55D6-4C38-9B0E-1832AA9616AC.jpeg
    323.1 KB · Views: 1
Back
Top