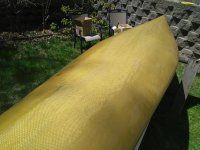
• Happy World Toilet Day! 🚽🚾

How to skin a Wenonah

Joined
Dec 16, 2016
Messages
691
Reaction score
706
Location
Bangor, Maine
I've been vicariously enjoying the builds that Jim Dodd and Deerfly have been doing, and with nice weather today, I decided to start on a restoration project that's been on my list for a long time.

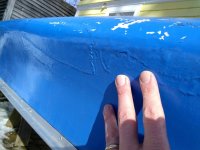
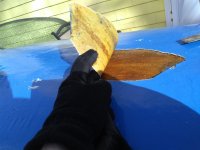
I have this old 1984 Wenonah C1W in kevlar ultralight. It's a beater boat with a lot of battle scars. At some point a previous owner decided to put a "new bottom" on the boat in the form of three big pieces of cloth, each about 5 feet long. I'm not sure what the material was, maybe 6oz e-glass, something from the auto parts store, potatoe sacks, who knows. Anyway these big patches had started to delaminate badly, coming off in chunks and allowing water between them and the original hull. This is my go-to solo boat these days, so I figured I'd bite the bullet and do an overhaul.
fetch
fetch

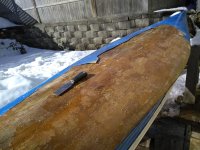
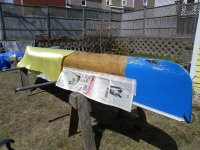
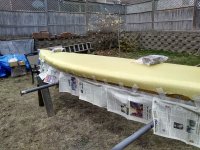
The only tools I used in tearing off the crap were a putty knife and a paint scraper. Mostly I just used my gloved hands. The fabric had deteriorated badly (UV?), and it tore as easily as duct tape.

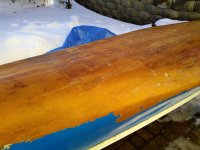
I'm happy with what I found under the lizard skin. Sometimes the demo is the scariest part of the project, since that's usually when you find out things are worse than you thought. My biggest worry was that only half the crap would come off, so I'd be stuck working around the stubborn pieces, but that turned out not to be an issue. The newly exposed hull is in better shape than I expected. I still have a lot of sanding and scraping work to do before it's ready for its new underbelly, but there's nothing fundamentally wrong.

I collected all the debris in a trash bag and weighed it: 5.5 lbs. Depending on what I add, this boat may lose a couple pounds on net. It was in the neighborhood of 41# when I started.

I haven't decided what fabric(s) I'm going to use. I might just add one layer of 6oz s-glass and call it good, or I might do a layer of kevlar by itself, or a layer of kevlar followed by glass. Suggestions appreciated! The way Wenonah lays up these boats, with a diamond shaped foam core in the football area and not much outside it, they're very vulnerable to rock strikes just above the waterline. I wouldn't mind adding some toughness. It's too cold for epoxy work now, so I have some time to think about it.
 

Attachments

  • photo8962.jpg
    photo8962.jpg
    100.1 KB · Views: 5
  • photo8963.jpg
    photo8963.jpg
    91.1 KB · Views: 5
  • photo8964.jpg
    photo8964.jpg
    137.2 KB · Views: 5
  • photo8965.jpg
    photo8965.jpg
    151.7 KB · Views: 5
If you're looking for toughness, nylon or polypropylene works well.
Abrasion resistance, see above for mild stuff, if serious protection is needed, nothing is better than Dynel.
If all you're looking for is to make the hull more presentable, 4 oz E-glass should do the trick.
I'm assuming that structurally, the hull as built is adequate, shouldn't need to add strength. However, if you need more strength, add glass and/or glass with foam (Divinycell)to the INSIDE.
IMHO, S-glass and Kevlar are overkill, especially for that hull.
 
After you get the resin off, you might make a better assessment, But if weight really isn't an issue, I'd think Stripperguy's suggestion of Dynel, might be the ticket.
I have some I want to try on a fiberglass Snow scoop.a " Wonder Scoop" !

The tight woven S-glass I used, was a royal pain, but it came out pretty smooth !

Jim
 
If you're looking for toughness, nylon or polypropylene works well.
Abrasion resistance, see above for mild stuff, if serious protection is needed, nothing is better than Dynel.
If all you're looking for is to make the hull more presentable, 4 oz E-glass should do the trick.
I'm assuming that structurally, the hull as built is adequate, shouldn't need to add strength. However, if you need more strength, add glass and/or glass with foam (Divinycell)to the INSIDE.
IMHO, S-glass and Kevlar are overkill, especially for that hull.
My thinking re Kevlar is that really this boat is a lighter layup than I'd spec if I was ordering or making one, and if I have to add a bottom layer anyway, why not add some impact resistance.

Dynel is really intriguing, but the thing that concerns me is that it's supposed to expand as it wets out. My boatbuilding chops are extremely limited (i.e., I've never built one), so I'm hoping to keep this a simple, surface laminate type job, where I can just distribute the epoxy with a roller. Can one do Dynel without peelply or similar?
 
After you get the resin off, you might make a better assessment, But if weight really isn't an issue, I'd think Stripperguy's suggestion of Dynel, might be the ticket.
I have some I want to try on a fiberglass Snow scoop.a " Wonder Scoop" !

The tight woven S-glass I used, was a royal pain, but it came out pretty smooth !

Jim
Yes, I have to clean it up to get a good look. It's amazing how much cruft there was between the big patches and the original hull -- presumably the remains of older patches. Hull archaeology.

I say weight isn't an issue, but I was just picking up the boat and boy it sure is light! If I just did a 4 oz glass layer I could probably keep the weight to ~37lbs or so. But anyway, I portage royalex boats on my head so whatever.

That satin s-glass makes a great looking hull.
 
The Dynel with fill coats of Graphite, would be a good route, for durability !
In my early days, we graphited a few bottoms. While it tends to slip over rocks leaving small scratches, it has it's drawbacks. Left out in the Sun, bottom up, can Bubble the graphite coating. This happened to a friend. So I learned .

Jim
 
Wow. And I thought glassing a wood/canvas boat constituted heresy.
 
Dynel application, different than what I'm used to seeing.

https://youtu.be/WdaPecHY4VQ

Louis really has a great handle on things !

Jim

Thanks, that's a great video. Hearing him talk about what a PITA Dynel is makes me even more reluctant to try it as a full layer. However, I think I'll buy a yard or two just to try it out on stems and skidplates.

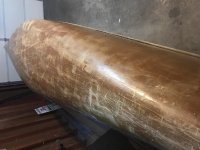
I scraped the bejeezus out of the Wenonah today, probably took another half pound off of it. It's definitely not watertight, but for all its scars there actually isn't anything missing from the original cloth. My intuition is that I should do a pseudo "fill coat" of epoxy on the original hull to smooth things out a bit, then sand and prep for the new layer of Fabric X. If I sanded now I'd have to avoid several deep scratches that go down to fabric and make fuzz.

n.b., In the photo, the near side of the boat looks lighter, but that's just because it's next to my yellow house.
 

Attachments

  • photo8967.jpg
    photo8967.jpg
    430 KB · Views: 5
That looks eerily similar to the 84 Jensen I reglassed and posted about this summer. It also has a few smashed in points like yours seems to have. I sanded it and just laid 4 oz E glass over it before applying the epoxy all together. It looks a lot better now but didnt give it all the strength I had hoped, as the tender chine took a crack when dropped on a BWCA portage. Not sure if its the age of the Kevlar and resin or just how the previous owner stored it, but I would error on strength if yours shares the same characteristics as mine.

In in any case, glassing will make for a smooth plug on a future build!
 

Attachments

  • photo8974.jpg
    photo8974.jpg
    397.9 KB · Views: 5
  • photo8973.jpg
    photo8973.jpg
    239.4 KB · Views: 5
That was a good vintage! Thanks for the pointer, I went back and reread that thread.

With this layup they seem to assume a certain amount of helpful flexibility with the kevlar and the resin up the sides. The cloth is one layer thicker on the bottom extending a few inches outside the diamond of foam core, but beyond that it's wafer thin. Maybe when the boat reaches a certain age the resin isn't flexible enough for that to work, even if the fabric is still strong enough, so it cracks but doesn't tear.

I'm leaning toward adding a fresh kevlar layer. A 38" wide strip would go just around the chines, and I could trim to that level (2-3 inches above the waterline) fore and aft. I'm guessing that would add ~3-4 lbs. Did you weigh your boat before and after you added the glass? How much resin did it use?
 
Yeah, I love that boat - fast tripper and we pack light anyway. Unfortunately I didnt weigh it before, but the difference in the factory weight and new weight is about 3 to 4 lbs. Gunwales were changed too, though. Epoxy: 3 cups, maybe more? If you dont have any cracks or tears on the sides and it still seems bendy, you might be in good shape. Those foam cores are solid and will far outlast the thin chines and sides. Maybe a full layer of Jims new S-glass would do the trick for abrasion resistance, a little strength and waterproofing? Do you do a lot of rivers and rapids or primarily flat water? That might play a factor in your decision. Well it is still in the teens (F) here, so you have some time to decide!
 
My sides seem fine. The most beat up area is right in the middle of the bottom, but as you say, that's the thick part.

I am doing some whitewater with this boat. I'm not as hard on it as the previous owner, and I switch to a royalex boat if I'm expecting very bony conditions, but realistically it has more hits in its future.

3-4 lbs for a full layer sounds pretty good. Maybe I can stay under 40 lbs.
 
Nice, happy to hear the sides are still solid. Maybe that lizard skin gave it some UV protection! I can see why youre considering a partial layer of Kevlar, shouldnt add too much weight Id imagine. Looking forward to seeing how it goes!
 
Goon, now this is what I call a real project! :)

I had a conversation with Jon at Soller composites and he thought vectran would be a better alternative to dynel. He only has vectran in 12oz I think and I wanted to stay conventional aramid/kevlar in the 5-6oz realm so I didn't try vectran but plan to on a future project.

The way I would look at this is you can't avoid adding 5-8lbs to that hull regardless of what fabric you choose. All will be better than what you had before you started. It really comes down to cost.

Personally I'm really impressed with the 5oz kevlar 4 harness weave I used on my NorthWind, but depending on how and where you use the canoe, you have to coat the kevlar with at least some 4oz cloth to fair it and give some scuff and scratch barrier to avoid the fuzzy's after some abuse. Its about $15 a yard which is in the s-glass realm too.

If I were doing this face lift I would scrape and sand the grunge layer off. Wash well with acetone then coat with some medium viscosity resin or low density with some cabosil added to thicken a bit. Then dust with some high build epoxy primer, microballoon putty and fair to taste. Then cover with fabric of your choice and also do the football with graphite enhanced epoxy.

- eric
 
That is a heck of a restoration project.

In many ways you got lucky that the previous owners new bottom was so badly installed, and with crappy materials. Auto store Eglass and poly resin? A better job of that, with Vinylester or epoxy would have been a much bigger challenge.

I love Dynel for skid plates and other wear areas. The first time I used Dynel was repairing the bottom of a friends glass and kevlar poling canoe. His choice to use Dynel and he shaped the hull length football for best protection.

Today I would be ashamed of our Dynel and epoxy work, without peel ply that football need a deep fill coat of epoxy, wet sanding, and a couple coats of varnish to finally be smooth.

The end result actually looked pretty good, but that Dynel blanket and fill coats added noticeable weight.

Our glass and nylon boats have held up well. Well scratched, but well. Same for the S glass over kevlar hulls, and some of those have endured serious whacks. Near all of those do have Dynel and Graphite powder skid plates, and all show their sacrifice in scraps and scratches.

Dynel at least as skid plates.

I will be curious with what you skin it. SSKK is a common schedule acronym, and you already have the K layers. Maybe the S layer?

Does anyone here know what materials and resin Wenonah was using in 1984, in kevlar ultralight. It is not Tufweave poly and glass if it is an ultralight. Any S glass in that UL kevlar?

I would get the hull to where I could RO sand it, fill and fair and divots or cracks, and cover it with a blanket of S glass and epoxy resin. Maybe even laid as partials, a long belly piece and two shorter stem pieces, so the warp and weft of the fabric conforms better along the curves and tapers, especially near the stems.

https://en.wikipedia.org/wiki/Warp_and_weft

The bigger the piece of fabric the harder it is for me to get it aligned working solo. With something even 3 feet long a second pair of hands helping for 60 seconds is good to have, especially with two pair of eyes sighting alignment, instead of just me facing it sideways and wondering how it looks on the other side.

I will keep my fingers crossed for a warm sunny day in Maine, when you can don PPE like you are working biohazard level 3, and spend a couple hours RO and hand sanding

The worst part of RO sanding a composite hull for me is the harmonic THRRUMMMMM the canoe can make. Beyond the respirator and goggles I need ear muffs. That sound alone takes it out of me.
 
Goon, now this is what I call a real project! :)
Indeed. I feel like I could quit my job and spend months dinking with this boat. Good thing it's too cold.

I had a conversation with Jon at Soller composites and he thought vectran would be a better alternative to dynel. He only has vectran in 12oz I think and I wanted to stay conventional aramid/kevlar in the 5-6oz realm so I didn't try vectran but plan to on a future project.

The way I would look at this is you can't avoid adding 5-8lbs to that hull regardless of what fabric you choose. All will be better than what you had before you started. It really comes down to cost.

Personally I'm really impressed with the 5oz kevlar 4 harness weave I used on my NorthWind, but depending on how and where you use the canoe, you have to coat the kevlar with at least some 4oz cloth to fair it and give some scuff and scratch barrier to avoid the fuzzy's after some abuse. Its about $15 a yard which is in the s-glass realm too.

I'm actually very relieved to hear that, because yesterday I ordered some kevlar from Sweet's, and I think it's the same stuff (5oz, 4 harness satin, style 285). Dave was very helpful on the phone, and I overcame my fear of non-plain weaves.

The bad patches I removed didn't extend all the way to the stems (think of a hotdog too long for the bun), and while the ends could be smoother, they're solid. So, I'm basically going to cover the middle 14 feet of a 16-6 boat. I feel OK going with just epoxy on kevlar in the middle, since that was how it was originally built, and now it will be thicker. I also picked up some Dynel, and I may put some of that on the ends as I clean them up.

If I were doing this face lift I would scrape and sand the grunge layer off. Wash well with acetone then coat with some medium viscosity resin or low density with some cabosil added to thicken a bit. Then dust with some high build epoxy primer, microballoon putty and fair to taste. Then cover with fabric of your choice and also do the football with graphite enhanced epoxy.

Is acetone better than alcohol for the last pass before adding epoxy?
 
That is a heck of a restoration project.

In many ways you got lucky that the previous owners new bottom was so badly installed, and with crappy materials. Auto store Eglass and poly resin? A better job of that, with Vinylester or epoxy would have been a much bigger challenge.

Yes! My guess about the history is that in the early days of the boat's life, there were a number of isolated gashes, and each one was patched or filled individually, with whatever was in the garage. At some point somebody said ah heck, let's put a new bottom on it, and they did. However, they didn't tear off any of the older patches. So, as those patches degenerated, it was like an egg salad sandwich on toast. You could actually hear stuff moving around in there as you pressed against the (outer) hull.

...
I will be curious with what you skin it. SSKK is a common schedule acronym, and you already have the K layers. Maybe the S layer?

Does anyone here know what materials and resin Wenonah was using in 1984, in kevlar ultralight. It is not Tufweave poly and glass if it is an ultralight. Any S glass in that UL kevlar?

I've heard vinylester, but I don't really know. I don't believe they used any glass.

I would get the hull to where I could RO sand it, fill and fair and divots or cracks, and cover it with a blanket of S glass and epoxy resin. Maybe even laid as partials, a long belly piece and two shorter stem pieces, so the warp and weft of the fabric conforms better along the curves and tapers, especially near the stems.

https://en.wikipedia.org/wiki/Warp_and_weft

The bigger the piece of fabric the harder it is for me to get it aligned working solo. With something even 3 feet long a second pair of hands helping for 60 seconds is good to have, especially with two pair of eyes sighting alignment, instead of just me facing it sideways and wondering how it looks on the other side.

I will keep my fingers crossed for a warm sunny day in Maine, when you can don PPE like you are working biohazard level 3, and spend a couple hours RO and hand sanding

The worst part of RO sanding a composite hull for me is the harmonic THRRUMMMMM the canoe can make. Beyond the respirator and goggles I need ear muffs. That sound alone takes it out of me.

It would be a lot of fun to dress up like the Ebola Nurse and scare the neighbors. But seriously, I'm hoping I can be fairly gentle with this boat, more hand scraping than anything else. There isn't all that much on top of the old kevlar.

This is my plan, please poke holes in this:

1. Scrape off all the historical crud, and flatten any bumps that I would feel through the next layer of cloth. (in process)
2. Apply a thin layer of epoxy to the "dry" areas of the hull.
3. Fill in gouges/dimples with thickened epoxy.
4. Mark with a sharpie the boundary of the area to be covered with the new layer (roughly waterline +3 inches, not quite out to the stems).
5. Mask off the rest of the hull.
6. Hand sand the area to be covered where it needs it for a mechanical bond (say, 100 grit).
7. Wash the hull with acetone, denatured alcohol, cheap vodka, etc. and let dry.
8. Lay the great big piece of cloth on the hull, and superglue it in a few places along the keel line so it doesn't move.
9. Trim the cloth to the markings on the hull with the best scissors in the house, all the way around like a rice bowl haircut.
10. Mix up the epoxy and do the deed, small foam roller, first the bottom, then one side, then the other side.
11. Do a couple of fill coats as soon as possible hopefully avoiding sanding.
12. Put it in the water and hope it floats.

Does that work?

I'm planning to use Raka UV inhibited epoxy, so I have the option to leave it unpainted if I like the way it looks. I wouldn't mind using a faster hardener so I can work in cooler temps, but it seems like faster => more blush, so maybe not. So in any case, I have some time to think about it.
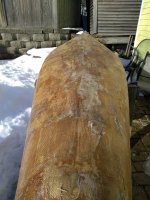
 
I think you're on the right path. For an old crudy restore like this I think I'd lean towards acetone over alcohol since acetone is a stronger solvent (save the cheap vodka for internal bug repellent, can't have too much of that on hand, esp when you need it). You want to get out as much oxidized material material as you can and etch the surface in preparation for the epoxy. I think acetone will do a better job here.

I've used Raka UV inhibited quite a bit and like it a lot to work with. Wets out great, durable and crystal clear. I've never let my work go derelict in the sun though so I can't speak to its UV effectiveness. I also cover any areas where direct sunlight hits it with a UV topcoat for an extra measure of protection too. I also live in the sunshine state, so I have to be extra careful. :)

You will need kevlar rated scissors, best in the house may not be good enough if they were not made to cut kevlar. You'll pull yarns and wreck the weave trying to grind through otherwise. You don't need the all steel $80 pair, but mid $30 plastic handle kevlar shears would be minimum. The ones Raka sells are fine.

Two fill coats before sanding is probably enough, but if you're going to sand start with 220 and go slow. You want to avoid cutting into the kevlar. Otherwise burning off the fuzz best you can and applying more fill coats is the only remedy.
 
I'm bumping this old thread to add the ending. I did the deed in late April, and the boat was in service by mid May.

Two things I screwed up / learned doing this:

1. It's OK to wet out in sections, but if you get like one friggin drop of epoxy on the area you're not working on yet, it will come back to haunt you. There is a huge difference between totally relaxed cloth and cloth with one little anchor. It's like a handkerchief with one big sticky booger.

2. I was working outside on a windy day, and keeping the dry kevlar in position was a problem. Holding it with masking tape was not a good idea. In fact, it was probably the stupidest thing I have ever done in the realm of boat repair. The masking tape sticks too well, and it's hard to get it off without deforming the weave, and even harder when you're wearing gloves and have effectively no thumbnails. I'm glad I got the blem stock kevlar ("minor weaving flaws") from Sweets, as I was going to add my own flaws anyway.

Things that were easier than I thought:

1. I was concerned that the boat wasn't smooth enough. I'd done a lot of surface prep, but it had a lot of scar tissue. Not at all like a pristine stripper. In the end, the wet out and fill coats went fine. The only post wet out remedial work I had to do was related to my dumb mistakes (esp masking tape).

2. This boat has a lot of tumblehome, and I was worried about wetting out cloth around the corner of the chines, where it's more or less upside down. As it turned out, the cigar roller took care of that and it wasn't a problem at all. I had some pipes tied to the thwarts so I could prop the boat up at odd angles, but that was overkill. I'd never done epoxy with rollers before, but I will again.

Overall I'm happy with how this turned out. It has a few warts, but they're acceptable for an old warhorse like this, and they're mostly above the waterline. At this point, given a whole layer of kevlar on the bottom outside and some fixes I made inside, it would be pretty hard to put a hole in this boat. Amateur expedition kevlar. I don't have a good scale, but on my somewhat awkward luggage hook scale it's right at 40 lbs. I did the Missouri River 340 in this boat last month, so this hull has 600+ miles on it since the overhaul. Fully broken in.

Thanks for all the help & advice!

Some photos...

IMG_20180424_110114500_golden_fleece.jpg
1984 Kevlar, meet 2018 Kevlar


IMG_20180424_120200331_masking_tape_duh.jpg
Dumb things to do with masking tape (the pavers in baggies were OK)


IMG_20180505_125755958_fill_coat.jpg
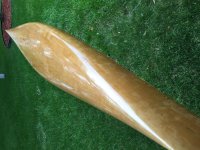
After a fill coat -- when the light is just so it reveals some of its history
 
Back
Top