• Happy 1st Sighting of Pacific Ocean by Lewis & Clark (1805)! 🧭

Big kevlar canoe repairs and new (to me) bias cut peel ply

Joined
Apr 21, 2015
Messages
846
Reaction score
452
Location
Livingston, Montana
After a short cold snap here in Montana, I finally started repairs on an old Wenonah Minn 4 that has been in service on the Missouri River for 20+ years. Perhaps this barge has carried some of your gear if you've ever done a guided trip through the breaks? Over the years this wonderful boat has hauled countless tons of food and gear for hundreds of well fed people from all over the world. Last fall it ended up in my small shop for a huge backlog of repairs. With each broken rib and gouge in the hull, guides have done quick repairs to get it back on the water as quick as possible. Repairs have deteriorated, and repairs have been repaired, usually with lots of extra epoxy to make it nice and strong!
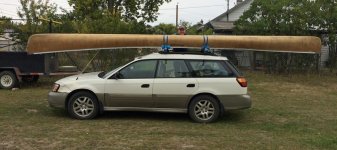
minn4.jpg

As many of you know, water in the section of the Missouri River where this canoe is in service is a little opaque at best, and often looks like chocolate milk during spring runoff. When the canoe, loaded with close to a thousand pounds of cargo encounters a rock under the surface, things bend and break. My job is to repair all the broken ribs and compromised foam core on the inside with a couple layers of kevlar cloth, and the same on the outside with s-glass. The canoe could probably use a new sheet of glass over the entire outside, but for now it will just get the repairs it needs.

For those of you who have worked with kevlar in the past, it is a pain to wet out. Once it is finally wet though, it tends to expand a bit and soak up of excess epoxy. Like many, I use peel ply, then squeegee or roller to get the cloth to lay in contact with the substrate. On the inside, there are some complex curves to get around, so darts have to be cut in the peel ply to get it to lay down. This is a pain since my epoxy covered gloves have to handle scissors. The darts are also visible in the repair.
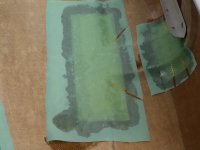

peelply1.JPG

Part way through the repairs on the inside, I ran out of the regular green peel ply, I switched to this pin stripe stuff.


It was a little cheaper than the green stuff, so I thought I'd give it a try.

To my surprise, I found the new stuff is bias cut, or woven in a way to conform to the curves. Wow! I really like finding things that save time and cleanup. This new stuff seems to soak up epoxy more readily and I can see through it better to see if there are air bubbles. I really like the pin stripes since it makes measuring and cutting a straight line easy. Now, I know I can just cut all the peel ply on the bias and it would do the same thing, but why do that if I can buy it like that already?

peelply2.JPG

The real test is to see whether this stuff will conform to the stems for putting down skid plates. I think it will. We'll see soon enough.

Mark
 
Dogbrain, This is so awesome to see today. I am headed to pick up a Minn3 this weekend and it is in need of repairs similar to what you are describing. So I come to CT and lo and behold someone doing something almost identical to what I am fixing to do. Anyway just looking for ideas. Do's and don'ts.

Could a person vacuum bag those sections down and get a lighter, tighter repair? Or would the resin then be forced into the foam ribs.
 
Good point on vacuum pressure. It is extremely powerful. It’s not that it forces the epoxy in, it sucks the air out. I’ve done some vacuum bagging on some big jobs and it is a fascinating technique.
Coincidentally this past summer I met the man that invented the Scrimp method of epoxy infusion. He is wonderful nice man and couldn’t have been more friendly. Our meeting is a whole ‘nother story that has nothing to do with canoes.
Jim
 
Dogbrain, This is so awesome to see today. I am headed to pick up a Minn3 this weekend and it is in need of repairs similar to what you are describing. So I come to CT and lo and behold someone doing something almost identical to what I am fixing to do. Anyway just looking for ideas. Do's and don'ts.

Could a person vacuum bag those sections down and get a lighter, tighter repair? Or would the resin then be forced into the foam ribs.
Hi Clint - If you know of a way to vacuum bag small areas it would be better/stronger since, as Jim said, you remove excess air and use the minimal amount of epoxy. Getting the new kevlar as tight as possible to the existing is the goal for maximum strength. I don't think I would waste the time and materials to do that though. These patches are now the stiffest/strongest parts of the boat. They don't need to be any stronger. The weight of the extra epoxy is negligible in my opinion.

Mark
Understood. It would be time consuming. I like the look of the new Peel Ply you are using I'll have to give it a try.
 
I've done a little bit of small area vacuum bagging/infusion and as I recall it was pretty straight forward. You'd just overlay what you'd already done with breather fabric and bagging material with tacky tape around the perimeter with a hole for the vacuum tube.

For multiple simultaneous patches I suppose you could branch off multiple vacuum lines but it would make it harder to pin down any leaks.

As easy as it seemed the few times I did it I more often was reluctant to drag out the vacuum pump and other paraphernalia for a small job. I'm also inherently lazy about stuff like that, even if I know it might save me time later by less sanding finish work.

Nice job on the patches. That bias peel ply looks nifty. How did it release?

Alan
 
I have ample peel ply in rolls in various widths (Thanks Glenn), but was running low on wider peel ply “fabric”.

I really don’t care for the featherweight blue release fabric, and don’t even get me started on the “green pull” nylon stuff.

The silky blue feather-weight stuff does leave a smoother no-visible weave surface, but it is so fly-away weightless that it is hard for me to lay atop epoxied materials without getting a wrinkle or crease. And it is weirdly reluctant to cut clean and even edges.

I prefer the “almost looks like fiberglass cloth” style plain white peel ply, and yes, I always label materials, so I don’t oopsie patch a hole with epoxied peel ply instead of glass. I honestly have not done that; I’m sure someone has. My money is on DougD.

I ordered some West System release treated peel ply. It arrived with, surprise, blue pin stripes. I thought that was a cunning addition to avoid confusion with glass cloth, and might assist in cutting out symmetrically shaped patches.

I just got that pin stripped West peel ply out for a look. Nope, not bias woven, straight weave # aligned with the pin stripes.

If that Econostitch peel ply is bias woven I want some.

https://compositeenvisions.com/product/airtech-econostitch-peel-ply/

Thanks, sometimes having the just-right materials on hand makes all the difference.
 
That bias peel ply looks nifty. How did it release?

Alan
It seems to release like the green stuff I've used in the past. I just did a big area on the bottom, an area of roughly 70 x 30 inches. It was still a little green and I really had to put my weight into it.

Mark
 
If that Econostitch peel ply is bias woven I want some.

I assume it's bias woven because of how it behaves. I had no idea until I put it on the next patch, it was then I realized it would just conform to the ribs and foam core. I was quite excited at the time, whooping and hollering. I was initially concerned because the new peel ply seemed a little stiffer than the green stuff. I thought it wouldn't lay down as well. But not the case. I looked at the suppliers web page again and noticed that the 60" stuff is just a little more expensive than the 24". I don't know why I originally bought the narrower stuff, it's twice the price. Maybe it had to do with shipping cost?
 
“I assume it's bias woven because of how it behaves. I had no idea until I put it on the next patch, it was then I realized it would just conform to the ribs and foam core.”

Mark, when you get a chance, por favor, have a close look at that peel ply. Does the weave run parallel # to the pinstripes, or is it on the bias XXX?

Like you said, I could cut bias pieces from #, but I think the waste would be less if the roll, especially a shorter length roll, came bias woven.

“I was initially concerned because the new peel ply seemed a little stiffer than the green stuff. I thought it wouldn't lay down as well. But not the case. I looked at the suppliers web page again and noticed that the 60" stuff is just a little more expensive than the 24". I don't know why I originally bought the narrower stuff, it's twice the price. Maybe it had to do with shipping cost?”

I have not seen the green (colored) peel ply, by “green pull” I meant Must pull the peel ply before the epoxy gets hard nylon variety. I don’t want to wait around to time that pull; too soon and it can pull the cloth up, too late and it is a forceful struggle to get off. It was fun to watch DougD grunt and groan and strain to remove some green pull peel ply. I helped; I held the hull down and tried not to laugh. Might have been the last time Doug used green pull peel ply.

The pin striped peel ply I bought was similar to this, but in 10” wide rolls. I think it was a West Systems product.

https://www.amazon.com/Infusion-Pro...&sprefix=west+system+peel+ply,aps,614&sr=8-20

Shipping on the 10” roll was inexpensive. Shipping costs for a 60” long box may become a price point issue.

At some point I need to use up the detested fly-away blue release fabric, and some older pieces of 60” wide peel ply. And keep my fingers crossed when I do; if “release treated” is anything like the sizing treatment coating on fiberglass peel ply may age out. Old glass, on which the sizing has degraded, does not stay epoxy attached.

I had an ancient roll of 4” glass tape. I now know that I should not have used that, and the remainder of the roll went in the trash when it failed; after the epoxy cured two 3 foot long x 4 inch wide pieces popped off clean as a whistle, with no more than a gentle Post-it note tug.
 
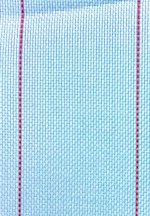
Bias cut peel ply.........not! I took a close look and here's a picture of the weave. I tried to get a piece to form around a canoe stem, and even though it goes a little ways, it's not as good as cutting peel ply on the bias. Having said that, this stuff conforms great to the minor features such as foam core and ribs. I think this is the same exact stuff in your link above Mike. From the link it's red striped now too. I don't think this stuff is release treated. It pulled fine when still green, and pulled fine on 24 hour epoxy as long as the patches were relatively small. On a larger sheet that I left overnight it came off OK, but I had to put my back into it.

Mark

peelply.jpg
 
I sure could have used some of that on my Nokomis build years ago ! The $8 / yd peel ply I used was a struggle for sure !
Thanks Mark, for the link !

That is one long hull. An oncoming Semi with a strong left hand wind, could make for a real hairy ride !
 
Mark, I’m certain that the pin striped stuff I have is release treated. I usually do epoxy and cloth work in the afternoon or evening and then walk away, pulling the peel ply the next morning.

With larger areas it can take some effort to remove the peel ply, but nothing like the amount of force and struggle with removing “green pull” peel ply after just a few hours. If the green pull stuff isn’t removed in time it isn’t coming off.

The Superelease Blue peel ply uses a silicone release agent and is very easy to pull. The downside for me is that it is difficult to cut neatly, and it is so fly-away lightweight that it is hard to lay flat, without wrinkles and crinkles, when working solo.

https://airtechintl.com/superlease-blue

Next time I am doing some epoxy and cloth work I’ll lay some of the pin stripe peel ply in place, let it sit for a couple days and see if it is removable. Or maybe lay a variety of peel ply; plain white, pinstripe, blue and the rolled 4” or 6” wide stuff from Aircraft Spruce & Specialty.
 
Back
Top