- Joined
- Aug 10, 2018
- Messages
- 1,319
- Reaction score
- 1,733
Rather than add to my previous build thread (and to make this subject more searchable), I'm starting a new thread on an old theme... namely, penance for my sloth of the past.
When I built my first stripper, I cut some corners and had some fun with the fact that I largely skipped "the sucky part" (ie: sanding). In all honesty, it probably would have worked out well except for 2 things: 1) I didn't do a good job of scraping off the excess epoxy so I had a lot of runs and 2) I didn't prep the epoxy well for the spar varnish so it was peeling off the whole way around the Steel river loop.
In addition, I was running out of time as launch day was approaching so I didn't varnish the inside of the hull before taking it on its maiden voyage. Now, as launch date is again approaching and I haven't gotten the Raven built, I figured I'd better take care of the varnish situation as I'm unsure how much UV light it takes to compromise the glass.
![DSCN2042[1].JPG DSCN2042[1].JPG](https://www.canoetripping.net/data/attachments/32/32780-d114c6d986865d45cabb463b1708446f.jpg?hash=0RTG2YaGXU)
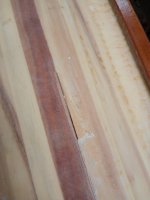
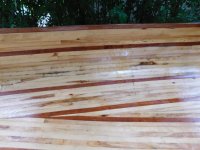
I dropped the Freedom solo out of the rafters in the carport, threw it in the backyard and started sanding off all the scratches and (most of) the runs in the epoxy. I put some 60 grit on the orbital and went to work. The poorly adhered varnish and most of the scratches came out nicely while the runs were more difficult but manageable. The issue with skipping the "sucky" part, however, is that, with the high spots in the boards, getting a good surface prep without cutting into (or through) the glass was harder than it should have been.
There was one area where I actually did sand through the glass (I'd used 4 oz e-glass above waterline) and I had to patch it. (you can also get an idea of how bad the runs were from that picture)

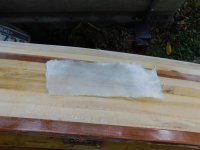
The area actually appeared to have had some air trapped under it anyway but I cut out the loose glass where it wasn't bonded to the wood, laid an approx 4"x 15" strip over the affected area and wet it out. About 4 hours later I added a fill coat but, in the meantime, I flipped it over & painted on 2 coats of spar varnish on the inside.

I also had various places on the inside where there were small air pockets due to the uneven wood. All of these were small and the hull obviously was up to the task on the last trip but those pockets, plus the lack of fill coats and the absence of any spar varnish, resulted in some unexpected souvenirs. There were sand particles that had managed to work through the exposed weave and were now under the glass in those pockets.
I scuffed up the inside glass as best I could with the 60 grit on the orbital and some 80 grit hand sanding, then swept of all the dirt & dust before painting on a coat of spar. When I came to the trapped sand, I tried to work a little extra spar into those areas. Two hours later, the inside of the hull was dry to the touch so I added another layer of varnish. A third was added after flipping it over to finish the fill coat on the exterior patch. I'm not unhappy with the result but, then again, I'm not building museum pieces.
The trapped sand is now part of the boat and I doubt that it will ever be an issue. I do feel that more sanding and the spar before launch would have prevented the sand issue so bear that in mind if you ever decide to cut that corner. Perhaps one fill coat would have been in order if I didn't have enough cure time to get the spar on before launch. (my understanding is that epoxy should cure 5 days before spar but I could have done a fill coat 4 hours after wet-out). Other alternatives would be to fill the small voids with a syringe full of epoxy or don't be so lazy and just sand it out better during the initial build.

Last night, after feathering & roughing up the exterior patch, I was wiping the boat w/ mineral spirits in preparation of spar when I found another small area where I'd gotten through the glass. I patched it as I had the other area and this morning before work, I used a scraper to level out the patch & applied a fill coat. I'll allow it to cure for couple of days and then sand the patch w/ 60 grit to feather it in a little & rough up the epoxy. I should be able to slap 3-4 coats of spar on Friday and/or Saturday so it'll be ready to get scratched up again (fully protected from the sun this time) on Sunday.
I'll post a couple of pics when all done. I don't expect it to be perfect but it'll be sound & ready for service.
When I built my first stripper, I cut some corners and had some fun with the fact that I largely skipped "the sucky part" (ie: sanding). In all honesty, it probably would have worked out well except for 2 things: 1) I didn't do a good job of scraping off the excess epoxy so I had a lot of runs and 2) I didn't prep the epoxy well for the spar varnish so it was peeling off the whole way around the Steel river loop.
In addition, I was running out of time as launch day was approaching so I didn't varnish the inside of the hull before taking it on its maiden voyage. Now, as launch date is again approaching and I haven't gotten the Raven built, I figured I'd better take care of the varnish situation as I'm unsure how much UV light it takes to compromise the glass.
![DSCN2042[1].JPG DSCN2042[1].JPG](https://www.canoetripping.net/data/attachments/32/32780-d114c6d986865d45cabb463b1708446f.jpg?hash=0RTG2YaGXU)
I dropped the Freedom solo out of the rafters in the carport, threw it in the backyard and started sanding off all the scratches and (most of) the runs in the epoxy. I put some 60 grit on the orbital and went to work. The poorly adhered varnish and most of the scratches came out nicely while the runs were more difficult but manageable. The issue with skipping the "sucky" part, however, is that, with the high spots in the boards, getting a good surface prep without cutting into (or through) the glass was harder than it should have been.
There was one area where I actually did sand through the glass (I'd used 4 oz e-glass above waterline) and I had to patch it. (you can also get an idea of how bad the runs were from that picture)

The area actually appeared to have had some air trapped under it anyway but I cut out the loose glass where it wasn't bonded to the wood, laid an approx 4"x 15" strip over the affected area and wet it out. About 4 hours later I added a fill coat but, in the meantime, I flipped it over & painted on 2 coats of spar varnish on the inside.

I also had various places on the inside where there were small air pockets due to the uneven wood. All of these were small and the hull obviously was up to the task on the last trip but those pockets, plus the lack of fill coats and the absence of any spar varnish, resulted in some unexpected souvenirs. There were sand particles that had managed to work through the exposed weave and were now under the glass in those pockets.
I scuffed up the inside glass as best I could with the 60 grit on the orbital and some 80 grit hand sanding, then swept of all the dirt & dust before painting on a coat of spar. When I came to the trapped sand, I tried to work a little extra spar into those areas. Two hours later, the inside of the hull was dry to the touch so I added another layer of varnish. A third was added after flipping it over to finish the fill coat on the exterior patch. I'm not unhappy with the result but, then again, I'm not building museum pieces.
The trapped sand is now part of the boat and I doubt that it will ever be an issue. I do feel that more sanding and the spar before launch would have prevented the sand issue so bear that in mind if you ever decide to cut that corner. Perhaps one fill coat would have been in order if I didn't have enough cure time to get the spar on before launch. (my understanding is that epoxy should cure 5 days before spar but I could have done a fill coat 4 hours after wet-out). Other alternatives would be to fill the small voids with a syringe full of epoxy or don't be so lazy and just sand it out better during the initial build.

Last night, after feathering & roughing up the exterior patch, I was wiping the boat w/ mineral spirits in preparation of spar when I found another small area where I'd gotten through the glass. I patched it as I had the other area and this morning before work, I used a scraper to level out the patch & applied a fill coat. I'll allow it to cure for couple of days and then sand the patch w/ 60 grit to feather it in a little & rough up the epoxy. I should be able to slap 3-4 coats of spar on Friday and/or Saturday so it'll be ready to get scratched up again (fully protected from the sun this time) on Sunday.
I'll post a couple of pics when all done. I don't expect it to be perfect but it'll be sound & ready for service.
Last edited:
