• Happy Halloween! 🎃🎂

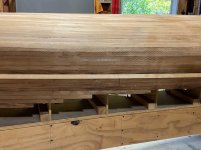
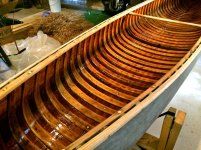
Inherited strip canoe on mold mid build. Stripping started at the football and moved toward gunwales?

Joined
Oct 5, 2024
Messages
6
Reaction score
5
Location
Westport, MA
Hello-I recently purchased a 14' canoe, still on the mold, stripped from the football down to the gunwales. Unclear as to the designer. While I'm not a sophisticated carpenter, I've built strip boats before (the 17' Endeavor kayak) but always from the sheer line to the football. It appears that the builder (now deceased) in every other way knew what s/he was doing. At a loss to figure out how best to approach finishing the hull. Every other reference I've seen strips in exactly the opposite direction. Any suggestions from this wise group would be very much appreciated.
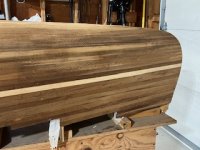
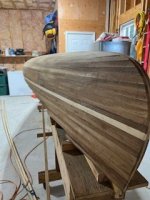
IMG_6363 (1).jpgIMG_6357.jpg
 
Hi Nancy & welcome to the site. I'm trying to enlarge to pictures to see where you're at but I can't. Does it appear that the shear was to be cut upon completion? It looks like it's almost there and that wouldn't (IMO) be the worst idea at this point. Maybe strip past the bottom of the form, reach under and drill a small hole near the bottom of each form, run a string line, cut between the holes and then finish smooth by planing & sanding? It might be an interesting look and, if needed, you can still hide a lot with the gunwales.

I'd like more pictures of the hull (football, etc) to try and understand why it was started there (and what that looks like). Also, really interested in the stems...

I'll be following along for sure.
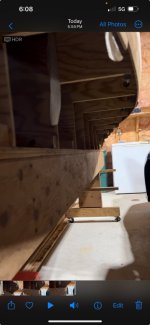
I think that's a fantastic idea-Here's a picture from underneath the canoe. The strips seem to go down to the appropriate point on the molds. I'll get you some pics of the football section as well. Nothing fancy there-pretty standard. Thank you!
 

Attachments

  • View recent photos.jpeg
    View recent photos.jpeg
    50.7 KB · Views: 24
I'm not sure what the problem is from the pictures, but I'll take a stab at it. If you run a long strip or flexible piece of wood along the gunwale line, are there any areas that are not covered by strips? If not, just draw a pencil line and then cut the gunwale line. If there are areas with gaps, fill in with strips, then cut the gunwale line.
 
I'm not sure what the problem is from the pictures, but I'll take a stab at it. If you run a long strip or flexible piece of wood along the gunwale line, are there any areas that are not covered by strips? If not, just draw a pencil line and then cut the gunwale line. If there are areas with gaps, fill in with strips, then cut the gunwale line.
Thank you-much appreciated!
 
I wonder if rather than starting on the football they started with the white and black stripes. That would allow them to position the strips exactly where desired cosmetically.

I'm not saying it's a good idea, just a possibility.
 
Lots of guys on here w/ more experience than me but I doubt it's even possible to build from the football down.

From the underside pic, it looks like the shear is fairly flat in the middle and someone started there and then added strips to cover the forms where the gunwales will sweep up at the bow and stern.

If this is the case, clamp a flexible strip along the middle, flex it to the tip of the stem (is that an external stem that someone fit the strips to?) then mark & cut the line as mem suggests. If that's all you need, you're done with stripping and ready for the fun part... sanding! (feel free to assume sarcasm)
 
Hello-I recently purchased a 14' canoe

NQH, I'm not one of the builders here, but I'd like to welcome you to site membership! Feel free to ask any questions and to post messages, photos and videos, and to start threads, in our many forums. Please read Welcome to CanoeTripping and Site Rules! Also, because canoeing is a geographic sport, please add your location to the Account Details page in your profile, which will cause it to show under your avatar as a clickable map link. Many of the site's technical features are explained in Features: Help and How-To Running Thread. We look forward to your participation in our canoe community.

I'm trying to enlarge to pictures to see where you're at but I can't.

If you open the photos in a new tab, they will become a bit larger, but not much because they are low resolution.
 
Welcome, NQH
First canoe I ever built was stripped from the keel line, past the football, trimmed to the football, then sides stripped past the sheer line, that was a method described in David Hazen's "Stripper's Guide to Canoe Building".
Probably no wrong way to build, many of us try alternate methods and ultimately find methods those that suit us, or suit the particular hull design. Nowadays, I generally start at the waterline, and work up past the keel line, and down past the sheer line. Or not, if it's a knuckled hull.

I wouldn't bother trimming the sheer line until after you sand and glass both the outside and inside. If you happen to have a couple long strips to use as a scribe or pencil guide, so much the better.
It looks like someone did a pretty good job so far, it's half way done!
Do you already have your glass and resin?
And how did you transport that partially built hull and forms?

Finally, let's see that kayak that you built, and maybe some pics of it in action.
 
Great score ! I'd love finishing that hull. Looks nicely built.
I will make a guess, that it is a Bear Mountain design, The use of a " Box beam " strong back, and the forms high enough, the stems are above the strongback. The stair stepped shear, and stems, are indicative of Ted Moore's designs.
More profile pics, and some length, width, and depth, would help a lot.

I like to cut my shearlines, before glassing, it's easier than after you have them glassed.
A ragged shearline tends to snag your cloth, when laying it out, causing more problems.

Get a hold of a copy of Canoecraft, and you will find it a great help.

Jim
 
What makes you think the original builder started at the middle, and worked towards the shearline ?

To me it appears to be built in the normal manner, shearline to the keel.

Jim
 
Good morning, all-
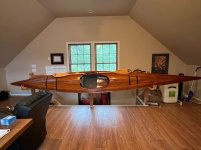
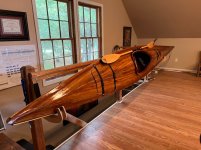
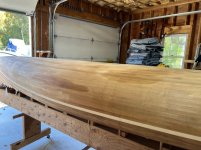
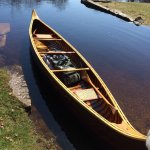
Thank you for your excellent suggestions, support and direction. Sharing some additional photos per requests above (and another problem that I'm hoping the learned folks on here can help solve). The unfinished canoe on the mold is 15' in length. Agree that it looks like a Bear Mountain design, I think either a Freedom 15' or a Bob's Special from the profile...I will need to create outer stems and decks. The inwale and outwale material came with it. My newest issue (not apparent from the crowded and dark garage where it was stored for years among car parts) is that the wood has some large oil stains that I've conservatively tried to remove with a baking soda mixture that was recommended (nope). I have purchased TSP but not tried it yet. I've considered oiling the whole darn thing but I think we'd have issues with the epoxy bonding. ANY suggestions (beyond painting the thing) would be very welcome. The more cosmetically pleasing photos are the Endeavour kayak that I built in my laundry room in Chicago about 15 years ago. Stripperguy had requested. She's stored in my office during the winter so no action shots (apologies). Again, thank you all!
PS Stripperguy asked how I got her home on the mold...a 28' UHaul with my heart in my throat. Go big or go home : )
 

Attachments

  • IMG_6392.jpeg
    IMG_6392.jpeg
    104.4 KB · Views: 16
  • IMG_6391.jpeg
    IMG_6391.jpeg
    154.1 KB · Views: 17
  • IMG_6387.jpeg
    IMG_6387.jpeg
    140.1 KB · Views: 17
  • IMG_6359.jpeg
    IMG_6359.jpeg
    116.8 KB · Views: 17
  • IMG_6355.jpeg
    IMG_6355.jpeg
    106.1 KB · Views: 15
Last edited:
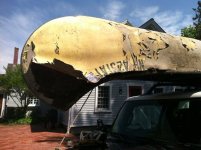
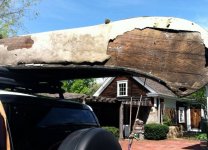
While I'm having my coffee and in a show and tell mood...my 1916 Old Town rescue from the burn pile before and after photos.
 

Attachments

  • 11952883_10205515613227106_1341185603855307902_o_10205515613227106.jpeg
    11952883_10205515613227106_1341185603855307902_o_10205515613227106.jpeg
    131.5 KB · Views: 16
  • 11865006_10205515614347134_1670242871706159907_o_10205515614347134.jpeg
    11865006_10205515614347134_1670242871706159907_o_10205515614347134.jpeg
    202.4 KB · Views: 16
  • 11935070_10205515613347109_721578696763727622_o_10205515613347109.jpeg
    11935070_10205515613347109_721578696763727622_o_10205515613347109.jpeg
    158.8 KB · Views: 16
  • 11952725_10205515624387385_4874774618732118689_o_10205515624387385.jpeg
    11952725_10205515624387385_4874774618732118689_o_10205515624387385.jpeg
    180.5 KB · Views: 16
  • 11950371_10205515626387435_5297678449735236264_o_10205515626387435.jpeg
    11950371_10205515626387435_5297678449735236264_o_10205515626387435.jpeg
    178.7 KB · Views: 16
I'd be concerned about those oil stains as well. Not so much from aesthetics but from adhesion.

I'd soak the areas with acetone and then rub it with fairly aggressive sandpaper for starters.

Alan
 
Wow, nice work!! You'll fit in here nicely...
If by chance that hull came with leftover strips, I would remove those stained pieces and replace them. As Alan mentioned, adhesion could be an issue, and the aesthetics as a secondary concern.
Acetone, Hexanes may be of help. I think that even if you did try to stain the entire hull, those areas would never blend in sufficiently. I dunno, depends on critical the visuals are for you.
Thanks for keeping us updated.
 
Agreed on the oil... Acetone might remove enough of it at the surface to get adhesion (which would be my only concern- to me the stains would just be part of the background story and add character).

I'm not sure what else you could try. I'd be shocked if there's anything that will draw the oil out of the wood completely and, if the aesthetics are important, you'll probably have to cut out & replace as sg suggests.

Great save on the OT. Always nice to see w/c boats restored.
 
Back
Top