• Happy National Hot Sauce Day! 🌶️🥵

Dynel Sleeve Epoxy Saturation Experiment

  • Thread starter Thread starter Guest
  • Start date Start date
G

Guest

Guest
Before you commit to all those dynel sleeve rub strips you might want to cut a sample sleeve section to be sure that both folded edges are tight against each other and the substrate

I know you need to know and all of us enjoy your experiments

Stripperguy, you know me too well. I know from belt sanding the ends of Dynel sleeve skid plates installed on the Vagabond that they are tightly adhered on that glass & nylon hull, at least at the bitter ends.

But I do not know the fullness of epoxy saturation, and have observed some resin starvation on the bottom at least with thicker materials. The fullness of two ply (still not very thick) sleeve saturation, and whether two pieces sides of the sleeve were adhered tightly to each other was a mystery.

I laid up four little pieces of lightweight Dynel sleeve for an epoxy saturation experiment. All with graphite powder and black pigment, the additives I prefer for the blackest of black skid plates. That blackened epoxy should serve to reveal any fabric “white” that remains unsaturated in the sleeve.

I didn’t test any epoxy without graphite powder & black pigment, or any epoxy less viscous than West 105/206. Or the heavier “standard weight” Dynel sleeve. Maybe later.

I laid up test strips on the curviest piece of Royalex scrap I had on hand. Sure wish I had used scrap Royalex pieces when I did the initial skid plate materials impact experiments instead of scrap vinyl siding.

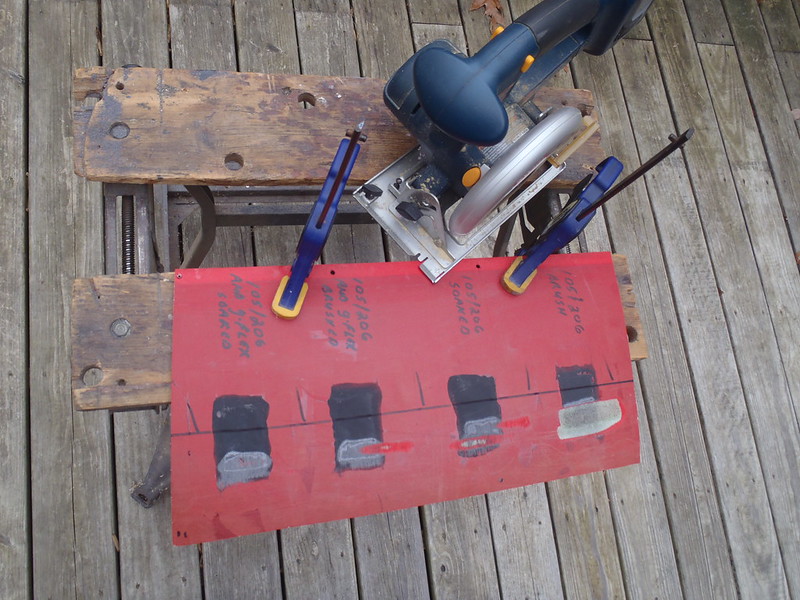
PB290001 by Mike McCrea, on Flickr

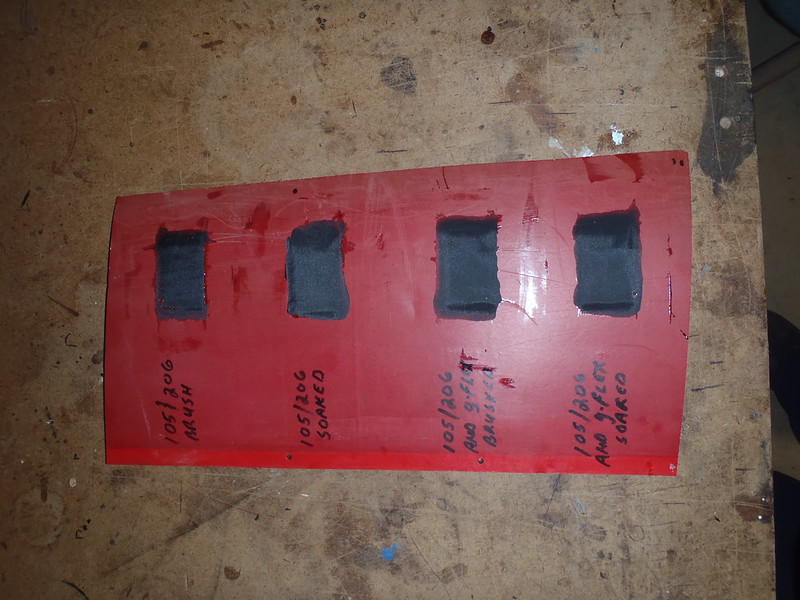
Those four test strips of Dynel sleeve, with release treated peel ply ready are:

West System 105/206, coat of epoxy brushed in the tape box, Dynel sleeve laid on the epoxy base coat and lightly gloved down, coat of epoxy brushed out on top the sleeve.

West System 105/206, Dynel sleeve dunk-saturated in the epoxy pot and laid in the tape box

West System 105/206 and G/flex (about 50/50), coat of epoxy brushed in the tape box, sleeve laid, coat of epoxy brush out on top

West System 105/206 and G/flex (about 50/50), sleeve dunk-saturated in the epoxy pot

A couple of variables in my experimental methodology:

Variable #1 - I realized I had made too much epoxy, so even with the brushed mixes the epoxy was slopped on thick. With the slight curve of the Royalex test strata epoxy puddles dripped off and formed at edges, enough that I went back several times with a dry foam brush and mopped up puddles of epoxy from the edges.

PB290004 by Mike McCrea, on Flickr

Once the excess dripped off and the puddles were repeatedly mopped up the Dynel appeared to begin setting up as usual, ie even the tight weave of the sleeve began to show, and the surface became rough textured in that weird Dynel way.

Variable #2 - A curvy piece of bow or stern stem would have been more revealing; the epoxy wants to run away from a vee curve, and especially away from the apex of the stem curves. That sharp curve is where it sets up thinnest and some fabric weave often shows even with peel ply compression.

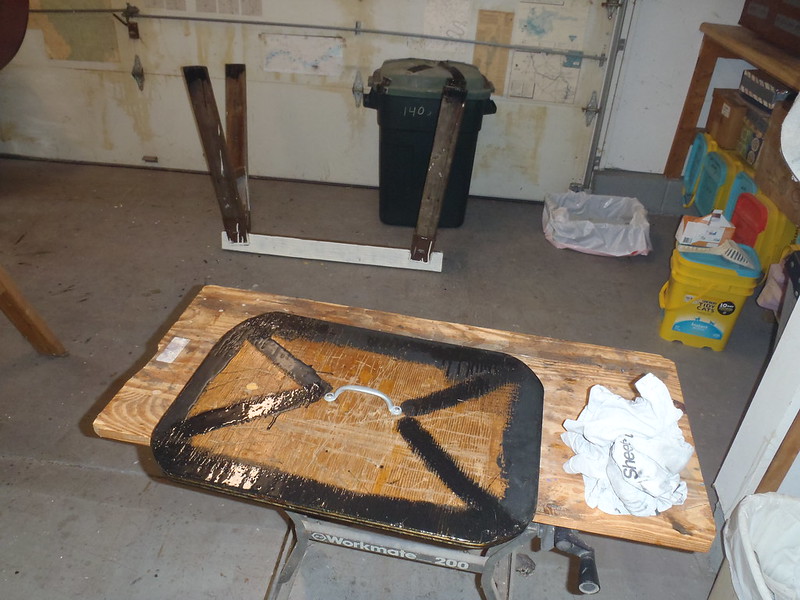
I am usually good at estimating the amount of epoxy needed. “Usually”, not this time; needing enough resin for sleeve dunking I had some left over. At least I remembered to prep some sawhorse legs and the DIY wood trash can lid for leftover epoxy use.

PB290005 by Mike McCrea, on Flickr

I waited an hour, pulled the tape, laid down the peel ply and hard rollered over top several timed times as the epoxy continued to set up.

PB300009 by Mike McCrea, on Flickr

Peel ply pulled the next morning.

PC010010 by Mike McCrea, on Flickr

I should have waited longer to pull the tape and compress the peel ply. The edges, especially on the epoxy soaked material, are wavy indistinct. Still nothing a top coat of black paint wouldn’t straighten up.

Next, wait a week+ or so before some test grinding and cutting inspection.
 
Dynel sleeve testing and inspections, replicating the previous skid plate materials test, without the bombsighted impact drops with steel rods.

http://www.canoetripping.net/forums...late-test-materials-impact-resistance-results

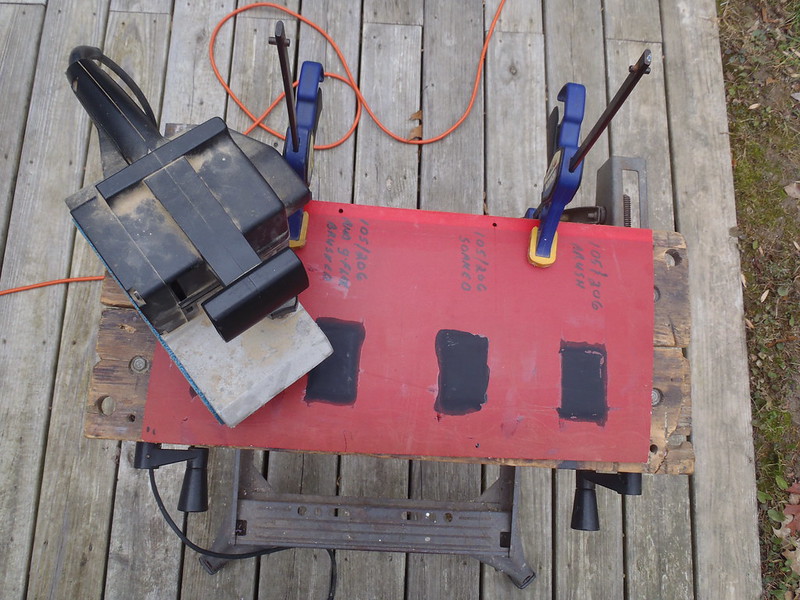
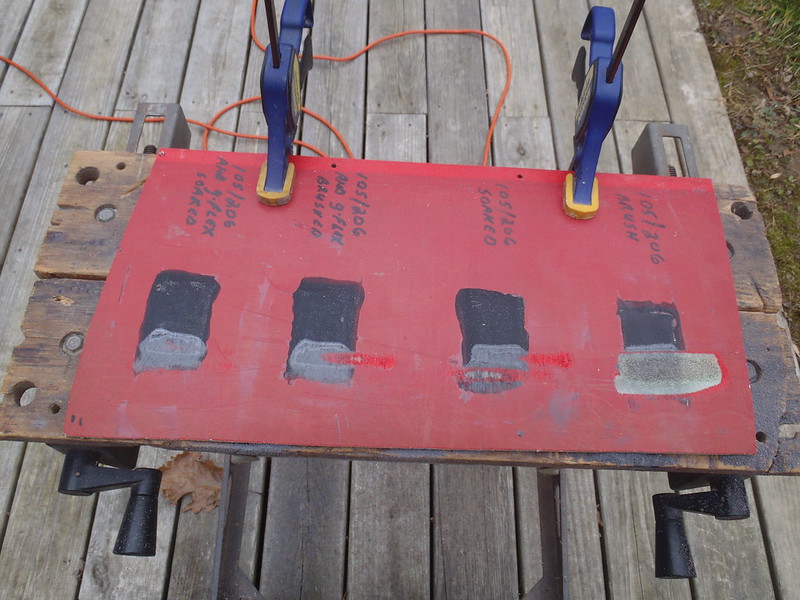
I hit each test piece with an 80 grit belt sander until I ground through down to the Royalex.

PC060016 by Mike McCrea, on Flickr

Without any scientific measurement the Dynel sleeve seems about as abrasion resistant as 5oz Dynel cloth, maybe a bit less to grind all the way through, but still far tougher than E-glass, S-glass or Kevlar/Twaron.

I sanded too far through the first test piece (105/206 brushed), but it is still dark throughout, and well adhered. Continuing the grinding all four test pieces of Dynel sleeve are at least dark gray throughout the sanded-to-Royalex depth, and well adhered.

PC060017 by Mike McCrea, on Flickr

I wonder if perhaps the black pigment/epoxy color agent is more permeable through the tight weave of that lightweight Dynel sleeve and the particulate graphite powder prone to sitting on top of the fabric?

In any case the Dynel sleeve test pieces are all agreeably saturated.
 
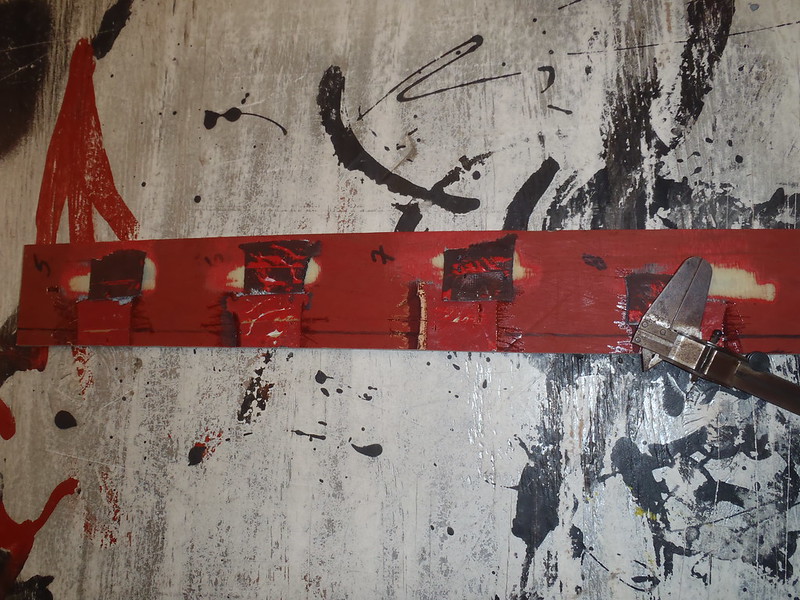
Continued testing. I sawed cleanly through each piece on the Royalex bed for a side-edge look inside at the adhered sandwiched layers.

PC060020 by Mike McCrea, on Flickr

PC060021 by Mike McCrea, on Flickr

Each test piece, measured on cut edge with a caliper, is 1/16” thick or less, and I can’t tell any black/grey saturation difference between the four test pieces, even under magnifying glass inspection.

PC060024 by Mike McCrea, on Flickr

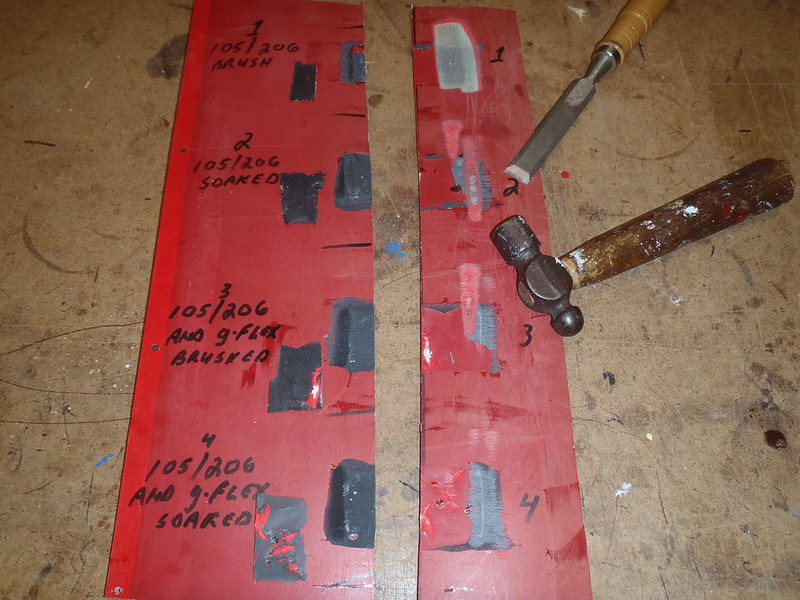
Next test, chisel the test Dynel pieces off the Royalex for a looksee at the bottoms. Going at the edges with a hammer and chisel was fruitless, I was gouging out the vinyl skin before the Dynel sleeve budged, so I would judge all of the test pieces well adhered along the perimeter.

Using the chisel at the clean cut edge between the Royalex and Dynel sleeve I did manage to pop the test pieces free. The two test pieces laid with some G/flex in the mix were definitely harder to chisel off, and took a bit of red Royalex skin with them.

PC060025 by Mike McCrea, on Flickr

Trying to part the two layers of sleeve by hammering the chisel in the middle of the Dynel sandwich didn’t achieve any clean separation; it was like chipping away at concrete. That part was my biggest concern/curiosity, whether the inside of the sleeve was well adhered to itself. It very much is.

Last test, I bent the chiseled free test pieces until they broke. The epoxy mix with G/flex bent further and was harder to snap. It has “flex” in the name, so that makes sense.
 
Sweet Composites is fast. I called in an order to Sweets two days ago and received the materials today.

OK, it helps that Sweets is only a couple hours away, but I had a hilarious and meandering phone conversation with Jennifer Hearn, who understood my curiosity with Dynel sleeve and other materials as skid plate testing experiments, and we got off on some wild tangents, including, somehow, a mention of my son’s names.

For some funny lettuce reason I told her they were named Euripides and Plato. Her immediate response was “That’s bold!”. Such good people at Sweets. I did confess their real names when she finished stifling a laugh.

Sweets has a $25 minimum service charge per order, but looking through shop stock I needed a variety of materials. A couple feet 1/8” N1S neoprene, handy for outfitting. Shipping cost was pricey but worth it on that thick rolled item; I was plumb out of neoprene and have no old wetsuits to cut up.

A couple feet of iron-on-the-nylon- side McNett Melco Tape. Also shop handy, and not just for N1S neoprene seams and edges. Melco tape is good stuff to have available.

And, to satisfy my curiosity, a couple yards of standard weight Dynel sleeve to continue the epoxy saturation, abrasion and laid-up thickness experiments.

I had expected the heavier “standard weight” Dynel sleeve would be thicker, or perhaps of courser weave, maybe similar to the 5oz Dynel fabric. By visual inspection it appears to be identical to the lightweight sleeve, same weave and thickness, but the sleeve is 1 ¾” wide vs 1 ½” wide with the “lightweight” stuff.

I’m pleased with that; a little wider would be a little better in many applications, especially when I want to lay a narrower strip of E-glass tape or etc underneath the Dynel for improved impact resistance. Another Dynel skid plate sleeve test is beaconing.

No G/flex this time; that G/flex experimentation was getting expensive even in small batches. Maybe straight West 105/206 with no graphite powder/just black pigment, including some test strips underlaid with 1” E-glass tape and some test strips underlaid with 1.5 inch Dynel sleeve, both under the “heavy weight” 1 ¾ inch wide Dynel sleeve.

Hell, I might have to re-assemble the bombsite for impact testing, dropping rebar and pointy end horseshoe pit stakes on the various layups.

http://www.canoetripping.net/forums...late-test-materials-impact-resistance-results
 
Dynel Sleeve Experiment #2 is in progress

A couple sea kayak guide friends are “I love this stuff” smitten with the Dynel sleeve samples I sent them, and planning to Dynel full length keel strips on some oft-abused hulls. That guided client abuse in the Everglades will be the real acid test.

That being the case I got started on Dynel sleeve experiment #2, using four different material layups:
1 ¾” wide Dynel sleeve only
1 ¾” wide Dynel sleeve over 1 ½” wide Twaron tape
1 ¾” wide Dynel sleeve over 1” wide E-glass tape
1 ¾” wide Dynel sleeve over 1 ½” wide Dynel sleeve

All of the underlay materials were cut a little shorter in length than the Dynel sleeve top layers, so the cut ends of the covering sleeve would bevel compress down under peel ply and roller, without an abrupt two-layer edge.

No G/flex this time, just West 105/206. No graphite powder, just black pigment. Enough pigment to fully blacken the mini-pot of epoxy, but still less than a pencil eraser in volume. That black epoxy on white fabric should be sufficient to show the fullness of hand epoxy saturation when I cut through the test pieces.

I don’t think I’ll bother with graphite powder in anything but the final epoxy topcoat from now on. I don’t really need the “low-friction coating with increased scuff resistance and durability” on the underlayers, but I’d sure like it on the top.

Usual short-length practice; coat of epoxy painted on the “hull” surface (another scrap piece of vintage Royalex), underlayer of fabric (if any) laid, top coat that with epoxy, 2[SUP]nd[/SUP] layer of material laid, top coated with epoxy, let sit 1 hour +/- with some cut end push down babysitting until the epoxy is firming up and the cloth fully seep saturated, pull the perimeter tape box, lay down release treated peel ply, hard roller over the peel ply a couple or three times for the following hour.

It only took a few minutes to cut the materials, tape the RX and lay the epoxy; the hard part will be waiting a week to start grinding away and cutting through the test strips, checking the depth of epoxy saturation and layered thicknesses.

I know from the original impact testing that any secondary layer increases impact resistance. And that none of the other materials is as abrasion resistant as Dynel.

For a boat at sees mostly scrapes, deep scratches and grinds (sea kayak vs wormrock, oyster bars and limestone) I think I’d use two layers, Dynel over Dynel. For a boat that sees both impacts and abrasion I’d use a thicker underlayer, maybe the bias woven Twaron tape, with Dynel atop.
 
Although I'm anti-skid plate, for many reasons I won't bother repeating here, as well as DIY-incompetent, I've nevertheless read with some interest the tsunami of posts on making the things.

At first, I would have thought stem reinforcement would best be made out of the material whitewater and other tough hulls typically have as the outside layer. That would encompass S-glass, carbon, Innegra H, Tuffweave, Blue Steel . . . and, oh, aluminum. But I guess that's all wrong. Everyone seems to love this Dynel fabric, which I believe I have as edging on one or two of my wooden paddles.

So, Mike, perhaps you could summarize your empirical findings for us who need a Skid Plates for Dummies, here or somewhere. In particular, I'd be interested in pithy answers to the following:

-- Favorite material: Is it now the wider Dynel tubing?
-- Favorite resin: Regular epoxy, G-flex epoxy, or a mixture? If a mixture, why?
-- Favorite resin saturation method: Brush on or dunk saturate?
-- Filler in the resin? Why?
-- Tint in the resin? Why, other than aesthetics?
-- Paint over the skid plate? Why? Won't that be the first thing to immediately scrape off? If any sort of top layer, why not gel coat?
 
(I'll give you MY answers, Mike probably has slightly different preferences......(this is all for Royalex boats with a snub nose/tail)

- Dynel fabric as the outer layer
- S-glass previously but probably the Dynel sleeve now for the underlayer
- Gflex (thickened version)
- Roller and/or scraper (in my case an old credit card or similar) to apply (on a fresh boat, roller on some epoxy to the bare hull, place the fabric, add gobs of Gflex, spread with "scraper", apply release fabric then use roller/hands to "squish".
- No filler
- No tint
- No paint

For me I apply a skid plate for protection, I could care less about looks so as long as it's placed correctly with as few drips as possible I'm happy.
 
At first, I would have thought stem reinforcement would best be made out of the material whitewater and other tough hulls typically have as the outside layer. That would encompass S-glass, carbon, Innegra H, Tuffweave, Blue Steel . . . and, oh, aluminum. But I guess that's all wrong. Everyone seems to love this Dynel fabric, which I believe I have as edging on one or two of my wooden paddles.

I know from unprotected stem wear on various composite hulls, and on different skid plates and experiments, that S-glass and carbon (or Kevlar/Twaron) are not nearly as abrasion resistant as Dynel. Tuf-weave hulls (50/50 interwoven polyester & fiberglass) seem more abrasion resistant than just glass, but less than even a single layer of Dynel.

I do not have enough experience with Blue Steel (kevlar & carbon) to have an opinion, and zero experience with Innegra (basalt/kevlar/carbon?).

With any material I would not expect to see much need-to-repair abrasion damage on gently used, always wet foot exit, never dragged boats. None of that daintiness is applicable to our boats. The boats I treat more delicately, or paddle in less abusive environments, are in better stem shape for longer, but have still eventually needed help.


So, Mike, perhaps you could summarize your empirical findings for us who need a Skid Plates for Dummies, here or somewhere. In particular, I'd be interested in pithy answers to the following:


Not pithy*. Yes empirical, not scientific. Here goes:

-- Favorite material: Is it now the wider Dynel tubing?

Dynel as a skid plate outer layer, absolutely. On a fatter stemmed hull probably 5oz Dynel fabric, cut to oblong length and width so that it overlaps existing wear by an inch or so all around. On a boat at sees both impact and abrasion on the stems incorporating an underlay of some thicker fabric, perhaps laid on the bias, seems worth the minor extra effort.

On a sharp stemmed hull where the wear is confined to a long, narrow (less than 1.5” wide) area I would use the wider “standard weight” Dynel sleeve for ease of installation. Perhaps with an underlayer, ie a strip of 1 ¾” wide Dynel sleeve over 1” wide glass tape, or even over another 1 ½” wide Dynel sleeve for multi-Dynel layers where the abuse is all abrasion wear.

-- Favorite resin: Regular epoxy, G-flex epoxy, or a mixture? If a mixture, why?

I use a 50/50 mix of “regular” epoxy and G/flex on Royalex boats, where some extra resin toughness, flexibility and improved adhesion on vinyl skin would be advantageous. On a composite hull I would now use just regular epoxy; the abrasion toughness is more in the Dynel fabric than the epoxy.

About “regular” epoxy, this info from Alan was eye opening, especially in light of some of the (hand laid) experimental test material inspections showing resin starvation or at least incomplete saturation. The ideal might be a vacuum bagged multi-layer skid plate with Dynel on top. Never gonna happen in my shop.

I agree with Mem in that probably the easiest way to wet out thick fabric is to use a thinner resin that's made to wet out thicker fabric. I've used resins ranging from 200-1000 centipoise (measure of viscosity) and can say there's a big difference in how it flows and wets out cloth.

I looked quick and found these viscosity specs:
West 105 - 1000 centipoise
Raka - 600
System 3 clear coat - 380
Vinyl Ester - ~200

-- Favorite resin saturation method: Brush on or dunk saturate?

In light of Alan’s info my favorite might be Raka or System 3 for more thorough epoxy saturation, but I have never used either. The more viscous West 105/206, or even 105/206 & G/flex mix, works well enough on skid plate sized pieces. Cutting through the past test pieces for a look at the sandwich saturation did not reveal a noticeable difference between straight epoxy and the G/flex mix.

If only to save from wasting epoxy I’d probably just brush epoxy on the hull, lay the cloth, or roll it out from a cut-to-length rolled coil in place atop the epoxy base coat, especially if overlong to hold between two hands, and brush more epoxy on top before compressing under peel ply.

I may know more about that when I cut up the last batch of two-layer skid plate test pieces; the thicker materials underneath the Dynel sleeve might benefit from the dunk saturate method. I will know more in a few days when I grind/cut up the most recent test pieces.

-- Filler in the resin? Why?

If by “filler” you mean Graphite powder I would now add it only to the topcoat layer of epoxy. I’m not sure if the epoxy mixed with fine particulate graphite powder saturates the cloth as fully, especially with a tight weave or thick cloth, and I don’t need the low-friction exterior coating with increased scuff resistance and durability anywhere except the outer coating.

Beyond durability and scuff resistance Graphite powder also adds some UV protection. From the West System manual:

“Both pigments and WEST SYSTEM 420 Aluminum Powder provide protection from sunlight. Epoxy breaks down under prolonged exposure to ultraviolet light; if you do not plan to coat your hull with a finish system immediately, add either pigment or powder to your last coat of epoxy”

“This is a temporary measure which does not replace a final paint finish. Aluminum powder is more difficult to sand than pigment, so we suggest using it only on areas that are already fair and smooth. WEST SYSTEM 423 Graphite Powder is used in specific areas in specialized coating applications. Graphite powder/epoxy coatings are occasionally applied to rudders, centerboards, and drysailed racers. They provide low friction coatings with increased scuff resistance and also provide UV protection”.

I thought about using aluminum powder, hoping it might create a not-milky-white skid plate if used with white pigment:

“Aluminum Powder provides limited protection from ultraviolet light in areas that will not be protected with other coatings. Can be used as a base for subsequent painting. 420 will increase the hardness and abrasion resistance of the coated surface and improve its moisture resistance. Cures to a metallic gray color.”

The “metallic gray” sounds ugly, and I’m not sure white pigment would hide it, and I’m not buying a whole can of aluminum powder just to find out. On white bottomed hulls where I want the Dynel to be all but invisible I just use white pigment and topcoat with white paint.

-- Tint in the resin? Why, other than aesthetics?

See above. Pigment/color agents also add some UV protection to the resin. The benefit of a white pigmented skid plate on a white hull bottom would be that the inevitable white scratches would blend in better. Although that would disguise the visibility of future wear areas that might need attention.

-- Paint over the skid plate? Why? Won't that be the first thing to immediately scrape off? If any sort of top layer, why not gel coat?

The paint is the first thing to get scraped off, but slowly, over time, and not off the entire skid plate fabric, so much of the painted surface remains intact and providing an additional layer of UV protection. And, after a few years, a paint re-application is cheap and easy.

Mostly though I topcoat graphite/black pigment skid plates because gives me an easy way to straighten up any sloppy lines and the final result looks better.

Why not gel coat? If you mean gel coat over the abrasion resistant Dynel material, in order to sit flush it would need to be almost as sacrificially thin as paint, at least in my hands. I have little gel coat repair experience, but have seen that it wears away faster than Dynel in abusive conditions.

For me I apply a skid plate for protection, I could care less about looks so as long as it's placed correctly with as few drips as possible I'm happy.

I can’t stop myself from un-drippy double taping, pigmenting or graphite powdering and paint topcoating. Adding the graphite powder and/or black pigment when mixing the epoxy takes only seconds, and topcoating the cured epoxy with paint is a quick, easy and inexpensive step. Some of our older beater boats may look like hell right side up, but upside down the skid plates look good.

*Not pithy concise at all. Having started down the skid plate materials testing road I remain interested in improving my best materials and practices. I could try to list/count the number of skid plates I have installed in the last 30 years (first one, an Old Town kev felt kit, was in 1988). I’m sure that number, between our current and past boats, resurrected boats and friend’s boats that have visited the shop is in the 30’s. Or, counting the batch of hulls in the past couple Dynel-loving months, the 40’s.

At least a half dozen of those were kevlar felt skid plate kits or kit left overs, and a few more were DIY’s using purchased kevlar felt and epoxy.

I regret every one of the felt fuglies I ever installed, and the continuing Dynel experiments may be a form of penance. Which beats self-flagellation, fasting, avoiding alcohol and tobacco, wearing a scrotal cilice, swearing off weed for Lent or other privations. Dynel skid plate experiments sound better all the time.

I am still hoping that West Systems EpoxyWorks Journal will replicate the skid plate tests, using a variety of materials and (West of course) epoxy mixes and additives, with actual scientific measurements of impact and abrasion resistance.

If I knew how to post a Poll on Canoe Tripping the skid plate the results of a skid plate questionnaire might be interesting. As long as the first poll question isn’t:

Do you find skid plates on canoes?
A – Heavy
B - Thick
C – Ugly
D - Unnecessary
E – Some combination of the above
 
Mike
great stuff! I am surprised but pleased to see that the sleeving flattened out at the edges
BTW I’ve been a fan of Dynel for abrasion resistance for over 25 years now
my background in research, specifically in the field of tribology exposed me to it
that stuff was developed back in the 50’s and still remains the best solution for abrasion resistance
I’m happy to see it gaining wide appeal, even more so now due to your efforts
 
I am surprised but pleased to see that the sleeving flattened out at the edges
BTW I’ve been a fan of Dynel for abrasion resistance for over 25 years now my background in research, specifically in the field of tribology exposed me to it that stuff was developed back in the 50’s and still remains the best solution for abrasion resistance

That sleeve comes off the roll pretty flat. The repeated hard roller over peel ply as the epoxy sets up helps, but even hand compression would do much the same. The cut ends want to lift a bit, but some babysitting with tongue depressor before pulling the tape helps, and the roller over peel ply knocks down anything left standing proud.

I wish I had known about Dynel years before I first started using it, and expect I learned about it from some canoe message board, possibly from Pblanc. Whoever first clued me in has my eternal gratitude. Ten years too late; wish I’d known before I ever installed the first kevlar felt skid plate.

For a material that will lay up and compress down to 1/16” thick it Dynel is amazingly abrasion resistant. I can see no reason anyone would ever install a kevlar felt skid plate, including (maybe especially) as a manufacturer option.

I need to do another skid plate materials test, despite already knowing the general results/answers. Test pieces # 5 – 8 were done mostly to check epoxy saturation without adding G/flex or graphite powder, and to measure the multi-layer thicknesses.

What I neglected to do was lay up any Dynel or Dynel with substrate material without using peel ply or compression. I know that without peel ply the 5oz Dynel material sets up rough as a rasp (haven’t yet used Dynel sleeve without peel ply) and that without hard roller or hand compression it swells up like an old sweatshirt.

For un-peel ply’ed and un-compressed texture and thickness measurement I’m thinking
Single layer 5oz Dynel fabric
Single layer Dynel sleeve
Dynel sleeve over Twaron tape
Kevlar felt

Cut them down the middle, chisel the test fabrics off the Royalex scrap and measure the thicknesses.
 
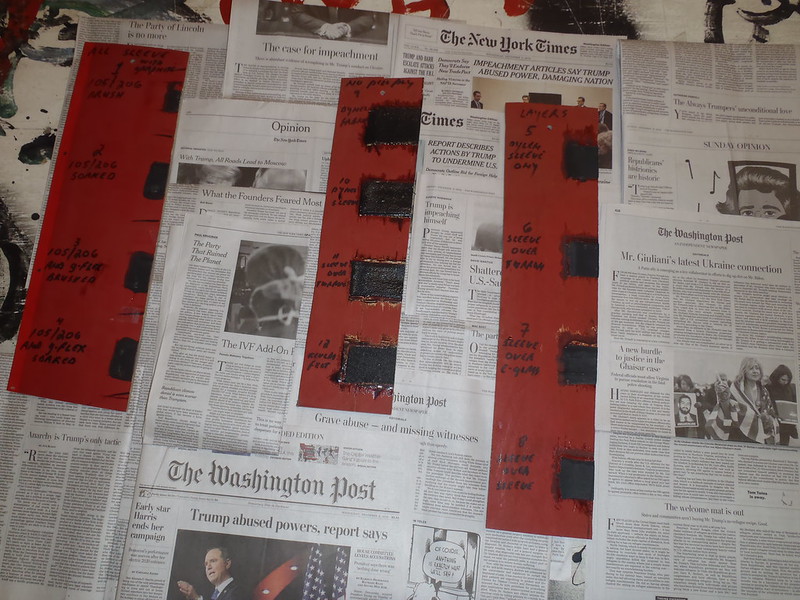
Dynel sleeve test panel #2, including layered materials

Materials used, top to bottom:
1 ½” Twaron Tape
1” E-glass tape
1 ½” Dynel Sleeve
1 ¾” Dynel sleeve

PC140002 by Mike McCrea, on Flickr

This test panel was laid up with straight West 105/206, no G/flex. No graphite powder, just black pigment
#5 Dynel sleeve only
#6 Dynel sleeve over Twaron tape
#7 Dynel sleeve over E-glass tape
#8 Dynel sleeve (1 ¾”) over Dynel Sleeve (1 ½”)

Tape pulled and black pigmented epoxy setting up. The Dynel is already becoming rough textured

PC150004 by Mike McCrea, on Flickr

That is the worst epoxy creep under the tape I have ever seen. That ancient scrap of Royalex is UV crispy dry, and thoroughly scratched/scraped. The Royalex piece is flat, no curve; it appears that some capillary action pulled the epoxy out along the scratches under the tape.

Never seen that action before; the previous scrap of RX, from the same derelict canoe, did not suck epoxy under the tape. That RX piece was smoother and the vinyl was noticeably less UV desiccated; perhaps that side of the canoe had been stored on the shady side of an outdoors rack.

There is another lesson learned; in actual skid plate installation on an old scratched up RX canoe I would pull the tape sooner and have some solvent/rags handy to clean up the epoxy creep on the edges. And figure on topcoating with paint to further neaten the edges

Release treated peel ply laid and hard roller compressed.

PC150006 by Mike McCrea, on Flickr

That hard roller, used for installing automotive sound deadening mat, is a boon for compressing Dynel under peel ply. It helps to clean it off between uses. A $2 wallpaper seam roller would work just as well, although I expect not as durably (they are also sold in packs of 8, probably for a flimsy reason)

https://www.homedepot.com/p/Piranha-1-25-in-Seam-Roller-202314/203809609

Release treated peel ply pulled the next morning

PC200010 by Mike McCrea, on Flickr

The pigment alone colored the Dynel thoroughly black, and gave me a saturation indicator when, after a week’s wait, I ground through and then cut the test pieces in half.

Abrasion test. Unscientific results after grinding through each test piece with 80 grit on a belt sander:

Single layer Dynel sleeve – Still plenty tough.

Sleeve over bias Twaron tape – Once I got through the Dynel and into the Twaron that aramid underlayer didn’t last very long. Probably a decent choice for increased impact resistance though.

Sleeve over E-glass tape – The E-glass underlay provided even less abrasion resistance once through the Dynel. Maybe an inexpensive way to add an seamed edge impact resistant underlayer.

Dynel sleeve over sleeve. Unsurprisingly the double (sleeve quadruple) layered Dynel was the hardest to abrade. If I was working on a hull that sees mostly abrasion I would use multiple layers of Dynel, with an epoxy top coat containing graphite powder (and maybe some G/flex in the mix). Done once and hopefully good for years to come.

(FWIW a single layer of 5oz Dynel cloth seems about the same thickness as a single layer of Dynel sleeve)

Time to cut that panel in half for a look at the sandwiched layers

Inspection results: All of the test pieces are well and fully saturated with black pigmented epoxy. No visible difference between the inner blackness of the single layer Dynel sleeve and the various multi-layer test pieces.

I don’t know whether that improved saturation comes from not using any G/flex in the initial epoxy (seems likely with that less viscous epoxy mix), or from not adding any particulate graphite powder (also possibly a factor).

Materials Thicknesses. I chiseled off the test pieces and measured the thickness with a caliper.

PC200021 by Mike McCrea, on Flickr

Single layer Dynel sleeve, just under 1/16” thick.

Sleeve over Twaron tape, 3/32” thick. I am surprised it compressed that thin, that bias Twaron is some thick stuff (10oz, 14 mil thick)

Sleeve over E-glass tape, right on 1/16” thick. The compressed E-glass tape added almost no thickness.

Wider Dynel sleeve over narrower Dynel sleeve, 3/32” thick.

There was a notable difference in the UV degraded vinyl skin on test panel #2, every test piece, without any G/flex added this time, tore off some aged red vinyl skin on removal

Bend ‘til it snaps test using the chisled off pieces.
The single layer sleeve snapped with moderate force, but perhaps because of the improved epoxy saturation, still held together well.
The sleeve over E-glass underlayer didn’t take much more to break.
The sleeve over Twaron and sleeve over sleeve were all but impossible to bend to a breaking point. I couldn’t bend the two-layer Dynel sleeve by hand and had to hold it in a vice and use both hands.

All of the test pieces held woven-strands together after snapping.

Make of all that what you will. I have my own take-aways for future skid plate applications
 
Test panel No 3, Dynel fabrics and Kevlar Felt

I realized I needed to make one more test panel, using uncompressed, un-peel plied materials for comparison.

I know the epoxied fabrics will be thicker and the material surfaces rougher without peel ply, but for demonstration purposes it only takes a couple minutes to cut the materials, tape the boards and mix the epoxy. What the hell.

Test #3:
#9, Dynel fabric
#10, Dynel sleeve
#11, Dynel sleeve over (thick) bias Twaron tape
#12, Kevlar felt

PC200012 by Mike McCrea, on Flickr

West 105/205 Fast Hardener this time, with Black pigment. No graphite powder, no peel ply, no roller or hand compression. Laid on a flat piece of Royalex with no curve; I slopped the epoxy coats on thick as usual, with no drip-away action, so every bit of epoxy stayed under and atop the fabric.

PC200023 by Mike McCrea, on Flickr
I had to babysit the cut ends of the sleeve, which kept wanting to rise up against fair and flush against the Royalex, with tongue depressor pressure to bevel down those cut ends as the epoxy set up. Pushing back down at those sleeve ends until the epoxy was getting too firm to compress the cut ends seemed to be staying flat and flush against the Royalex.

Some of those mysteriously popped back up overnight with fugly raised sleeve ends; call that part unsuccessful without peel ply compression.

PC200025 by Mike McCrea, on Flickr

Surface inspection once the epoxy cured: Neither of the Dynel fabrics set up as rough as I remember previously when not using peel ply, but all are still rough enough to rasp skin. I’d be extra careful doing a canoe-over-canoe rescue with that exposed stem surface.

My guess is that using 205 Fast Cure hardener was the difference; Dynel seems to develop an increasingly rougher surface the longer it takes for the epoxy to fully harden, and in the past when using 206 Slow Hardener the surface was considerably nastier.

The kevlar felt was twice as raspy rough as the Dynel. It had been so long since I epoxied any uncovered kevlar felt than I had forgotten how nasty it could be with epoxy resin. That surface would abrade epidermis on contact, which is something I’d rather have nowhere on a boat. The urethane kit resin did not turn out as rough, just fugly and thick.

With the test panel cut in half the epoxy saturation was noticeably different from the previous test panels using peel ply compression. The single layer Dynel fabric was thoroughly epoxy black throughout, but the sleeves showed fabric white in the center, and the kevlar felt was still yellow most of the way through, with just a skim of epoxy black on top and bottom

As bad, or worse, the sleeve materials were raised unevenly on the inside, visibly two layers thick.

PC200028 by Mike McCrea, on Flickr

Call that part of the no peel ply/no compression test completely unsatisfactory, if very revealing. Smoothness and saturation-wise using peel ply and compression is a winner all the way around.

Caliper tales on the chiseled off uncompressed test pieces.

The single layer Dynel fabric, even without peel ply compression, was very thin. Surprisingly thin, less than 1/16” thick.

The Dynel sleeve was just a hair over 1/16” thick, not much thicker than sleeve with peel ply compression.

The Dynel sleeve over Twaron tape was nearly 1/8” thick, with visible white in both the sleeve and Twaron.

The kevlar felt was 3/32” thick, thinner than in some past kev felt skid plate kits. That test piece was Sweet’s 3.5oz kevlar felt, which seems to be a thinner material than comes with some kits. (I had some kevlar felt leftover from an Old Town kit and checked – Sweet’s is definitely a thinner kev felt than OT’s kit stuff)

Even so that kevlar felt had lots of unsaturated yellow in the middle. Way more unsaturated yellow felt than with peel ply and compression. Using Fast Cure hardener may have been a set up before it seeped in factor beyond no peel ply/no compression.

Bent ‘til broken all of the test pieces had much the same rigidity as the pieces with peel ply compression. All but the kevlar felt hung fiber stranded together when folded over. The kevlar felt snapped cleanly into two pieces before it bent very far, with some unsaturated and unwoven yellow “hairs” on the snapped edges.

Not many lessons learned on that test panel, mostly confirmation that peel ply and compression serves multiple functions. It smoothes out the otherwise raspy rough material surface, it helps more thoroughly saturate the materials when compressed, and compression made the multi-layer pieces a little thinner; ie resting more flush against the “hull”.

And, again, just say no to kevlar felt. I think those are the last skid plate test panels.
 
Last test panels, not the last test. I have the three panels, and can’t resist one final “test”.

PC220003 by Mike McCrea, on Flickr

I still wanted to impact test all 12 sample pieces, but I didn’t want to reassemble the bomb site; it’s freaking 12 feet tall and needs to be assembled outside the shop. Those are awfully small targets to hit with a horse shoe stake or piece of rebar dropped from 12’ in the air.

P3170001 by Mike McCrea, on Flickr

I need something more accurate with those small - suddenly operative word - targets. I’ll just shoot them. We’re having some fun now!

Er, not “me”, or “we”. The neighbor’s son was out back this morning plinking away at targets with a .22. He and his father happily took the three test panels down to their range, promising as requested to shoot them with BB guns, pellet guns and .22’s.

Lucky me; those guys have a range set up, and shoot every weekend. I haven’t shot for accuracy in years, and they have lots of guns.

I gave them a couple boxes of .22 dust shot, and asked them to fire away, and to feel free to well hit them with the .22 LR if they wanted. I was a little surprised when I heard the shotgun going off. Those boys are thorough research assistants.

PC230005 by Mike McCrea, on Flickr

The results of their happy efforts:

.22 rifle with Dust Shot– Did nothing to any of the test panel materials, teeny shallow dents in the uncovered Royalex skin.

(They had to stand pretty close with the dust shot; that stuff spreads out quickly, especially with a rifled barrel. Everything else was shot at some distance)

BB rifle (a good one) – A surface blemish on the skid plate material, shallow punctures in the uncovered Royalex.

.177 Pellet gun (a very good one, with a scope) – No through and throughs on the test materials, but some vdeep punctures. On the unprotected RX pellets buried deep in the foam core, or all the way through with some shots.

.410 shotgun with #6 shot – No through and throughs on the test materials, a small percentage all the way through on the uncovered Royalex.

.22 long rifle – As expected through and through everywhere, with some ugly exit wounds on the backside.

PC230009 by Mike McCrea, on Flickr

That “test” revealed little real world impact resistance, but it was fun to get the neighbors involved, and I think they enjoyed it. I’d still be out there trying to hit a 2” x 3” target from any distance.

Done and done, and I have some curious shop wall decorations.
 
Epoxyworks on Impact and abrasion resistance

I am still hoping that West Systems EpoxyWorks Journal will replicate the skid plate tests, using a variety of materials and (West of course) epoxy mixes and additives, with actual scientific measurements of impact and abrasion resistance.

Well, they did. Kinda sorta, authored by the West System Composite Materials Engineer I spoke with and sent links to of my DIY experiments

Epoxyworks Number 51, Fall 2020.

No scientific measurement of abrasion resistance, just an overview of Kevlar, Dynel, Xynole, Innegra, Spectra and fiberglass, with a bit of resin and resin additive information.

Hell, they didn’t even take test panels out back and shoot them full of holes.
 

Not yet on-line.

The paper copy of Epoxyworks is free and comes out twice a year. Couple dozen pages, color photographs, different folk’s builds from boats to planes to furniture to, in this issue, Mammoth tusk restoration and a carbon fiber dashboard

I don’t know about the digital subscription, but the paper copy is always an enjoyable read.

https://www.epoxyworks.com/index.php/subscribe/

The article did reference the material impact test from Epoxyworks 4, which is where I copied the pipe-sleeve bombsight I used in my own smash tests. I had hoped that Epoxyworks would do some high tech abrasion experiments with more scientific results, but you’ll have to live with the bias of McCrea Labs & Tavern.
 
I’m still searching for a source of rolls of 4” (or even 3” or 5”) Dynel “tape”. I did find another interesting Dynel vs fiberglass DIY test on the Glen-L site, someone who DIY abraded fiberglass and Dynel using a brick.


A 6 pound fire brick held on a 45 degree angle
The test with 6oz fiberglass cloth took 52 strokes to cut through to the wood
The 5.5oz Dynel has more than 250 strokes and is still not through to the wood
 
Back
Top